
How to Program Different Microcontrollers on Arduino UNO R4
Learn the specifics of the new Arduino UNO R4 WiFi, why it has multiple MCUs, what ESP32 chip it is using and how to program each of the MCUs independently
The Arduino UNO has always been a beloved option for makers and hobbyists. Its amazing community has made it a go-to choice for many projects and especially because of its simplicity and ease of use have brought many new users into the microcontrollers world.
As already discussed in the previous post - “Arduino UNO R4 announcement. News for the ESP32 community”, the new Arduino UNO R4 WiFi version, in addition to the Cortex M4 processor, has the ESP32 chip integrated, which brings advanced capabilities and extensive wireless connectivity to the popular Arduino UNO series.
Why Arduino UNO R4 WiFi has Two MCUs (Microcontroller Units)? #

Arduino Uno R4 WiFi
By combining the Cortex M4 (RA4M1) microcontroller, the backbone of the new Arduino Uno R4, together with the ESP32-S3 microcontroller, the Arduino Uno R4 WiFi achieves a balance between familiarity and advanced capabilities. The Cortex M4, with its 32-bit architecture and powerful ARM-based design, brings a significant performance boost to the board.
On the other hand, the ESP32-S3 microcontroller adds a new level of power and versatility to the Arduino Uno R4 WiFi. Known for its advanced features, the ESP32-S3 boasts a more robust processing capability, expanded memory, and built-in Wi-Fi connectivity. This integration enables seamless wireless communication, making it effortless to connect your projects to the Internet, interact with online services, or create Internet of Things (IoT) devices.
But why opt for two MCUs instead of relying solely on the ESP32-S3? The answer lies in the division of labor and optimized performance. By assigning specific tasks to each MCU, the Arduino Uno R4 WiFi leverages the strengths of both to create a synergistic combination.
The Role of Each Microcontroller #
Therefore, the inclusion of two MCUs on a single development board is a strategic decision aimed at allocating specific tasks to each controller, leading to optimized performance.
The powerful 32-bit Cortex M4 excels at handling basic input/output (I/O) tasks, making it ideal for controlling sensors, reading data, and interfacing with various components.
ESP32-S3's built-in Wi-Fi capabilities enable seamless wireless communication. It can connect to Wi-Fi networks, allowing the Arduino Uno R4 WiFi to access online resources, communicate with other devices over the internet, and interact with web services. This makes it ideal for IoT projects, remote monitoring applications, and projects that require connectivity to cloud platforms.
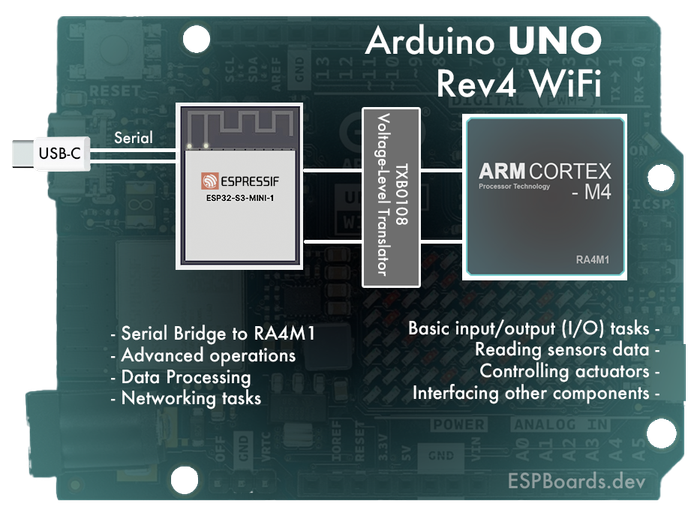
The division of labor between the two microcontrollers ensures optimized performance and flexibility. While the Cortex M4 handles the foundational Arduino functionality and maintains compatibility with existing libraries, the ESP32-S3 takes charge of more advanced operations, data processing, and networking tasks. This collaboration allows you to leverage the strengths of each microcontroller, creating a harmonious balance between simplicity, compatibility, and advanced capabilities.
Which ESP32 exactly does the Arduino UNO R4 have? #
Well, the answer can be found everywhere and it is simple - the ESP32-S3. But if we want to actually understand what is under the hood, that is not enough. What we actually want to know is the exact model, which is ESP32-S3-MINI-1-N8.
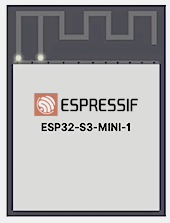
The ESP32-S3-MINI-1 is a small-sized module, supporting 2.4 GHz WiFi and Bluetooth 5.0 (LE). It is built around ESP32-S3 SoC and has the Xtensa dual-core 32bit LX7 microprocessor and a rich set of peripherals.
Now, there is a lot of information on the internet about ESP32-S3-MINI-1, but what does the prefix “N8” at the end means? Taking the reference from the ESP32-S3-MINI-1 datasheet, we can see that the “N8” means the chip has 8 MB Quad SPI flash memory.
The ESP32 module acts as a secondary MCU on the UNO R4 WiFi board and communicates with the Cortex M4 MCU using the logic level converter, as the ESP32 operates on 3.3V, while the Cortex M4 on 5V.
Programming the Different Microcontrollers (Coretex M4 and ESP32) #
As already mentioned before, the UNO R4 WiFi board features the RA4M1 MCU (Cortex M4) as its primary microcontroller, responsible for the core functions. And the ESP3, which acts as a secondary MCU. This brings a question - Can we program the different MCUs individually?
The Default behavior, when programming the board #
So by default, when programming the UNO R4 WiFi board, the Coretex M4 (RA4M1) MCU is programmed via the ESP32-S3 module. However, because the RA4M1 operates on 5V, while the ESP32 operates on 3.3V, the connection is not direct, but the MCUs communicate through the 8-Bit Bidirectional Voltage-Level Translator (TXB0108DQSR).
Apart from that the ESP32-S3 acts as a Serial bridge, handling the connection to your computer's USB port, it also handles the controlling of the main MCU (RA4M1), for example restarting and resetting it when receiving a new sketch.
Programming the Coretex M4 (RA4M1) directly #
In case you would like to access the RA4M1 Serial Bus directly, the Arduino UNO R4 gives two options for this:
- Software - the D40 pin is used to control which MCU is connected to the USB Serial port. If the pin D40 is pulled to LOW, the ESP32 is connected, just like in the default configuration, and if the D40 pin is pulled to HIGH, the RA4M1 is connected, allowing you to access the RA4M1 MCU directly through the USB port. This can be done by including the following code in
setup()function:
  pinMode(40, OUTPUT);
  digitalWrite(40, HIGH); // defaults to LOW
First, we set the pin D40 to act as an OUTPUT, so we can set the digital value for it. And second, we set the pin to HIGH or LOW, depending on which MCU we want to be connected to the USB Bridge.
- Hardware - If you look at the back of the UNO R4 WiFi board, you will notice there are solder pads labeled as "RA4M1 USB." By creating a short circuit between these pads (connecting them together), you can establish a connection between the RA4M1 and the USB Serial port, rather than the ESP32.
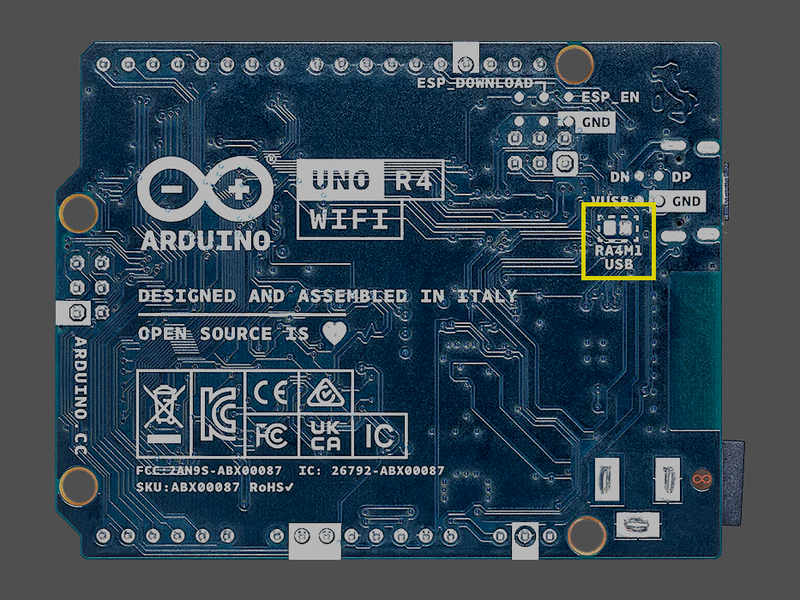
In case you do not want to use the ESP32 by default, switching the USB Bridge to be connected to RA4M1 instead, might be annoying doing it through the software all the time, therefore hardware option might be the best in this case.
You can find more information and the hardware diagram in the official Arduino Uno R4 WiFi datasheet, section "6.2 USB Bridge" on page 11.
Programming the ESP32-S3 directly #
If you find yourself wondering how to program ESP32 directly, without touching the RA4M1, you are in luck, as Arduino thought about that too.
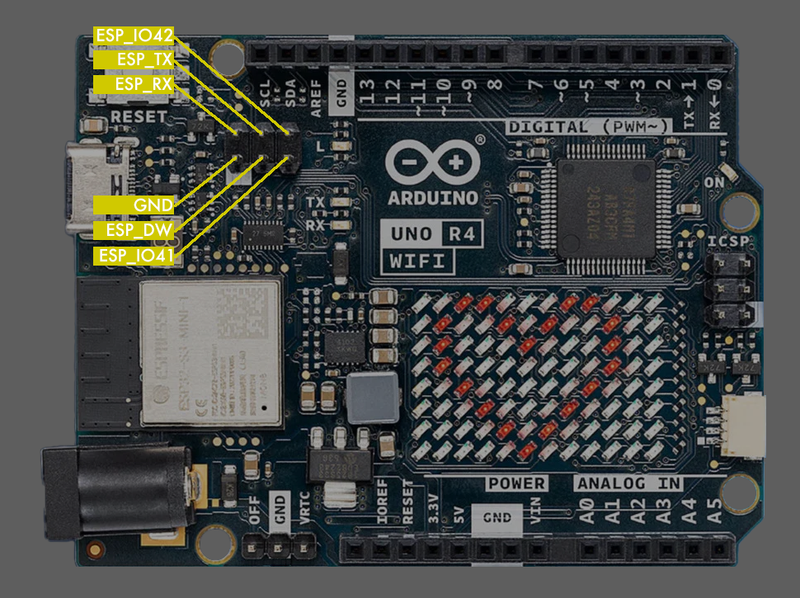
On the Arduino UNO R4 WiFi front, close to the ESP32-S3 chip, you can find the 3x2 pin header, which has the following exposed ESP32 pins:
- ESP_IO42 - MTMS debugging
- ESP_IO41 - MTDI debugging
- ESP_TXD0 - Serial Transmit (UART TX)
- ESP_DOWNLOAD - Boot
- ESP_RXD0 - Serial Receive (UART RX)
- GND - Ground
Please note, that by default, the ESP32-S3 has some firmware installed, which is used for communication with RA4M1. If you program the ESP32 directly, the default firmware will be overridden and the connection with RA4M1 will be disrupted. In case you need to revert back and allow ESP32 to communicate with RA4M1 in the same way as initially, you will have to restore the original firmware.
Since we are now connecting directly to the ESP32 board, we are skipping the USB-to-Serial (USB-to-UART) interface of the Arduino UNO R4 board. Therefore, we need some custom, additional USB to Serial interface to be able to program it, such as the FTDI or the CP210x.
Connecting the ESP32 with the USB-to-UART module is fairly simple. We Will need to use 4 out of 6 pins, exposed in the Arduino UNO R4 WiFi to program the ESP32 chip.
- We will connect the ESP_TXD0 with FTDI_RX, ESP_RXD0 with FTDI_TX and ESP32 GND with FTDI GND.
- To allow ESP32 to be reprogrammed, we need to put it in the Download mode when booting. This can be done by connecting the ESP_DOWNLOAD pin to GND.
After connecting the ESP32 to the USB-to-UART module, and plugging the USB-to-UART module into the USB port of your computer, you can program the ESP32-S3 like you normally would any other ESP32 board.
Get Arduino UNO R4 Minima and WiFi #
On June 26th, 2023, the Arduino team announced the release of the Arduino UNO R4 Minima and WiFi in the market.
Arduino Uno R4 WiFi
Arduino Uno R4 Wifi with ESP32
Conclusion #
The Arduino Uno R4 WiFi combines the power of two microcontroller units (MCUs) with the integration of the ESP32-S3. The RA4M1 and ESP32-S3 work together to offer compatibility, advanced processing power, and built-in wireless connectivity.
By incorporating the ESP32-S3, the Arduino Uno R4 WiFi gains access to Wi-Fi networks, enabling seamless communication with online resources and other devices. This opens up exciting opportunities for IoT projects, remote monitoring applications, and cloud-connected systems. The ESP32-S3's great processing power and memory capacity facilitate complex computations, real-time data processing, and the execution of advanced algorithms.
The RA4M1 ensures compatibility with existing Arduino Uno projects and libraries, making it easy for users to transition and access a wealth of community-developed resources. This compatibility benefits both beginners and experienced users, offering a gentle learning curve for newcomers while allowing experienced users to build upon their previous work.
Moreover, Arduino allows us to program each of the microcontrollers separately and even provides multiple ways to choose which MCU should be programmed through the USB Serial Port, allowing great flexibility and for us, the ESP fans, a direct communication with the ESP32-S3 chip.