
Measuring ESP32 capabilities with Inbuilt Temperature Sensor
Measuring the capabilities of ESP32 with the Internal Temperature Sensor. Safety features, debugging and testing the ESP32 capabilities without overheating.
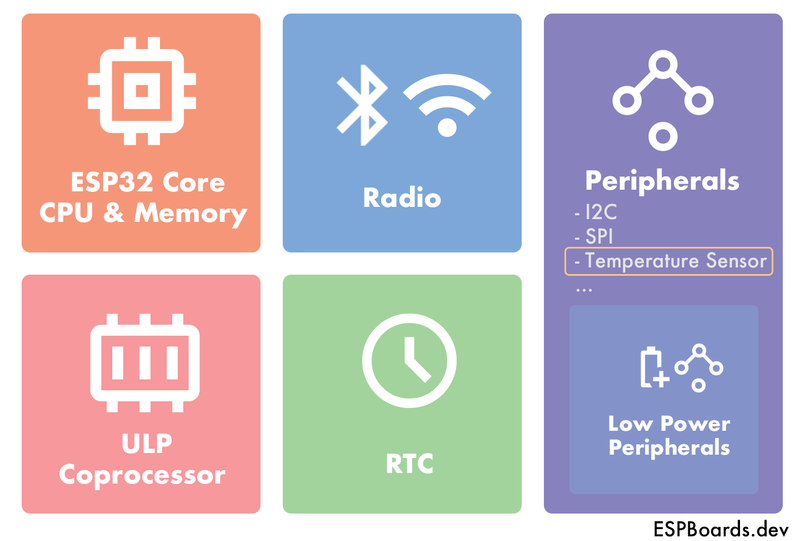
The ESP32 microcontroller has emerged as a powerful and versatile platform for a wide range of projects. Among its many built-in features, the integrated temperature sensor is a valuable asset. This sensor allows to effortlessly measure temperature without the need for external components, simplifying temperature monitoring of the chip.
In this blog post, we will explore the ESP32 in-built temperature sensor and its applications. We will start by identifying the ESP32 boards that come equipped with this feature, so you can make an easier decision when selecting the ESP32 board for your project.
Additionally, we will dive into the real-world applications of ESP32 In-built Temperature Sensor together with code examples for your preferred ESP-IDF or Arduino Framework.
ESP32 Boards with In-built Temperature Sensor #
ESP32 boards come in a variety of configurations, each tailored to cater to specific project requirements. However, not all ESP32 boards are equipped with the same peripherals, therefore it is essential to choose an ESP32 board model, which offers the features and esp32 sensors needed for your project, including the in-built temperature sensor.
According to the ESP-IDF documentation, the supported targets for temperature sensor drivers are:
- ESP32-C2
- ESP32-C3
- ESP32-C6
- ESP32-H2
- ESP32-S2
- ESP32-S3
Looking at the list, we can see that all the newer versions of ESP32 do have integrated temperature sensors. However, if you have one of the older models, like the original ESP32, ESP32-WROOM or ESP32-WROVER series chip, you will not be able to take advantage of the built-in temperature sensor, as these models do not have the temperature sensor built-in.
Note, that even though the official ESP-IDF documentation does not implicitly says that ESP32-WROVER has the temperature sensor built-in, some older models might still have one, while the newer releases of the ESP32-WROVER deprecated it.
If you are not sure, which chip your development board is based on, check the text on your ESP32 chip. In case you have a board with USB-C, check the ESP32 development boards with USB-type C.
Understanding the ESP32 In-built Temperature Sensor #
The in-built temperature sensor on the ESP32 is a digital sensor that operates based on the principle of temperature-dependent voltage, it is one of the esp32 sensors inbuilt in the chip. It measures the voltage generated across a junction formed by two different materials with known temperature coefficients. By accurately measuring this voltage, the sensor can determine the ambient temperature.
It is important to remember that the sensor is primarily designed to be used for measuring the internal chip temperature and not the ambient temperature.
Technical Specifications and Features:
- The Temperature Sensor module uses an 8-bit ADC and a DAC to make adjustments for the temperature offset.
- Measuring Range: The ESP32 temperature sensor can measure a range of temperatures from -40 to 125 degrees Celsius.
- Accuracy: The in-built temperature sensor accuracy varies between +/- 1 to +/- 3 degrees Celsius, depending on the preferred range selected (-10 ~ 80 degrees Celsius being the most precise).
- Resolution: The sensor offers high-resolution temperature measurements, enabling it to capture minor fluctuations in temperature.
Handling Temperature Conversion: The sensor provides temperature data in the form of a raw analog-to-digital converter (ADC) value. To obtain the temperature in degrees Celsius, this raw value must undergo a conversion process using calibration data and mathematical calculations. Thankfully, this conversion is handled by the ESP32's hardware, simplifying the software implementation.
It's important to note that the temperature sensor's accuracy and performance can be affected by factors such as voltage fluctuations, noise, and nearby heat sources. As with any sensor, it is essential to consider these environmental factors during project design and implementation.
Practical Applications of the ESP32 Integrated Temperature Sensor #
As mentioned previously, the ESP32 temperature sensor is designed to measure the temperature inside the ESP32 chip and not the ambient temperature.
The internal chip temperature can provide valuable insights into the ESP32's performance, CPU load, and clock frequency, as the temperature will naturally increase with the higher processing power required.
Here are some key practical applications of the ESP32's temperature sensor:
Checking the chip performance: By monitoring the internal chip temperature, you can assess the ESP32's performance under various conditions. By checking the ESP32 chip's temperature differences, you can identify bottlenecks, ensuring the microcontroller operates within safe temperature limits, which is essential for optimizing the code for performance.
Electronic Device Protection: In electronic devices, temperature management is critical to ensure their longevity and performance. The ESP32's in-built temperature sensor can be employed to monitor the operating temperature of electronic components and systems. By setting up temperature thresholds, the system can trigger cooling mechanisms or safety protocols to prevent overheating and protect sensitive electronics from damage.
Energy Monitoring and Conservation: Temperature plays a significant role in energy consumption. By utilizing the temperature sensor in energy monitoring projects, users can gain insights into how temperature affects energy usage. This knowledge can be leveraged to optimize energy consumption and promote sustainable practices.
Even though at first glance, the internal chip's temperature might not seem a very useful statistic to know, it can help with ensuring device reliability, optimizing energy efficiency, or fine-tuning performance.
Using the Internal ESP32 Temperature Sensor with Arduino IDE #
The Arduino IDE (Integrated Development Environment) is a popular choice for programming and prototyping ESP32 projects due to its user-friendly interface and extensive library support. Integrating the ESP32's in-built temperature sensor into your Arduino projects is straightforward with the help of readily available libraries. Below, you can find the steps to set up your Arduino IDE and read temperature data from the ESP32's in-built sensor.
The internal temperature sensor driver, which was used for early ESP32 models, was deprecated on Arduino Core for the newer ESP32 models, even though they do have the sensor. We can still use the temperature sensor on newer models by utilizing the legacy ESP32 Temperature Sensor Driver and configuring the sensor manually as shown below.
#include "driver/temp_sensor.h"

void initTempSensor(){
    temp_sensor_config_t temp_sensor = TSENS_CONFIG_DEFAULT();
    temp_sensor.dac_offset = TSENS_DAC_L2;  // TSENS_DAC_L2 is default; L4(-40°C ~ 20°C), L2(-10°C ~ 80°C), L1(20°C ~ 100°C), L0(50°C ~ 125°C)
    temp_sensor_set_config(temp_sensor);
    temp_sensor_start();
}

void setup() {
  Serial.begin(115200);
  initTempSensor();
}

void loop() {
  Serial.print("Temperature: ");
  float result = 0;
  temp_sensor_read_celsius(&result);
  Serial.print(result);
  Serial.println(" °C");
  delay(5000);
}
That's it! We have successfully set up the ESP32's in-built temperature sensor with the Arduino IDE. The serial monitor should now display the ambient temperature in degrees Celsius, updating every five seconds.
Using the Internal ESP32 Temperature Sensor with ESP-IDF Framework #
The ESP-IDF (Espressif IoT Development Framework) is the official development framework for the ESP32 microcontroller. It offers a more in-depth and flexible approach to programming the ESP32, allowing developers to take full advantage of its features, including the in-built temperature sensor. If you prefer using the ESP-IDF Framework, below you can find the steps to set up the ESP-IDF environment and read temperature data from the ESP32's in-built sensor.
#include "freertos/FreeRTOS.h"
#include "freertos/task.h"
#include "esp_log.h"
#include "driver/temperature_sensor.h"

static const char *LOG_TAG = "ESP32";

void app_main(void)
{
    ESP_LOGI(LOG_TAG, "Setup the internal temperature sensor, set min/max values to -10 ~ 80 °C");
    temperature_sensor_handle_t temp_handle = NULL;
    temperature_sensor_config_t temp_sensor = {
        .range_min = -10,
        .range_max = 80,
    };
    ESP_ERROR_CHECK(temperature_sensor_install(&temp_sensor, &temp_handle));


    ESP_ERROR_CHECK(temperature_sensor_enable(temp_sensor));

    float tsens_out;
    ESP_LOGI(LOG_TAG, "Get converted data from internal temperature sensor");
    ESP_ERROR_CHECK(temperature_sensor_get_celsius(temp_handle, &tsens_out));
    ESP_LOGI(LOG_TAG, "Temperature value %.02f °C", tsens_value);

    ESP_LOGI(LOG_TAG, "Disabling internal temperature sensor to save power");
    ESP_ERROR_CHECK(temperature_sensor_disable(temp_handle));
}
With the ESP-IDF framework, you have more control over the ESP32's hardware and can optimize its performance for specific applications. With this code example, you can easily use the ESP32's in-built temperature sensor in your ESP-IDF projects.
Testing the Internal Temperature Sensor #
As mentioned earlier, we should see the internal temperature changing with different ESP32 CPU loads, CPU clock frequency or the ambient environment temperature. Because our program is very simple, the CPU load will not change much when the ESP32 is running. We could test the temperature sensor, assuming that the environment temperature will change, but we would need to stimulate the temperature change, which would require additional tools. Therefore the easiest test in our case will be changing the clock frequency.
Before you start, you will need:
- ESP32 board, that has the internal temperature sensor (We are using the DFRobot Beetle ESP32-C3 for this example).
- Arduino IDE with ESP32 boards ready to use
- For this test, we will be using the Arduino Core example provided above.
Step 1: Copy the example code to your Arduino IDE Go to the Arduino Core example above and copy it into your Arduino IDE
Step 2: Select the ESP32 board In Arduino IDE, select "Tools->Board->ESP32 Arduino->{Your ESP32 Board}" to select the ESP32 board you are using.
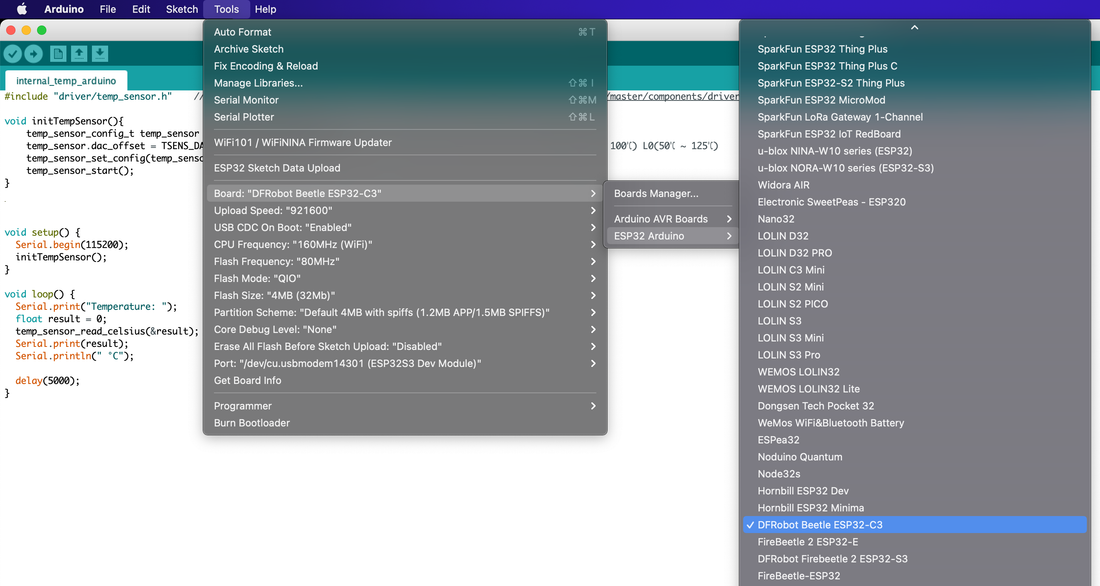
We are using the DFRobot Beetle ESP32-C3 for this example.
*If you cannot find the "ESP32 Arduino" menu in Arduino IDE, make sure you have installed the Arduino-ESP32 support.
Step 3: Select CPU Frequency In Arduino IDE, select "Tools->CPU Frequency->{Maximum CPU Frequency Available}".
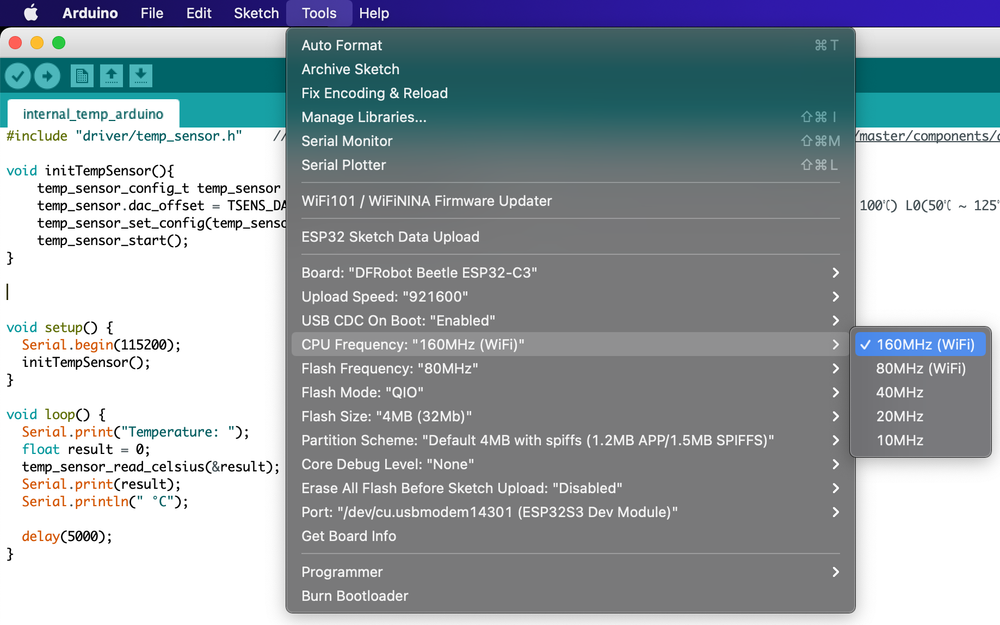
In our case, as we are using the DFRobot Beetle ESP32-C3, the maximum available option is "160 MHz (WiFi)".
Step 4: Upload the code In Arduino IDE, click "Sketch->Upload", or the shortcut in the top-left corner to upload the code.
Step 5: Open Serial Monitor After successfully uploading the code to your ESP32 board, open the Serial Monitor inside Arduino IDE.
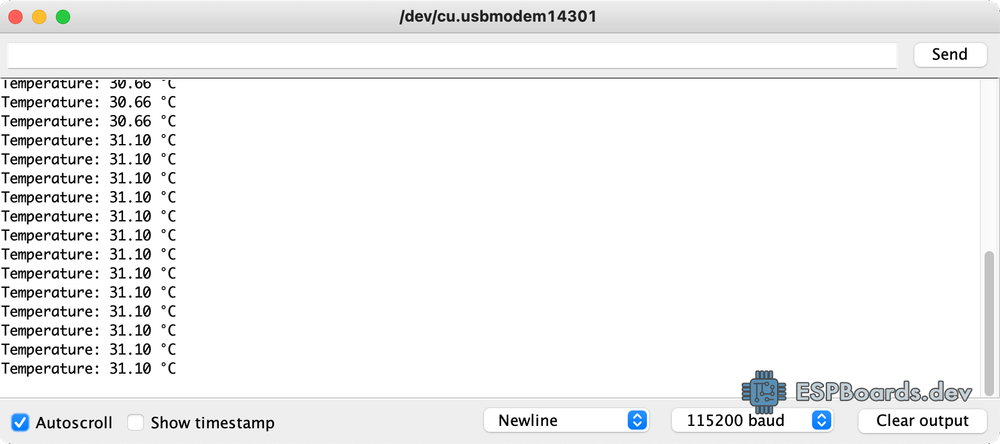
Wait for some time and you should start seeing the logs being printed in Serial Monitor, showing the internal ESP32 chip temperature. If everything is fine, you should see more or less stable temperatures being shown in each new line. This is probably ok and that is the normal ESP32 working temperature.
Step 6: Reduce the CPU Frequency Following the same steps as in "Step 3", reduce the ESP32 CPU frequency to the lowest available option. In our case, it is "10 MHz".
Step 7: Upload the code Following the same steps as in "Step 4", upload the code to your ESP32 board.
Step 8: Check Serial Monitor If you did not close the Serial Monitor, shortly after uploading the code, you should start seeing the logs being printed again. This is now an internal ESP32 chip temperature with reduced esp32 cpu frequency.
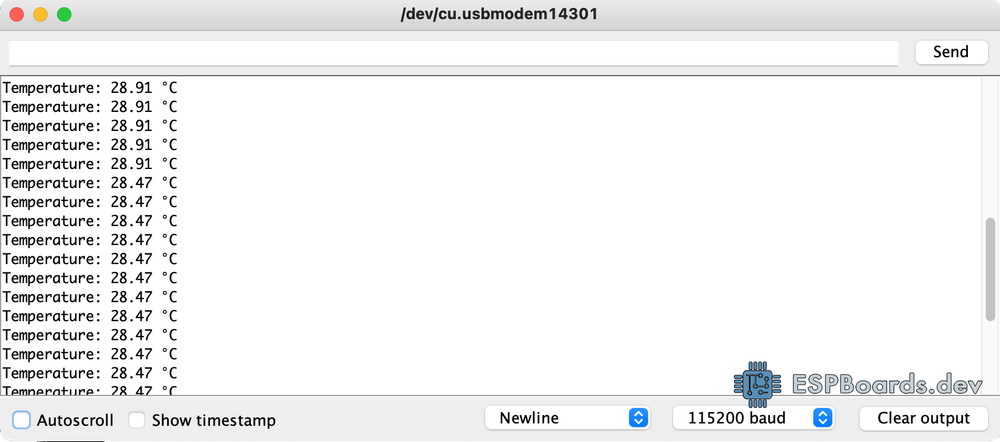
Test results
As you can see in the screenshots above, in Step 5 with the DFRobot Beetle ESP32-C3 running at a maximum 240 MHz CPU frequency, the working temperature is around 31.10 °C. After reducing the ESP32 CPU frequency to the lowest 10 MHz, we see that the working temperature is around 28.47 °C. That is a difference of around 2.63 °C.
As expected, the temperature internal ESP32 working temperature dropped when running at a lower CPU frequency, which confirms that the ESP32 internal temperature sensor is working correctly.
Troubleshooting #
- Why the temperature shown is always the same?
- As the in-built temperature sensor is measuring the internal chip temperature, if the CPU load and speed are not changing, the temperature will stay the same. The working temperature depends on the model of the chip used but normally should be around 53 degrees Celsius.
- The temperature sensor is not present. Sometimes, the ESP-IDF and Arduino Core do not detect, that the temperature sensor is not present on the chip and compile without any errors. However, if the temperature stays the same no matter the CPU frequency or load, probably the chip does not have a temperature sensor.
- Why am I getting the error "128, function not present" during the compilation?
- If ESP-IDF or Arduino Core detects that the temperature sensor is not present on your selected ESP32 chip, it will show this error during compilation. Please use another ESP32 board or select the appropriate board model before compiling the program. Check the ESP32 Boards with In-built Temperature Sensor.
- I am getting an error
fatal error: driver/temp_sensor.h: No such file or directory.- The board does not have the internal temperature sensor, therefore the driver for it (driver/temp_sensor.h) is not provided for your selected board. Select another board in "Tools->Board".
internal_temp_arduino:1:10: fatal error: driver/temp_sensor.h: No such file or directory
#include "driver/temp_sensor.h"
          ^~~~~~~~~~~~~~~~~~~~~~
compilation terminated.
exit status 1
driver/temp_sensor.h: No such file or directory
Conclusion: #
In conclusion, the ESP32's internal temperature sensor provides a convenient and reliable way to measure the chip's temperature. Monitoring the chip's internal temperature can be useful for safety purposes, debugging the code, measuring the capabilities of the chip and more. Whether using Arduino Core or ESP-IDF, accessing and utilizing the internal temperature sensor is straightforward.
With constant temperature monitoring, the ESP32 can implement thermal management strategies to prevent overheating, ensuring device safety and longevity. Additionally, developers gain valuable insights into the chip's behavior under different conditions, optimizing code and enhancing overall performance.