
IKEA Vindriktning Air Quality Sensor with Home Assistant
Make the IKEA Vidrikning Air Quality Sensor Smarter by adding Xiao ESP32 C3, OLED Screen, BMP280 and integrating with Home Assistant
IKEA Vindriktning is a great and affordable air quality Sensor from IKEA. You can buy it directly from IKEA for around 16 USD in USA or 10 EUR in Europe.
However, you couldn't really call it a smart sensor, since all it does is it measures the air quality and displays it using LED lights.
Today, we are going to make the IKEA Vindriktning an actually smart sensor. We are going to add an ESP32 Board, 0.91" OLED Screen, AHT21 Temperature + Humidity Sensor and connect our IKEA Vindriktning to Home Assistant with ESPHome.
More about IKEA Vindriktning #
A nice 10$ PM 2.5 Sensor - IKEA Vindriktning Air Quality Sensor measures the air quality based on particles (PM2.5). PM2.5 are small inhalable particles, that measure 0.1-2.5 micrometres.
The measured air quality is indicated in 3 levels of air quality – green (good), yellow (ok), and red (not good) with an LED light.
PM 2.5 Air Quality LED Indicators Values, according to the manual:
| LED Color | PM 2.5 Measured Value | Air Quality | Readable Value |
|---|---|---|---|
| 🟢 Green | 0-35 | ✅ Good | Low |
| 🟠 Amber | 36-85 | ⚠️ OK | Medium |
| 🔴 Red | >=86 | ❌ Not good | High |
| Pulsing | - | - | ⏳ Start-up mode |
Integrations with Air Humidifers #
As IKEA states, it is “perfect to combine with FÖRNUFTIG air purifier”, but you would have to turn on the purifier manually. There is no possibility to turn the air purifier automatically when air quality decreases.
Me personally, I wouldn't even dare to call it a "combination". To work around that we could connect both devices to Home Assistant to automate the workflow. But first, lets start from the Vindriktning IKEA itself.
Planning the Vindriktning Upgrade #
So to make the IKEA Vindriktning sensor smarter, I want to add a AHT21 Temperature and Humidity Sensor, show these and Air Quality values on OLED screen and connecting all these sensors to Home Assistant.
To integrate the device with Home Assistant, we will make an ESPHome Vindriktning sensor, using an ESP32 Development board.
Before we begin, let's define a plan that we will follow to create a Home Assistant Vindriktning Sensor:
- Disassemble the IKEA Vindriktning Sensor
- Trace pins on the IKEA Vindriktning
- Identify additional parts needed for our new device
- Prepare ESP32 board
- Test and reassemble the ESPHome Vindriktning
Without further ado, let's jump right into it.
Disassemble the IKEA Vindriktning #
Disassembling the Vindriktning is pretty easy, just unscrew the 4 screws in each corner and the front panel should come off easily.
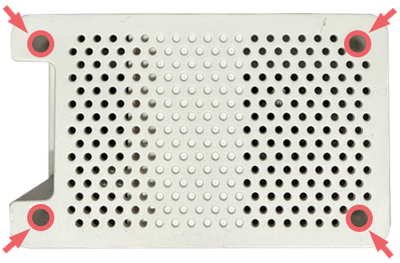
Be careful though, when removing the front panel, as there is a PCB mounted to the front panel and some wires are guided to the rest of the enclosure.
If you decide to disconnect the JST Connectors from the front plate's PCB, be very careful! I have managed to break the JST socket from the PCB and had to resolder them! Also after breaking the one from front plate's PCB, decided to disconnect the JST from the other side (the PM2.5 sensor) and managed to brake that one also :) Not sure if its just the device that I got, or they are soldered like that everywhere... At least it was easy to solder them back into place.
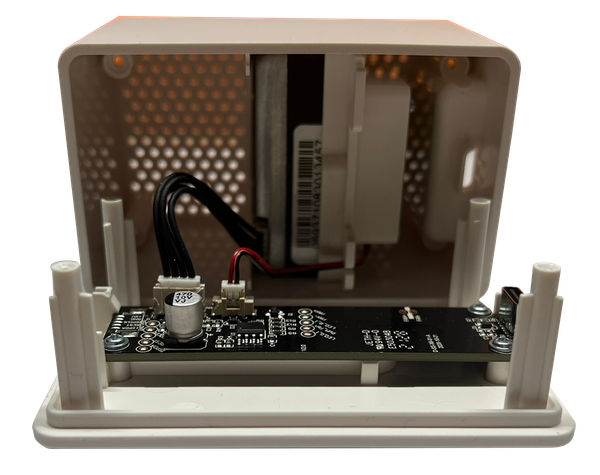
Slide the PM 2.5 Sensor out of the back plate of the IKEA Vindriktning enclosure.
Trace pins on IKEA Vindriktning #
On the front panel's PCB, on the opposite side of the USB-C port, find an exposed pins marked as "+5V, GND, ISPCLK, REST, ISPDA".

The PM 2.5 Sensor communicates with the main IKEA Vindriktning controller by UART protocol. The sensor reads the data and sends it to the main controller board through UART's Transmit (TX) pin.
"REST" pin is the one we need. It is the UART Transmit (TX) pin from the PM 2.5 Air Quality Sensor, which we will intercept using the ESP32 Board. This will allow the main Vindriktning IKEA controller to function without any changes, but additionally, the sensor data sent by the PM 2.5 Sensor, will be read by our ESP32.
We will also need the +5V and GND pins.
Identify additional parts needed for our new device #
So as discussed earlier, we will be adding ESP32 Board, OLED Screen and AHT21 Sensor to the IKEA Vindriktning. Let's identify the parts we will need.
- ESP32 Board

XIAO ESP32-C3 Development Board
- OLED Screen

0.91 inch OLED Display Screen
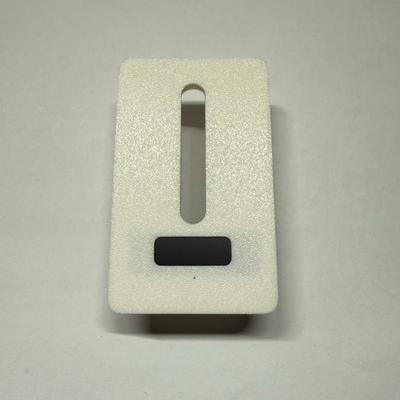
- Custom Vindriktning Front Cover (Optional)

To fit the screen in the Vindriktning's front panel, we will need a hole there. You could try cutting it out, but we chose to 3D print it. We found a nice model on Printables made by @TataGEEK_80060 – IKEA Vindriktning front cover with OLED.
In case you do not have a 3D printer and don't want to damage the Vindriktning, you can continue this project without a display screen. You will still be able to see all the values on the Home Assistant Dashboard.
💡 Don't have a 3D printer, but still want the screen? Check our 🛒 Etsy Store.
On our 🛒 Etsy Store, you can find cases for different ESP32 development boards, the ESP32 boards with sensors, screens, etc. The stock is always filling up! 📦
Need a custom case? ✉️ Contact Us on Etsy or use our Contact Form.
- AHT21 Sensor

AHT21 Sensor
Prepare the ESP32 Board #
There are two steps needed for preparation of the ESP32 board: - Software, where we will configure the ESPHome with our sensors and OLED screen. - Hardware, where we will connect our sensors, including the IKEA PM 2.5 Air Quality Sensor
Software #
To program the sensors and integrate our ESP32 board to Home Assistant we will be using ESPHome. If you don't have the Home Assistant or ESPHome installed yet, you can find detailed instructions here.
Create a new text file and call it
ikeapm25.yaml.Open the file and paste the following ESPHome configuration
esphome:
  name: ikeapm25

esp32:
  board: seeed_xiao_esp32c3
  framework:
    type: arduino

# Enable logging
logger:

# Enable Home Assistant API
api:
  password: ""

ota:
  password: ""

wifi:
  ssid: "<WIFI_SSID>"
  password: "<WIFI_PASSWORD>"

  # Enable fallback hotspot (captive portal) in case wifi connection fails
  ap:
    ssid: "Ikeaxiao Fallback Hotspot"
    password: ""

captive_portal:

font:
  - file: 'arial.ttf'
    id: font1
    size: 14

display:
  - platform: ssd1306_i2c
    setup_priority: -100
    id: oled
    model: "SSD1306 128x32"
    address: 0x3C
    lambda: |-
      it.printf(0, 0, id(font1), TextAlign::TOP_LEFT, "%.0f ug/m2", id(pm25).state);
      it.print(0, 16, id(font1), "ESPBoards");
      it.printf(80, 0, id(font1), TextAlign::TOP_LEFT, "%.1f °C", id(temperature).state);
      it.printf(80, 16, id(font1), TextAlign::TOP_LEFT,  "%.1f %%", id(humidity).state);

i2c:
  sda: GPIO8
  scl: GPIO9
  frequency: 200kHz

uart:
  rx_pin: GPIO10
  baud_rate: 9600

sensor:
  - platform: pm1006
    pm_2_5:
      name: "Particulate Matter 2.5µm Concentration"
      id: pm25

  - platform: aht10
    setup_priority: -100
    temperature:
      name: "Temperature"
      id: temperature
    humidity:
      name: "Humidity"
      id: humidity
    update_interval: 60s
Beginning of the configuration (until "font") is a standard ESPHome config, that you can generate with esphome wizard <name>. Note the board: seeed_xiao_esp32c3, where we set the board as XIAO ESP32-C3. Don't forget to change <WIFI_SSID> and <WIFI_PASSWORD> with your WiFi credentials.
Then, we import a font 'arial.ttf'. Download any ttf font from the internet and store it in the same folder as the this ESPHome configuration.
Next, we setup a display component to be the 0.91" OLED 128x32 display.
Configure the I2C component. It will be used for the I2C components - OLED and AHT21.
Next, configure the UART component. This is the component that we will read the PM 2.5 Air Quality Sensor data from.
Finally, setup the sensors - pm1006 platform - the PM 2.5 Air Quality Sensor, aht10 platform - the aht21 humidity and temperature sensor.
- Connect your ESP32 board to computer and run
esphome run ikeapm25.yaml.
If you need more detailed instructions how to upload ESPHome configuration to the ESP32 board or integrate the ESPHome device into Home Assitant, check our post.
Note: Since our used ESP32-C3 GPIO9 is a strapping pin, there might be issues initializing the i2c interface in ESPHome. Adding the setup_priority: -100 to aht10 and display components should fix this issue. If you don't have issues without the setup_priority parameter, you can safely remove it.
Hardware #
First, solder wires to the IKEA Vindriktning PCB pins, identified earlier. We will need 3 wires - +5V, GND and REST. Connect them to the ESP32 Board as follows:
Next, connect the 0.91" OLED Display Screen and AHT21 Sensor to the ESP32 Board as follows:
| IKEA Vindriktning | ESP32 | OLED | AHT21 |
|---|---|---|---|
| +5V | VCC | - | - |
| GND | GND | - | - |
| REST | GPIO10 | - | - |
| - | GPIO8 | SDA | SDA |
| - | GPIO9 | SCL | SCL |
| - | 3.3V | VIN | VIN |

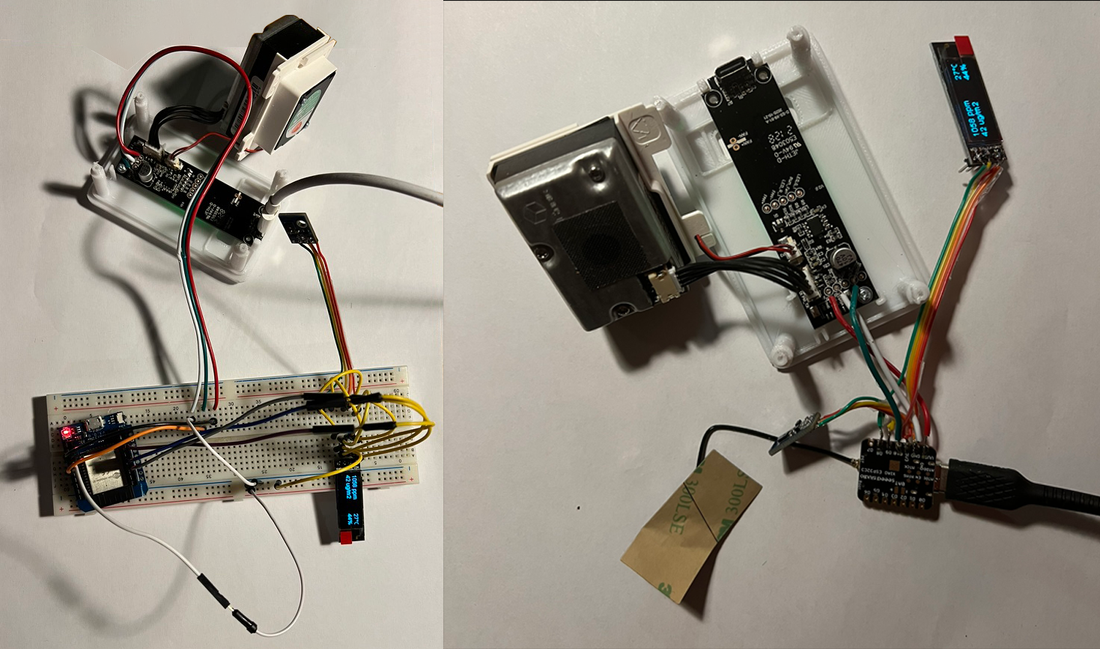
I made the prototype with the ESP32 D1 Mini (On the left), but apparently the board with 2 rows of pins does not fit into the IKEA Vindriktning case, without blocking the airflow for the PM2.5 sensor. Therefore I made the final modification (on the right) with the XIAO ESP32-C3.
Test and Reassembly #
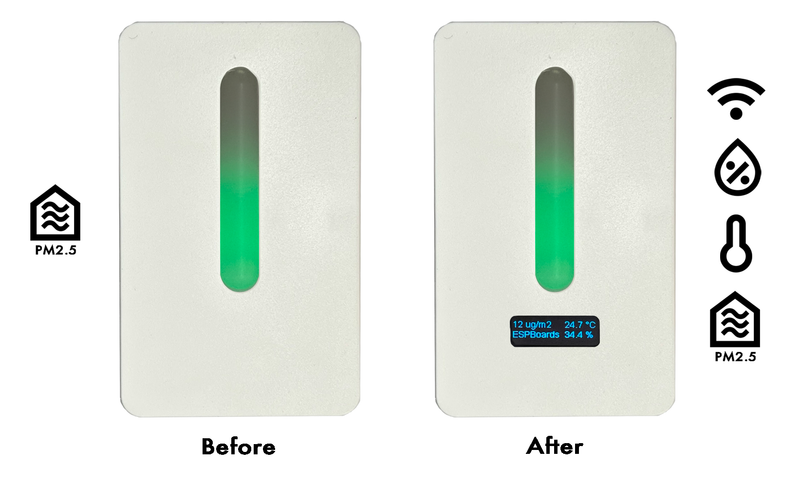
Disconnect the ESP32 board from the USB cable and connect the USB-C cable to the IKEA Vindriktning USB-C Port. You should see the OLED Screen light up. In a few seconds, the measurements from PM 2.5, Temperature and Humidity sensors will show up.
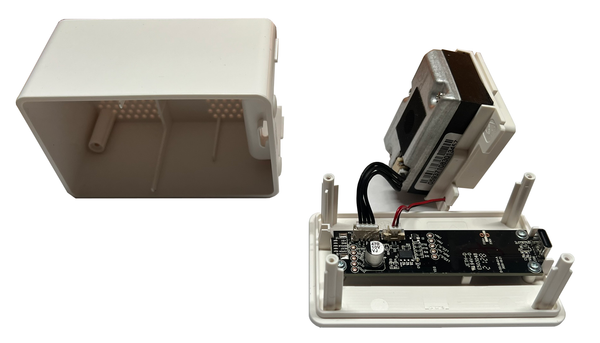
If everything works as expected, ove the main Vindriktning PCB to the custom printed front panel. Slide back in the PM 2.5 Sensor, insert the ESP32 board and AHT21 sensor. I used some hot glue to fix them in place.
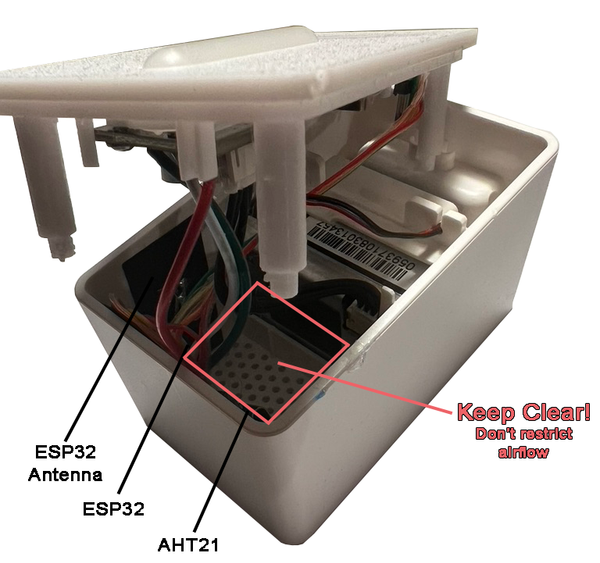
The PM 2.5 Sensor needs unrestricted airflow to accurately measure the air quality. Make sure not to block or restrict the airways inside the Vindriktning enclosure.
Put the screws back in and plug the USB-C cable into the new smarter Vindriktning. Isn't it nice?
Additional Resources #
- 🔗 LASKAKIT ESP-VINDRIKTNING - If you don't want to solder at all and have a sleek PCB with all the features, check the Checzh designed, open-source Laskakit
- 🔗 IKEA VINDRIKTNING ESP32-CAM - Want even more new features? Add a camera on top of the Ikea Vindriktning with the ESP32-CAM Board.
Conclusion #
In this post we have upgraded the not-so-smart IKEA Vindriktning Air Quality Sensor to a much smarted WiFi connected Air Quality, Temperature and Humidity Sensor with ESPHome, that can be easily integrated into Home Assistant
We have went through a step-by-step tutorial on the disassembly, identifying the upgrade and performing the upgrade. We have seen how already existing devices on the market can be easily upgraded to a up-to current standards of IoT devices.