
CrowPanel 2.1" ESP32 Rotary Display Review – The Smart Home Knob I Actually Enjoy Using
Elecrow CrowPanel 2.1 inch rotary display review: ESP32-S3, 480×480 IPS, ESPHome + LVGL setup, Home Assistant integration, and 3D-printed case guide.
Quick Verdict
Why the CrowPanel 2.1" Rotary Display? #
The Elecrow CrowPanel 2.1" Rotary Display is an ESP32-S3 based round display with a built-in rotary encoder - and it's one of the more interesting pieces of hardware I've had on my desk recently.
Rectangular displays are great, but they're screens you look at. A rotary display is something you use. There's a real difference.
The physical knob gives you something no touchscreen slider ever will: tactile feedback, muscle memory, and the ability to adjust things without even glancing at the screen. It's the same reason good audio gear still has physical knobs in 2026. The round form factor isn't a workaround - it's the right tool for any use case where you're controlling a single value: brightness, volume, temperature, a timer.
A rotary display is an interaction device that happens to have a screen on it. The CrowPanel 2.1" specifically caught my eye because of its 480×480 resolution - a big jump over the smaller 240×240 round displays, and much more space to build a proper UI on.
What's in the Box #
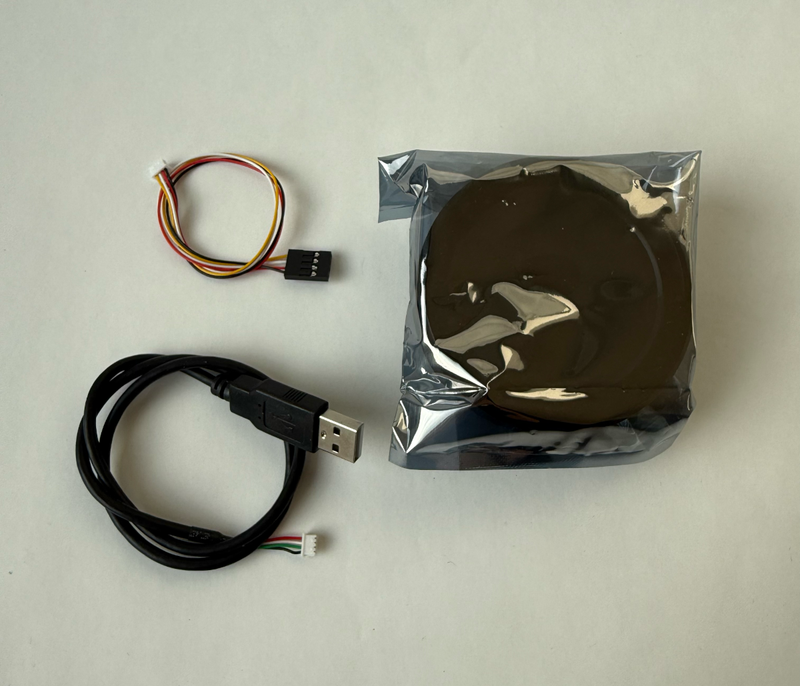
You get the display, a USB cable, and a 4-pin Dupont cable for the expansion headers. All you need - nothing more, nothing less.
- 1x CrowPanel 2.1" Rotary Display (pre-assembled in aluminum+plastic shell)
- 1x MX1.25 to USB cable (50cm)
- 1x 4-pin Dupont cable (for I2C/UART expansion)
CrowPanel 2.1 Hardware: Display, Knob & Build Quality #
The Display - Genuinely Impressive #
Let me get this out of the way: the screen is beautiful.

480x480 pixels on a 2.1" IPS panel means the pixel density is high enough that you don't see individual pixels at normal viewing distance. Colors are vibrant, viewing angles are wide (it's IPS after all), and the circular shape actually makes UI elements look more intentional than they do on a rectangular screen.
For reference, Elecrow also makes a 1.28" version at 240x240 - if you want something smaller and cheaper. But the 2.1" at 480x480 is the sweet spot for me. Big enough to show useful information, small enough to not look out of place on a desk or wall.
The Rotary Mechanism - Smooth, But... #
The knob rotation itself is smooth. Clockwise, counterclockwise, press-to-confirm - it all works as expected. There's enough resistance that you won't accidentally bump it, but it's light enough for comfortable one-handed use.
The shell is mostly plastic - the cover that snaps over the screen has a slight looseness to it, and the rotation has that characteristic plasticky feel. Honestly though, it's not a problem. It still feels nice to use and the knob action is satisfying enough that I don't think about it after the first few minutes.
3D Printed Case #
I found a 3D-printable case made by Amrut Prabhu on Printables - it includes both a display stand and a wall mount:
3D Printable Case on Printables
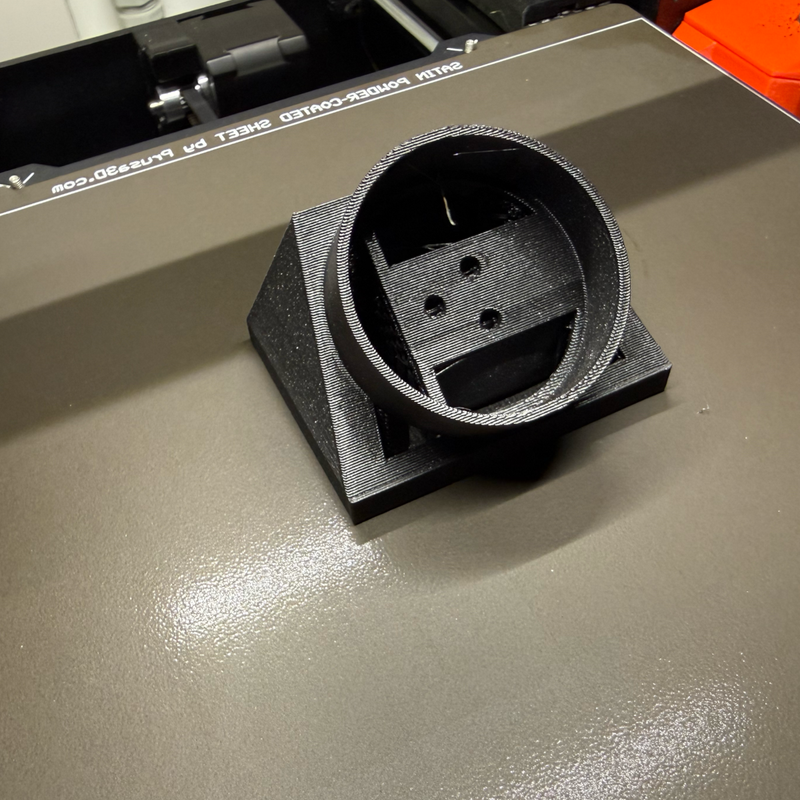
After printing and assembling, the whole thing feels significantly more premium. The display sits snugly, the knob rotation is unaffected, and it looks like an intentional product rather than a dev board. If you have access to a 3D printer (or a friend with one), I highly recommend this upgrade.
Specifications at a Glance #
| Spec | Detail |
|---|---|
| Chip | ESP32-S3R8 (dual-core LX7, 240 MHz) |
| Memory | 512KB SRAM + 8MB PSRAM |
| Storage | 16MB Flash |
| Display | 2.1" IPS, 480×480, capacitive touch |
| Input | Rotary knob (CW/CCW + press) + touch |
| Wireless | Wi-Fi 802.11 b/g/n (2.4 GHz), BLE 5.0 |
| Interfaces | UART×2, I2C, FPC (12-pin), USB-C (5V power + programming) |
| Buttons | RESET, BOOT, encoder press |
| Extras | Power indicator LED, ambient LED ring |
| Size | 79 × 79 × 30 mm |
| Weight | 80g |
| Price | ~$35.70 |
The ESP32-S3 with 8MB PSRAM is the hero here. For a display running LVGL with animations, you need that extra RAM. Elecrow didn't cut corners on the silicon, which I appreciate.
CrowPanel 2.1 ESPHome Setup #
This is where things got exciting for me. For a long time, round displays like this were Arduino IDE territory - LVGL examples in raw C, custom drivers, and a lot of fighting with display initialization sequences.
Then, in January 2026, Elecrow dropped official ESPHome examples.
Official ESPHome Examples on GitHub
This is a big deal. It means you can integrate this display into Home Assistant with nothing but YAML configuration. No C code, no custom firmware builds, no suffering.
Base ESPHome Configuration #
Here's a cleaned-up version of the base configuration. I've stripped out the default passwords and restructured it for clarity:
esphome:
  name: crowpanel-rotary
  friendly_name: CrowPanel Rotary 2.1
  platformio_options:
    build_flags: "-DBOARD_HAS_PSRAM"
    board_build.esp-idf.memory_type: qio_opi
    board_build.flash_mode: dio
  on_boot:
    priority: 800
    then:
      # Power-on sequence for the display and touch controller
      - output.turn_on: lcd_power
      - output.turn_on: display_reset
      - delay: 100ms
      - output.turn_off: display_reset
      - delay: 100ms
      - output.turn_on: tp_reset
      - delay: 100ms
      - output.turn_off: tp_reset
      - delay: 120ms
      - output.turn_on: tp_reset
      - delay: 120ms
      - output.turn_on: tp_intr

esp32:
  board: esp32-s3-devkitc-1
  framework:
    type: esp-idf
    sdkconfig_options:
      CONFIG_ESP32S3_DEFAULT_CPU_FREQ_240: y
      CONFIG_ESP32S3_DATA_CACHE_64KB: y
      CONFIG_SPIRAM_FETCH_INSTRUCTIONS: y
      CONFIG_SPIRAM_RODATA: y

psram:
  mode: octal
  speed: 80MHz

wifi:
  ssid: !secret wifi_ssid
  password: !secret wifi_password
  ap:
    ssid: "CrowPanel Fallback"
    password: "your-fallback-password"

api:
  encryption:
    key: "YOUR_API_KEY_HERE"

ota:
  - platform: esphome
    password: "YOUR_OTA_PASSWORD"

logger:
  level: DEBUG
A few things to note:
- ESP-IDF framework is required - Arduino framework won't work here due to the RGB display bus
- PSRAM configuration is critical - without
qio_opimode and theBOARD_HAS_PSRAMflag, you'll run out of memory fast - The boot sequence handles the PCF8574 I/O expander that controls LCD power, display reset, and touch controller reset
The I/O Expander & Pin Mapping #
This display uses a PCF8574 I/O expander (at I2C address 0x21) to manage several control signals. This is important to understand - not all pins are direct GPIOs:
i2c:
  sda: GPIO38
  scl: GPIO39
  id: bus_a
  scan: true

pcf8574:
  - id: pcf
    address: 0x21

# PCF8574 pin mapping:
# P0 → Touch reset (output)
# P2 → Touch interrupt (input)
# P3 → LCD power (output)
# P4 → LCD reset (output)
# P5 → Encoder button (input, pull-up)
Display, Touch & Rotary Encoder #
The display uses the ST7701S driver over an RGB parallel bus. The touch controller is a CST816 (via I2C), and the rotary encoder uses two GPIO pins:
# Backlight control via LEDC PWM
output:
  - platform: ledc
    pin: 6
    id: bl_pwm
    frequency: 19531Hz

light:
  - platform: monochromatic
    name: "LCD Backlight"
    output: bl_pwm
    id: display_backlight
    default_transition_length: 0s
    restore_mode: ALWAYS_ON

# Rotary encoder (note: pin_a is GPIO4, pin_b is GPIO42)
sensor:
  - platform: rotary_encoder
    id: knob
    name: "Encoder"
    pin_a:
      number: 4
      mode:
        input: true
        pullup: true
    pin_b:
      number: 42
      mode:
        input: true
        pullup: true
    resolution: 1

# Touch controller (CST816)
touchscreen:
  platform: cst816
  id: my_touchscreen
  i2c_id: bus_a
  skip_probe: true
  update_interval: 25ms
  address: 0x15
Heads up: Pin A and Pin B for the rotary encoder are GPIO4 and GPIO42 respectively - easy to mix up. If your knob direction is inverted, swap them.
Display Init Sequence #
The ST7701S requires a specific initialization sequence. This is the part that historically made these displays painful to work with - getting one byte wrong and the display shows garbage or nothing at all. Thankfully, Elecrow's ESPHome example includes the complete working init sequence:
display:
  - platform: st7701s
    id: my_display
    update_interval: 50ms
    spi_mode: MODE3
    color_order: RGB
    invert_colors: false
    dimensions:
      width: 480
      height: 480
    cs_pin: 16
    de_pin: 40
    hsync_pin: 15
    vsync_pin: 7
    pclk_pin: 41
    pclk_frequency: 18MHz
    pclk_inverted: true
    data_pins:
      red: [46, 3, 8, 18, 17]
      green: [14, 13, 12, 11, 10, 9]
      blue: [5, 45, 48, 47, 21]
    init_sequence:
      # ... (full init omitted for brevity - grab it from the official repo)
The full init_sequence is about 30 lines of hex commands. Don't try to type these manually - copy them from the official YAML file.
Building a Display Backlight Brightness Controller with LVGL #
Alright, config is done - let's build something actually useful. I wanted a backlight brightness controller that:
- Shows the current brightness level on a slick circular arc
- Lets you change it two ways - drag the arc on the touchscreen or twist the physical rotary knob
- Has accelerated control - slow twist for fine-tuning, fast twist for big jumps
- Looks good doing it
This is a round display. A brightness knob. It's almost too perfect.
Designing the UI with ESPHome LVGL Designer #
Instead of hand-coding pixel coordinates (been there, hated that), I used our ESPHome LVGL UI Designer to lay out the interface visually.
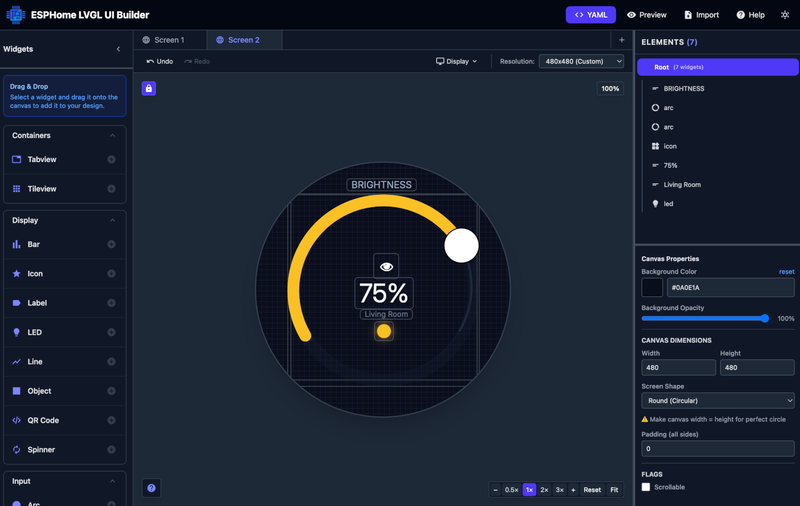
If you haven't tried it yet - it's a free, web-based tool we built specifically for ESPHome users. You drag widgets onto a canvas sized to your display (480×480 in this case), adjust styles in real-time, and export production-ready YAML. No coordinate guessing, no compile-upload-check cycles.
For this project, I used:
- A main arc (amber, 22px wide) as the draggable brightness control
- A thinner outer ring arc as a subtle decorative border
- A sun icon in the center
- A big percentage label showing the current value
- A status label and a small LED glow indicator
New to the LVGL Designer? Check out our full introduction post - it covers all 19+ widgets, the export workflow, and tips for different display sizes.
Want to tweak this UI yourself?
Import the LVGL snippet below directly into the ESPHome LVGL Designer and customize colors, sizes, and positions visually - then export your own version.
Click to expand importable LVGL YAML
lvgl:
  pages:
    - id: canvas_2
      bg_color: 0x0A0E1A
      widgets:
        - label:
            id: page_title
            x: 170
            y: 30
            text: "BRIGHTNESS"
            text_color: 0x94A3B8
            text_font: MONTSERRAT_18

        - arc:
            id: outer_ring
            x: 65
            y: 58
            width: 350
            height: 350
            value: 100
            min_value: 0
            max_value: 100
            adjustable: false
            start_angle: 150
            end_angle: 30
            arc_color: 0x141B2D
            arc_width: 4
            indicator:
              arc_color: 0x1E293B
              arc_width: 4

        - arc:
            id: brightness_arc
            x: 59
            y: 60
            width: 360
            height: 360
            value: 75
            min_value: 0
            max_value: 100
            adjustable: true
            start_angle: 150
            end_angle: 30
            arc_color: 0x1E293B
            arc_width: 22
            indicator:
              arc_color: 0xFBBF24
              arc_width: 22

        - label:
            id: lv_icon_4
            x: 210
            y: 160
            width: 48
            height: 48
            text: "\uF06E"
            text_font: montserrat_24
            text_color: 0xFFFFFF
            align: CENTER

        - label:
            id: brightness_value
            x: 185
            y: 215
            text: "75%"
            text_color: 0xF8FAFC
            text_font: MONTSERRAT_48

        - label:
            id: brightness_status
            x: 195
            y: 275
            text: "Living Room"
            text_color: 0x64748B
            text_font: MONTSERRAT_14

        - led:
            id: glow_indicator
            x: 222
            y: 298
            width: 36
            height: 36
            color: 0xFBBF24
            brightness: 90%
The Full LVGL UI #
Here's the actual LVGL configuration running on my device. The dark background (0x0A0E1A) makes the amber arc really pop on the IPS panel. Two arcs are stacked - a thin decorative outer ring and the thick interactive brightness arc:
lvgl:
  displays:
    - my_display
  touchscreens:
    - my_touchscreen
  pages:
    - id: canvas_2
      bg_color: 0x0A0E1A
      widgets:
        # Header label
        - label:
            id: page_title
            x: 170
            y: 30
            text: "BRIGHTNESS"
            text_color: 0x94A3B8
            text_font: MONTSERRAT_18

        # Decorative outer ring (non-interactive)
        - arc:
            id: outer_ring
            x: 65
            y: 58
            width: 350
            height: 350
            value: 100
            adjustable: false
            start_angle: 150
            end_angle: 30
            arc_color: 0x141B2D
            arc_width: 4
            indicator:
              arc_color: 0x1E293B
              arc_width: 4

        # Main brightness arc (draggable via touch!)
        - arc:
            id: brightness_arc
            x: 59
            y: 60
            width: 360
            height: 360
            value: !lambda return id(brightness_pct);
            min_value: 0
            max_value: 100
            adjustable: true
            start_angle: 150
            end_angle: 30
            arc_color: 0x1E293B
            arc_width: 22
            indicator:
              arc_color: 0xFBBF24
              arc_width: 22
            on_value:
              then:
                - lambda: |-
                    int val = (int)x;
                    if (val < 0) val = 0;
                    if (val > 100) val = 100;
                    id(brightness_pct) = val;
                    // Update backlight
                    auto call = id(display_backlight).turn_on();
                    call.set_brightness((float)val / 100.0f);
                    call.perform();
                    // Update percentage label
                    char buf[8];
                    snprintf(buf, sizeof(buf), "%d%%", val);
                    lv_label_set_text(id(brightness_value), buf);

        # Sun icon
        - label:
            id: sun_icon
            x: 215
            y: 165
            text: "\uF06E"
            text_color: 0xFBBF24
            text_font: MONTSERRAT_36

        # Big percentage readout
        - label:
            id: brightness_value
            x: 185
            y: 215
            text: !lambda |-
              char buf[8];
              snprintf(buf, sizeof(buf), "%d%%", id(brightness_pct));
              return std::string(buf);
            text_color: 0xF8FAFC
            text_font: MONTSERRAT_48

        # Status label
        - label:
            id: brightness_status
            x: 222
            y: 275
            text: "Local"
            text_color: 0x64748B
            text_font: MONTSERRAT_14

        # Glow indicator LED
        - led:
            id: glow_indicator
            x: 222
            y: 298
            width: 36
            height: 36
            color: 0xFBBF24
            brightness: 90%
The key part is the on_value handler on brightness_arc - when you drag the arc on the touchscreen, it updates the backlight brightness in real-time and keeps the percentage label in sync. This gives you full touchscreen control without the rotary knob.
Accelerated Rotary Encoder Control #
Now for the physical knob. A naive implementation maps each encoder tick to 1% brightness change. That's fine for small adjustments, but painful when you want to go from 10% to 90%.
I implemented velocity-based acceleration - the faster you twist, the bigger each step:
globals:
  - id: brightness_pct
    type: int
    restore_value: true
    initial_value: '75'
  - id: last_knob_time
    type: uint32_t
    restore_value: false
    initial_value: '0'
  - id: last_knob_val
    type: int
    restore_value: false
    initial_value: '75'

sensor:
  - platform: rotary_encoder
    id: knob
    name: "Encoder"
    pin_a:
      number: 4
      mode:
        input: true
        pullup: true
    pin_b:
      number: 42
      mode:
        input: true
        pullup: true
    resolution: 1
    min_value: -100000
    max_value:  100000
    on_value:
      then:
        - lambda: |-
            uint32_t now_ms = millis();
            int delta = (int)x - id(last_knob_val);
            id(last_knob_val) = (int)x;

            // Acceleration: faster turn = bigger steps
            uint32_t dt = now_ms - id(last_knob_time);
            id(last_knob_time) = now_ms;
            int step = 1;
            if (dt < 30) step = 10;
            else if (dt < 60) step = 5;
            else if (dt < 120) step = 3;
            else if (dt < 200) step = 2;

            int dir = (delta > 0) ? 1 : -1;
            int val = id(brightness_pct) + dir * step;
            if (val < 0) val = 0;
            if (val > 100) val = 100;
            id(brightness_pct) = val;

            // Update backlight
            auto call = id(display_backlight).turn_on();
            call.set_brightness((float)val / 100.0f);
            call.perform();

            // Update LVGL arc + label
            lv_arc_set_value(id(brightness_arc), val);
            char buf[8];
            snprintf(buf, sizeof(buf), "%d%%", val);
            lv_label_set_text(id(brightness_value), buf);
The acceleration logic is simple but effective:
| Turn speed | Time between ticks | Step size |
|---|---|---|
| Very fast | < 30ms | 10% per tick |
| Fast | < 60ms | 5% per tick |
| Medium | < 120ms | 3% per tick |
| Moderate | < 200ms | 2% per tick |
| Slow / precise | > 200ms | 1% per tick |
This means a slow, deliberate turn gives you fine 1% control, but a quick flick jumps 10% at a time. It feels natural - exactly how a physical brighness / volume knob should behave.
Bidirectional sync: Both the touchscreen arc and the physical rotary knob control the same brightness value. Drag the arc → knob state updates. Twist the knob → arc animates. They stay in sync through the shared brightness_pct global.
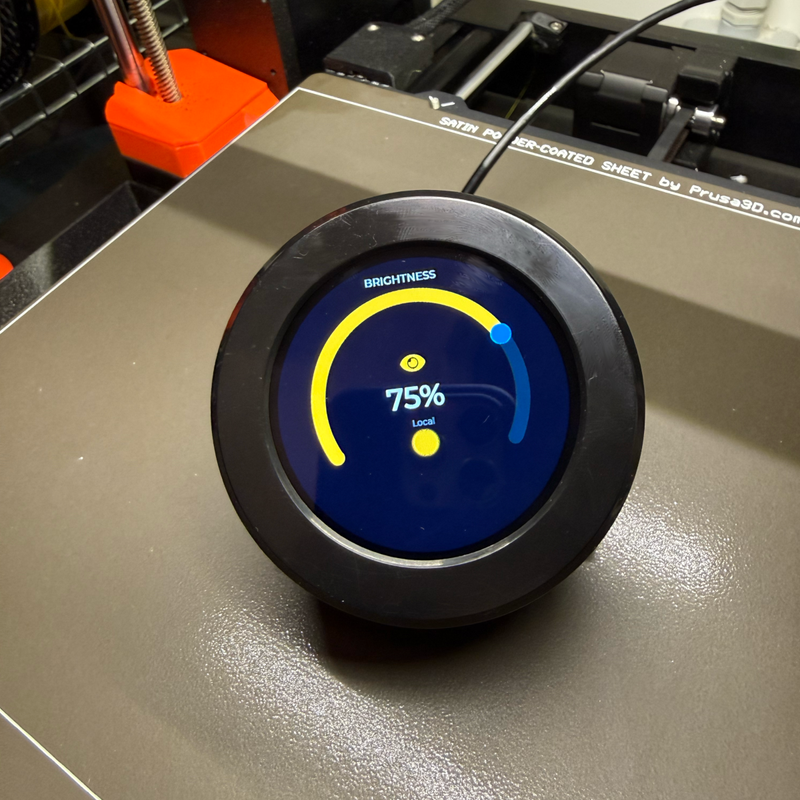
The result? A dark-themed circular UI with an amber arc that you can control two ways. Twist the knob for quick adjustments, or drag the arc on the touchscreen for precise positioning. The percentage label updates in real-time, and the display backlight responds instantly. It's satisfying in a way that tapping a phone screen will never be.
Full ESPHome config (click to expand)
esphome:
  name: elecrow-rotary
  friendly_name: elecrow-rotary
  platformio_options:
    build_flags: "-DBOARD_HAS_PSRAM"
    board_build.esp-idf.memory_type: qio_opi
    board_build.flash_mode: dio
  on_boot:
    priority: 800
    then:
      - output.turn_on: lcd_power
      - output.turn_on: display_reset
      - delay: 100ms
      - output.turn_off: display_reset
      - delay: 100ms
      - output.turn_on: tp_reset
      - delay: 100ms
      - output.turn_off: tp_reset
      - delay: 120ms
      - output.turn_on: tp_reset
      - delay: 120ms
      - output.turn_on: tp_intr

esp32:
  board: esp32-s3-devkitc-1
  framework:
    type: esp-idf
    sdkconfig_options:
      CONFIG_ESP32S3_DEFAULT_CPU_FREQ_240: y
      CONFIG_ESP32S3_DATA_CACHE_64KB: y
      CONFIG_SPIRAM_FETCH_INSTRUCTIONS: y
      CONFIG_SPIRAM_RODATA: y

psram:
  mode: octal
  speed: 80MHz

logger:

api:
  encryption:
    key: !secret api_key

ota:
  - platform: esphome
    password: !secret ota_password

wifi:
  ssid: !secret wifi_ssid
  password: !secret wifi_password
  ap:
    ssid: "Elecrow-Rotary Fallback"

captive_portal:

i2c:
  sda: GPIO38
  scl: GPIO39
  id: bus_a
  scan: true

pcf8574:
  - id: pcf
    address: 0x21

output:
  - platform: ledc
    pin: 6
    id: bl_pwm
    frequency: 19531Hz
  - platform: gpio
    id: lcd_power
    pin:
      pcf8574: pcf
      number: 3
      mode:
        output: true
      inverted: false
  - platform: gpio
    id: tp_reset
    pin:
      pcf8574: pcf
      number: 0
      mode:
        output: true
  - platform: gpio
    id: display_reset
    pin:
      pcf8574: pcf
      number: 4
      mode:
        output: true
      inverted: true
  - platform: gpio
    id: tp_intr
    pin:
      pcf8574: pcf
      number: 2
      mode:
        output: true
  - platform: gpio
    id: encode_button
    pin:
      pcf8574: pcf
      number: 5
      mode:
        input: true

globals:
  - id: brightness_pct
    type: int
    restore_value: true
    initial_value: '75'
  - id: last_knob_time
    type: uint32_t
    restore_value: false
    initial_value: '0'
  - id: last_knob_val
    type: int
    restore_value: false
    initial_value: '75'

sensor:
  - platform: rotary_encoder
    id: knob
    name: "Encoder"
    pin_a:
      number: 4
      mode:
        input: true
        pullup: true
    pin_b:
      number: 42
      mode:
        input: true
        pullup: true
    resolution: 1
    min_value: -100000
    max_value: 100000
    on_value:
      then:
        - lambda: |-
            uint32_t now_ms = millis();
            int delta = (int)x - id(last_knob_val);
            id(last_knob_val) = (int)x;
            uint32_t dt = now_ms - id(last_knob_time);
            id(last_knob_time) = now_ms;
            int step = 1;
            if (dt < 30) step = 10;
            else if (dt < 60) step = 5;
            else if (dt < 120) step = 3;
            else if (dt < 200) step = 2;
            int dir = (delta > 0) ? 1 : -1;
            int val = id(brightness_pct) + dir * step;
            if (val < 0) val = 0;
            if (val > 100) val = 100;
            id(brightness_pct) = val;
            auto call = id(display_backlight).turn_on();
            call.set_brightness((float)val / 100.0f);
            call.perform();
            lv_arc_set_value(id(brightness_arc), val);
            char buf[8];
            snprintf(buf, sizeof(buf), "%d%%", val);
            lv_label_set_text(id(brightness_value), buf);

light:
  - platform: monochromatic
    name: "LCD Backlight"
    output: bl_pwm
    id: display_backlight
    default_transition_length: 0s
    restore_mode: ALWAYS_ON

spi:
  clk_pin: 2
  mosi_pin: 1

touchscreen:
  platform: cst816
  id: my_touchscreen
  i2c_id: bus_a
  skip_probe: true
  update_interval: 25ms
  address: 0x15

display:
  - platform: st7701s
    id: my_display
    update_interval: 50ms
    spi_mode: MODE3
    color_order: RGB
    invert_colors: false
    dimensions:
      width: 480
      height: 480
    cs_pin: 16
    de_pin: 40
    hsync_pin: 15
    vsync_pin: 7
    pclk_pin: 41
    data_pins:
      red: [46, 3, 8, 18, 17]
      green: [14, 13, 12, 11, 10, 9]
      blue: [5, 45, 48, 47, 21]
    hsync_front_porch: 20
    hsync_pulse_width: 10
    hsync_back_porch: 10
    vsync_front_porch: 8
    vsync_pulse_width: 10
    vsync_back_porch: 10
    pclk_frequency: 18MHz
    pclk_inverted: true
    init_sequence:
      - [0x01]
      - [0xFF, 0x77, 0x01, 0x00, 0x00, 0x10]
      - [0xCC, 0x10]
      - [0xCD, 0x08]
      - [0xB0, 0x02, 0x13, 0x1B, 0x0D, 0x10, 0x05, 0x08, 0x07, 0x07, 0x24, 0x04, 0x11, 0x0E, 0x2C, 0x33, 0x1D]
      - [0xB1, 0x05, 0x13, 0x1B, 0x0D, 0x11, 0x05, 0x08, 0x07, 0x07, 0x24, 0x04, 0x11, 0x0E, 0x2C, 0x33, 0x1D]
      - [0xFF, 0x77, 0x01, 0x00, 0x00, 0x11]
      - [0xB0, 0x5D]
      - [0xB1, 0x43]
      - [0xB2, 0x81]
      - [0xB3, 0x80]
      - [0xB5, 0x43]
      - [0xB7, 0x85]
      - [0xB8, 0x20]
      - [0xC1, 0x78]
      - [0xC2, 0x78]
      - [0xD0, 0x88]
      - [0xE0, 0x00, 0x00, 0x02]
      - [0xE1, 0x03, 0xA0, 0x00, 0x00, 0x04, 0xA0, 0x00, 0x00, 0x00, 0x20, 0x20]
      - [0xE2, 0x00, 0x00, 0x00, 0x00, 0x00, 0x00, 0x00, 0x00, 0x00, 0x00, 0x00, 0x00, 0x00]
      - [0xE3, 0x00, 0x00, 0x11, 0x00]
      - [0xE4, 0x22, 0x00]
      - [0xE5, 0x05, 0xEC, 0xA0, 0xA0, 0x07, 0xEE, 0xA0, 0xA0, 0x00, 0x00, 0x00, 0x00, 0x00, 0x00, 0x00, 0x00]
      - [0xE6, 0x00, 0x00, 0x11, 0x00]
      - [0xE7, 0x22, 0x00]
      - [0xE8, 0x06, 0xED, 0xA0, 0xA0, 0x08, 0xEF, 0xA0, 0xA0, 0x00, 0x00, 0x00, 0x00, 0x00, 0x00, 0x00, 0x00]
      - [0xEB, 0x00, 0x00, 0x40, 0x40, 0x00, 0x00, 0x00]
      - [0xED, 0xFF, 0xFF, 0xFF, 0xBA, 0x0A, 0xBF, 0x45, 0xFF, 0xFF, 0x54, 0xFB, 0xA0, 0xAB, 0xFF, 0xFF, 0xFF]
      - [0xEF, 0x10, 0x0D, 0x04, 0x08, 0x3F, 0x1F]
      - [0xFF, 0x77, 0x01, 0x00, 0x00, 0x13]
      - [0xEF, 0x08]
      - [0xFF, 0x77, 0x01, 0x00, 0x00, 0x00]
      - [0x36, 0x00]
      - [0x3A, 0x60]
      - [0x11]
      - delay 100ms
      - [0x29]
      - delay 50ms

lvgl:
  displays:
    - my_display
  touchscreens:
    - my_touchscreen
  pages:
    - id: canvas_2
      bg_color: 0x0A0E1A
      widgets:
        - label:
            id: page_title
            x: 170
            y: 30
            text: "BRIGHTNESS"
            text_color: 0x94A3B8
            text_font: MONTSERRAT_18
        - arc:
            id: outer_ring
            x: 65
            y: 58
            width: 350
            height: 350
            value: 100
            min_value: 0
            max_value: 100
            adjustable: false
            start_angle: 150
            end_angle: 30
            arc_color: 0x141B2D
            arc_width: 4
            indicator:
              arc_color: 0x1E293B
              arc_width: 4
        - arc:
            id: brightness_arc
            x: 59
            y: 60
            width: 360
            height: 360
            value: !lambda return id(brightness_pct);
            min_value: 0
            max_value: 100
            adjustable: true
            start_angle: 150
            end_angle: 30
            arc_color: 0x1E293B
            arc_width: 22
            indicator:
              arc_color: 0xFBBF24
              arc_width: 22
            on_value:
              then:
                - lambda: |-
                    int val = (int)x;
                    if (val < 0) val = 0;
                    if (val > 100) val = 100;
                    id(brightness_pct) = val;
                    auto call = id(display_backlight).turn_on();
                    call.set_brightness((float)val / 100.0f);
                    call.perform();
                    char buf[8];
                    snprintf(buf, sizeof(buf), "%d%%", val);
                    lv_label_set_text(id(brightness_value), buf);
        - label:
            id: sun_icon
            x: 215
            y: 165
            text: "\uF06E"
            text_color: 0xFBBF24
            text_font: MONTSERRAT_36
        - label:
            id: brightness_value
            x: 185
            y: 215
            text: !lambda |-
              char buf[8];
              snprintf(buf, sizeof(buf), "%d%%", id(brightness_pct));
              return std::string(buf);
            text_color: 0xF8FAFC
            text_font: MONTSERRAT_48
        - label:
            id: brightness_status
            x: 222
            y: 275
            text: "Local"
            text_color: 0x64748B
            text_font: MONTSERRAT_14
        - led:
            id: glow_indicator
            x: 222
            y: 298
            width: 36
            height: 36
            color: 0xFBBF24
            brightness: 90%
What Else Can You Build? #
The backlight controller above controls the device's own display brightness - a perfect first project. But the same pattern extends to anything in Home Assistant. Swap the display_backlight call for a homeassistant.service call targeting light.turn_on with brightness_pct, and you've got a physical dimmer for any smart light in your house.
The rotary form factor is naturally suited for:
Smart Light Dimmer
Control any HA light entity - same arc UI, add a homeassistant.service call
Volume Control
Media player volume with album art on the display
Thermostat
Turn to set target temp, screen shows current vs. target
Timer / Pomodoro
Twist to set time, press to start, arc shows countdown
Color Wheel
RGB light color picker - the round display IS a color wheel
Scene Selector
Twist through HA scenes, press to activate - icons on screen
Resources & Links #
Here's everything you need to get started:
Official Resources
- Product Page (Elecrow) - ~$35.70
- Official Wiki
- GitHub Repository - schematics, datasheets, examples
- ESPHome Examples - official YAML configs
- 3D Printable Case by Amrut Prabhu - stand + wall mount
Our Tools
- ESPHome LVGL UI Designer - drag-and-drop UI builder for ESPHome displays
- LVGL Designer Introduction Post - full walkthrough & tips
Frequently Asked Questions #
Does the CrowPanel 2.1" rotary display work with ESPHome? Yes. Elecrow published official ESPHome examples in January 2026. It uses the ESP-IDF framework, ST7701S display driver, CST816 touch controller, and PCF8574 I/O expander - all configurable in YAML, no C code needed.
Does it work with Home Assistant? Yes. Once flashed with ESPHome it connects via the native API. You can control any HA entity directly from LVGL widgets on the display.
Is a 3D-printed case necessary? Not strictly - the stock shell works fine. But the case by Amrut Prabhu on Printables makes a noticeable difference if you want it on a desk or wall permanently.
Final Thoughts: Who Should Buy This? #
After a few weeks of daily use, here's where I've landed:
Buy it if...
- You want a physical smart home controller
- You're in the ESPHome/Home Assistant ecosystem
- You like building custom UIs with LVGL
- You have access to a 3D printer for the case
- You want something unique on your desk or wall
Skip it if...
- You need a larger display for dashboards
- You want a premium metal enclosure out of the box
- You're not comfortable with ESPHome/YAML
- A phone app does the job for you
The CrowPanel 2.1" Rotary Display is one of those products that's greater than the sum of its parts. The display is excellent. The rotary mechanism is fun! The ESP32-S3 is overkill for basic knob duties (which means it has headroom for complex UIs). The ESPHome support, now official, makes integration straightforward.
The plastic housing is the only real weakness - but for $35 and a 3D-printed case, you get a genuinely delightful smart home controller that feels purpose-built rather than improvised.
I've got one controlling my office lights right now. I'll probably buy another for the living room thermostat.
That's the highest recommendation I can give a $35 gadget.