
Introducing ESPHome LVGL UI Designer: Visual UI Builder for ESP32
Free web-based drag-and-drop UI designer for ESP32. Create beautiful interfaces with 19+ LVGL widgets, no coding required. Export production-ready YAML for ESPHome.
I was building an ESPHome display project. Every time I wanted to move a button 10 pixels to the left, I had to:
- Edit the YAML coordinates
- Recompile the firmware
- Upload to the device
- Wait and look at the result
- Realize it's still wrong
- Repeat 20 times
For a button.
The core problem: LVGL is powerful, but hand-coding coordinates into YAML is brutal. You're flying blind, guessing where things will end up on the actual display.
The real problem: LVGL UI Designers already existed in the ecosystem. But they were generic-built for standalone LVGL projects, generating C code, not understanding ESPHome's YAML workflow at all.
I thought: "There has to be a better way for ESPHome users."
So I built one.
🎨 ESPHome LVGL UI Designer
Stop writing YAML coordinates by hand. Design beautiful UIs visually. Export production-ready configs in seconds.
Free • Web-based • 19+ LVGL Widgets • Real-time Preview
The Solution: Design, See, Deploy #
Every time I was trying to design something, sometimes with a paper and pen, writing down the cordinates, I really wanted to see changes in real-time, adjust layouts visually, and export the final YAML without any manual coordinate tweaking.
That's exactly what the ESPHome LVGL UI Designer does.
❌ The Old Way
- Edit YAML coordinates
- Compile firmware
- Upload to device
- Look at result
- Button's in wrong spot?
- Repeat 20 times 😤
✅ The New Way
- Drag widget onto canvas
- See it in real-time
- Adjust size/position
- Export YAML
- Deploy
- Done in minutes ✨
Quick Preview: What You're Getting #
Designer Canvas Interface
Key Features at a Glance #
Drag & Drop
Zero coding. Pixel-perfect positioning. Real-time preview.
19+ Widgets
Buttons, sliders, labels, tabs, switches, and more. Everything LVGL offers.
Export YAML
Click export. Copy paste into ESPHome. Deploy.
Full Styling
Colors, borders, padding, corner radius. Complete control.
Multi-Screen
Build dashboards with multiple pages and navigation.
Interactive Preview
Test buttons, sliders, and navigation before deploying.
The Main Editor Interface #
This is where the magic happens. The interface uses a color-coded layout with six main sections that work together seamlessly:
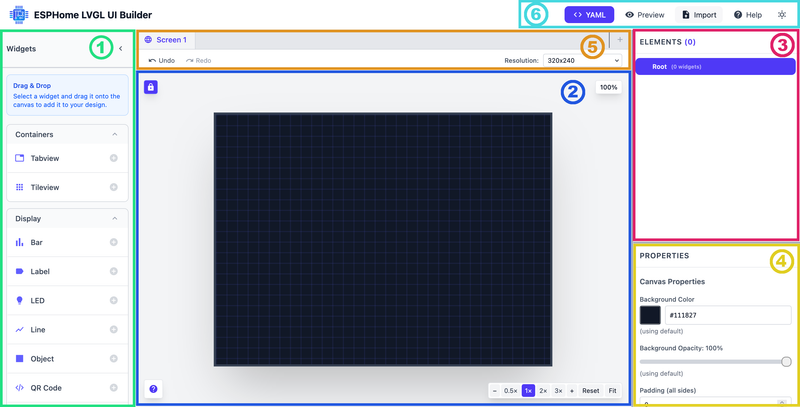
1. Left Sidebar - Widgets Toolbox #
19+ LVGL components ready to drag & drop:
Button, Slider, Switch, Checkbox, Dropdown, Keyboard, Roller, Spinbox
Label, Arc, Bar, LED, Line, QR Code
Tabview, Tileview, Object, Buttonmatrix, Textarea
Drag widgets onto the canvas or click + to add. That's it.
2. Main Canvas - Design Workspace #
Your visual design area. Real-time preview as you edit.
🔒 Top-Left
Lock/Pan toggle-drag canvas without moving components
📊 Top-Right
Scale % (50%, 100%, 200%)-relative to display size
🔍 Bottom-Right
Zoom: 0.5x, 1x, 2x, 3x + reset & fit-to-view
❓ Bottom-Left
Help-instant access to docs
3. Right Sidebar Top - Elements Tree #
Hierarchical view of all components.
✓ See every widget you've placed
✓ Drag to reorder (controls Z-index/stacking order)
✓ Expand/collapse nested containers
✓ Click to select on canvas
✓ Full nesting support: Tabview → Tabs → Buttons
4. Right Sidebar Bottom - Properties Panel #
Selected widget property editor. Changes update canvas instantly.
Position & Size
X, Y, Width, HeightColors
Background, Border, Text (color picker)Styling
Border width, Radius, PaddingEffects
Opacity, Visibility, Font size5. Top Area - Screen Tabs & Controls #
Manage multiple screens and workflow.
Left: Screen tabs-create new with +, switch between screens
Center: Undo/Redo buttons for design history
Right: Resolution selector (320×240, 800×600, custom sizes)
6. Top Menu Bar #
Essential actions & settings.
| Action | What It Does |
|---|---|
| ⬇️ Export YAML | Generate production-ready config |
| 👁️ Preview | Test UI before deploying |
| ⬆️ Import YAML | Load existing designs |
| ❓ Help | Docs & keyboard shortcuts |
| 🌙 Dark/Light | Toggle editor theme |
Color & Styling #
Full control over how everything looks. When you select a widget, the properties panel on the right gives you complete design control:
Per-Widget Control
- ✓ Background color (with color picker)
- ✓ Border color & width
- ✓ Text color & size
- ✓ Padding & margins
- ✓ Corner radius
- ✓ Opacity
Properties Panel - Color & Styling

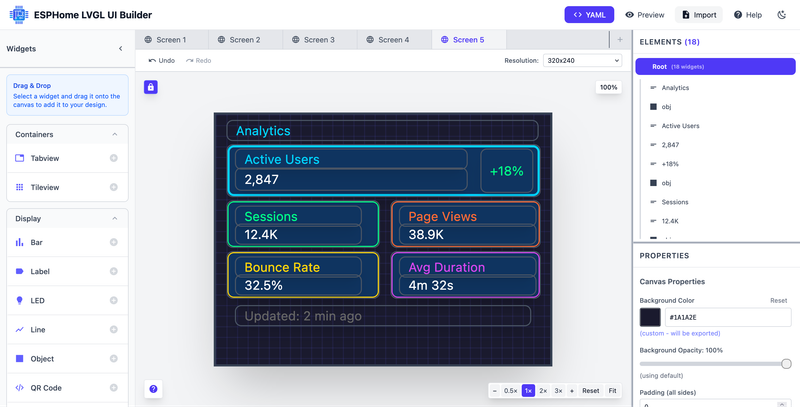
Example: Production-Ready YAML Export #
Here's what the designer generates. This example shows a complete Analytics Dashboard with styled cards, and real data displays:
Analytics Dashboard UI - What You See in the Designer
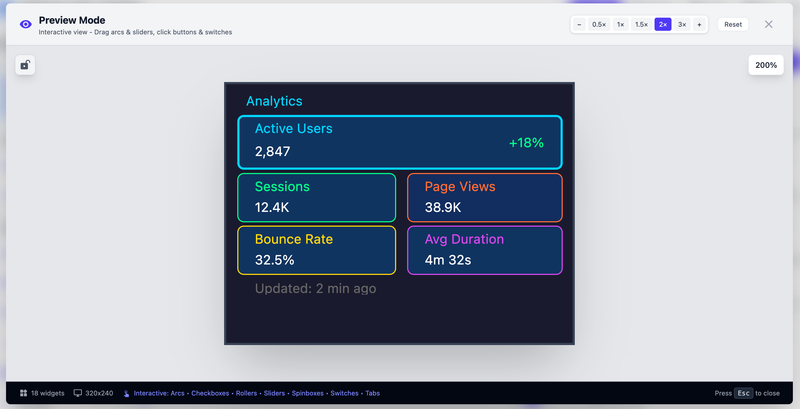
And this is what we see after uploading to CYD 2.8":
Analytics Dashboard UI - What You See in the Designer

Want to Try It Yourself? #
Copy the YAML below and import it directly into the designer to see this dashboard come to life. You can then modify colors, add widgets, or use it as a template for your own projects.
📋 Complete YAML Config Click to expand
lvgl:
  pages:
    - id: main_page
      bg_color: 0x1a1a2e
      widgets:
        - label:
            id: page_title
            x: 10
            y: 5
            width: 295
            height: 20
            text: "Analytics"
            text_color: 0x00d4ff

        - obj:
            id: card_active
            x: 10
            y: 28
            width: 297
            height: 50
            bg_color: 0x0f3460
            border_color: 0x00d4ff
            border_width: 2
            radius: 6

        - label:
            id: label_active
            x: 18
            y: 32
            width: 220
            height: 16
            text: "Active Users"
            text_color: 0x00d4ff

        - label:
            id: value_active
            x: 18
            y: 50
            width: 220
            height: 22
            text: "2,847"
            text_color: 0xffffff

        - label:
            id: trend_active
            x: 250
            y: 32
            width: 50
            height: 42
            text: "+18%"
            text_color: 0x00ff88

        - obj:
            id: card_sessions
            x: 10
            y: 81
            width: 145
            height: 45
            bg_color: 0x0f3460
            border_color: 0x00ff88
            border_width: 1
            radius: 6

        - label:
            id: label_sessions
            x: 18
            y: 86
            width: 120
            height: 14
            text: "Sessions"
            text_color: 0x00ff88

        - label:
            id: value_sessions
            x: 18
            y: 103
            width: 120
            height: 18
            text: "12.4K"
            text_color: 0xffffff

        - obj:
            id: card_views
            x: 165
            y: 81
            width: 142
            height: 45
            bg_color: 0x122d60
            border_color: 0xff6b35
            border_width: 1
            radius: 6

        - label:
            id: label_views
            x: 173
            y: 86
            width: 130
            height: 14
            text: "Page Views"
            text_color: 0xff6b35

        - label:
            id: value_views
            x: 173
            y: 103
            width: 130
            height: 18
            text: "38.9K"
            text_color: 0xffffff

        - obj:
            id: card_bounce
            x: 10
            y: 129
            width: 145
            height: 45
            bg_color: 0x0f3460
            border_color: 0xffd60a
            border_width: 1
            radius: 6

        - label:
            id: label_bounce
            x: 18
            y: 134
            width: 120
            height: 14
            text: "Bounce Rate"
            text_color: 0xffd60a

        - label:
            id: value_bounce
            x: 18
            y: 151
            width: 120
            height: 18
            text: "32.5%"
            text_color: 0xffffff

        - obj:
            id: card_duration
            x: 165
            y: 129
            width: 142
            height: 45
            bg_color: 0x0f3460
            border_color: 0xd946ef
            border_width: 1
            radius: 6

        - label:
            id: label_duration
            x: 173
            y: 134
            width: 130
            height: 14
            text: "Avg Duration"
            text_color: 0xd946ef

        - label:
            id: value_duration
            x: 173
            y: 151
            width: 130
            height: 18
            text: "4m 32s"
            text_color: 0xffffff

        - label:
            id: last_updated
            x: 18
            y: 180
            width: 280
            height: 12
            text: "Updated: 2 min ago"
            text_color: 0x666666
💡 Quick Tip: Copy this YAML, go to the designer, click "Import YAML", paste, and hit import. Boom-instant dashboard!
This is a very early release of the ESPHome LVGL UI Designer. I've tested it with a couple of displays I have - a 2.8" CYD with 320x240 resolution and an Elecrow HMI with 7" 800x600 resolution - and it works well on both.
That said, bugs might exist, especially with different display sizes or edge cases. If you find something broken or have feedback:
I will try to actively monitor the repository and would love to hear about any problems. I hope this project will be driven by community feedback, so your bug reports and feature requests will help make it better for everyone.
ESP32 Compatibility #
ESPHome 2023.x+ • Any ESP32 with display support • CYD boards • Custom setups • Works with your existing ESPHome automations and sensors
Browser Compatibility #
- Modern browsers with ES6+ support
- Chrome, Firefox, Safari, Edge (latest versions)
- Responsive design works across desktop, tablet, and mobile
- Lightweight with no heavy external dependencies
Pro Tips: Keyboard Shortcuts & Import/Export #
⌨️ Keyboard Shortcuts
- Ctrl+S - Save design
- Ctrl+Z - Undo
- Ctrl+Shift+Z - Redo
- Delete - Remove widget
- Arrow keys - Fine positioning
📥 YAML Import/Export
Not starting from scratch? Load existing ESPHome YAML into the designer.
- ✓ Import existing designs
- ✓ Modify visually
- ✓ Export updated config
- ✓ Changes preserved
Why This Beats Traditional Coding #
| Aspect | Visual Designer | Hand-Coded YAML |
|---|---|---|
| Learning Curve | 5 minutes | Weeks |
| Tweaking Layout | Drag & instant preview | Edit → Upload → Check → Repeat |
| Professional Results | Day 1 | After weeks of iteration |
| Time to Deploy | Hours | Days or weeks |
| Cost | Free | Your time |
Ready to Build? #
It's free. It's web-based. It's ready right now. No installation. No sign-ups. Just open and start designing.
Stop Writing Coordinates by Hand
Design beautiful LVGL UIs visually. Export production-ready YAML in minutes.
Your first UI, running on your ESP32, is just 5 minutes away.
Open Designer NowFAQ #
Do I need to know how to code?
Nope. Everything is visual. Drag widgets, adjust colors, export YAML. The tool handles all the graphics complexity.
Will it work with my existing ESPHome setup?
Yes. ESPHome 2023.x and later. Any ESP32 with a display. The generated YAML integrates seamlessly with your automations and sensors.
Can I edit the exported YAML manually?
Yes. The YAML is clean and readable. You can hand-edit it if needed, or import it back into the designer to modify visually.
What display resolutions are supported?
320×240 (most common for CYD boards), 480×320, and larger. You can customize your target resolution.
Is there a limit to how many widgets I can add?
No hard limit in the designer. The practical limit depends on your device's memory and display capabilities.
How do I get help if I get stuck?
GitHub issues, ESPHome community forums, and documentation. The project is actively maintained with responsive feedback.
Found a bug? Report it on GitHub. Your feedback helps make the tool better!
That's It #
Honestly, if you've been hand-coding LVGL coordinates into YAML, you know how painful it is. Try the designer for like 5 minutes. Drag a button around. Watch it update live. Export the YAML. Boom.
It's free. It's live right now. No signup, no hassle.
Open the designer and see what I mean.
Happy building. 🎨