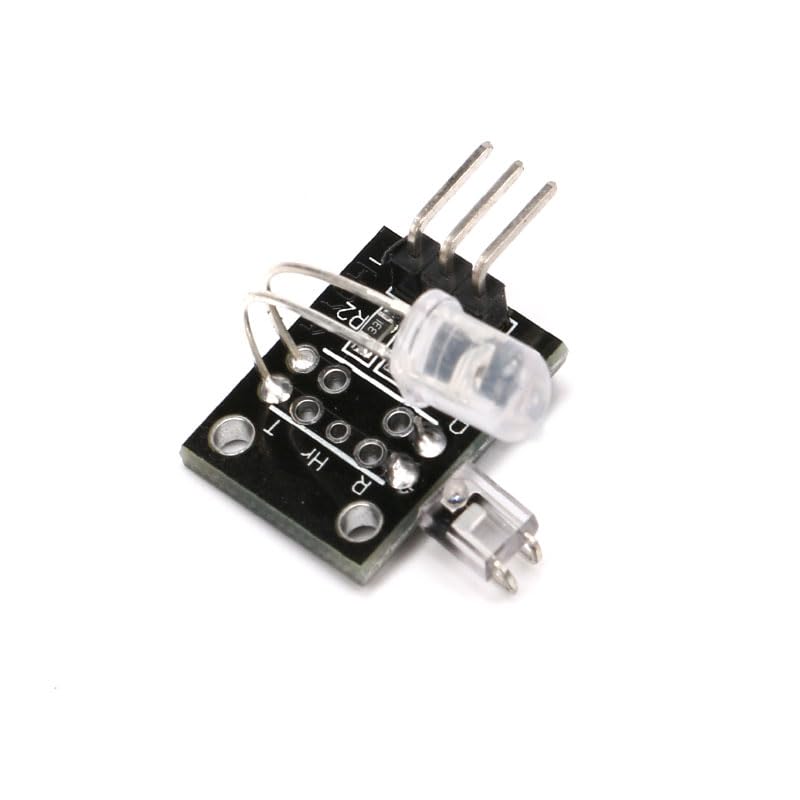
KY-039 Heartbeat Sensor Module

View on Amazon
Overview


About KY-039 Heartbeat Sensor Module
The KY-039 Heartbeat Sensor Module is designed to detect heartbeats by measuring the variations in blood flow through a finger. It utilizes an infrared (IR) LED and a phototransistor to sense these changes. When a finger is placed between the IR LED and the phototransistor, the module outputs an analog voltage corresponding to the detected heartbeat. This sensor is commonly used in health monitoring projects, fitness applications, and biofeedback systems.
Get Your KY-039
Starting from
$2 per unit


Prices are subject to change. We earn from qualifying purchases as an Amazon Associate.
KY-039 Specifications
Complete technical specification details for KY-039 Heartbeat Sensor Module
📊 Technical Parameters
KY-039 Pinout
The **KY-039** is a 3-pin optical heartbeat/pulse sensor module:
Visual Pinout Diagram

Pin Types
Quick Tips
**Interface**: Analog output (pulse waveform),❤️ **Sensor**: IR LED + phototransistor for optical pulse detection
**Detection**: Measures blood flow variations in fingertip,⚡ **Power**: 3.3V or 5V operation
**Output**: Analog voltage waveform corresponding to heartbeat,🎯 **Applications**: Heart rate monitors, fitness trackers, health monitoring, biofeedback systems
Pin Descriptions
| Pin Name | Type | Description | Notes |
|---|---|---|---|
1 VCC | Power | Power supply | 3.3V or 5V |
2 GND | Power | Ground connection | |
3 S (Signal) | Communication | Analog output | Voltage varies with pulse/heartbeat |
Wiring KY-039 to ESP32
To interface the **KY-039** with an **ESP32** for heartbeat detection:
Pin Connections
| KY-039 Pin | Connection | ESP32 Pin | Description |
|---|---|---|---|
1 VCC Required | 3.3V | Power supply | |
2 GND Required | GND | Ground | |
3 S (Signal) Required | GPIO34 | Analog input (ADC pin) |
**Placement**: Place finger between IR LED and phototransistor
**ADC Pins**: Use GPIO32-39 for analog input on ESP32
**Voltage**: 3.3V recommended for ESP32
**Signal Processing**: Requires filtering and peak detection in software
**Pressure**: Apply gentle, steady pressure for best readings
KY-039 Troubleshooting
Common issues and solutions to help you get your sensor working
Common Issues
Issue: The sensor does not output any signal when a finger is placed between the IR LED and phototransistor.
Solutions:
- Ensure the module is properly powered with the correct voltage (3.3V or 5V).
- Verify all connections are secure and correctly wired.
- Make sure the finger is positioned correctly between the IR LED and phototransistor.
- Check for ambient light interference and consider shielding the sensor from external light sources.
Issue: The sensor outputs fluctuating or noisy signals.
Solutions:
- Implement signal filtering in the software to smooth out the readings.
- Ensure the environment is free from electrical noise or interference.
- Check for any loose connections or faulty components on the module.
Debugging Tips
Use the Serial Monitor to check for error messages and verify the sensor's output. Add debug prints in your code to track the sensor's state.
Use a multimeter to verify voltage levels and check for continuity in your connections. Ensure the power supply is stable and within the sensor's requirements.
Additional Resources
KY-039 Programming Examples
Ready-to-use code examples for different platforms and frameworks
#define SENSOR_PIN A0

void setup() {
    Serial.begin(9600);
    pinMode(SENSOR_PIN, INPUT);
    Serial.println("KY-039 Heartbeat Sensor Test");
}

void loop() {
    int sensorValue = analogRead(SENSOR_PIN);
    Serial.println(sensorValue);
    delay(10);
}
This Arduino code initializes the analog pin connected to the KY-039 sensor. It reads the analog value corresponding to the heartbeat signal and prints it to the serial monitor every 10 milliseconds. Users can observe the serial plotter to visualize the heartbeat waveform.
#include <stdio.h>
#include "freertos/FreeRTOS.h"
#include "freertos/task.h"
#include "driver/adc.h"

#define SENSOR_CHANNEL ADC1_CHANNEL_6 // GPIO34

void app_main(void) {
    adc1_config_width(ADC_WIDTH_BIT_12);
    adc1_config_channel_atten(SENSOR_CHANNEL, ADC_ATTEN_DB_11);

    printf("KY-039 Heartbeat Sensor Test\n");
    while (1) {
        int raw = adc1_get_raw(SENSOR_CHANNEL);
        float voltage = raw * (3.3 / 4095.0);
        printf("Analog Voltage: %.2f V\n", voltage);
        vTaskDelay(pdMS_TO_TICKS(10));
    }
}
This ESP-IDF code configures GPIO34 as an analog input for the KY-039 heartbeat sensor. It reads the analog voltage corresponding to the heartbeat signal and prints it to the console every 10 milliseconds, allowing for real-time monitoring of the pulse waveform.
sensor:
  - platform: adc
    pin: GPIO34
    name: "KY-039 Heartbeat Sensor"
    update_interval: 10ms
    filters:
      - multiply: 3.3
      - lambda: |-
          return x * 1000;  // Convert to millivolts
This ESPHome configuration sets up the KY-039 sensor connected to GPIO34. It reads the analog value every 10 milliseconds, converts it to millivolts, and makes it available as a sensor named "KY-039 Heartbeat Sensor" for further processing or visualization.
platformio.ini
[env:esp32]
platform = espressif32
board = esp32dev
framework = arduino
main.cpp
#include <Arduino.h>

#define SENSOR_PIN 34

void setup() {
    Serial.begin(115200);
    Serial.println("KY-039 Heartbeat Sensor Test");
}

void loop() {
    int sensorValue = analogRead(SENSOR_PIN);
    float voltage = sensorValue * (3.3 / 4095.0) * 1000; // Convert to millivolts
    Serial.printf("Analog Voltage: %.2f mV\n", voltage);
    delay(10);
}
This PlatformIO code sets up GPIO34 as an analog input for the KY-039 heartbeat sensor. It continuously reads the sensor value, converts it to millivolts, and prints it to the serial monitor every 10 milliseconds to capture the heartbeat waveform.
import machine
import time

SENSOR_PIN = machine.ADC(machine.Pin(34))
SENSOR_PIN.atten(machine.ADC.ATTN_11DB)

while True:
    sensor_value = SENSOR_PIN.read()
    voltage = (sensor_value / 4095) * 3300  # Convert to millivolts
    print("Analog Voltage:", voltage, "mV")
    time.sleep(0.01)
This MicroPython script configures GPIO34 as an ADC input for the KY-039 heartbeat sensor. It continuously reads the sensor value, converts it to millivolts, and prints the voltage every 10 milliseconds for real-time heartbeat monitoring.
Wrapping Up KY-039
The ESP32 KY-039 Heartbeat Sensor Module is a powerful KY-0xx module sensor that offers excellent performance and reliability. With support for multiple development platforms including Arduino, ESP-IDF, ESPHome, PlatformIO, and MicroPython, it's a versatile choice for your IoT projects.
Best Practices
For optimal performance, ensure proper wiring and follow the recommended configuration for your chosen development platform.
Safety First
Always verify power supply requirements and pin connections before powering up your project to avoid potential damage.
Ready to Start Building?
Now that you have all the information you need, it's time to integrate the KY-039 into your ESP32 project and bring your ideas to life!
Explore Alternative Sensors
Looking for alternatives to the KY-039? Check out these similar sensors that might fit your project needs.

KY-036 Metal Touch Sensor Module
The KY-036 is a metal touch sensor module that detects touch via its metal tip, offering both analog and digital outputs. With adjustable...

KY-018 Photoresistor Module
The KY-018 is a photoresistor module that detects ambient light levels. It outputs an analog signal corresponding to the light intensity,...

KY-001 Temperature Sensor Module
The KY-001 is a temperature sensor module that operates within a wide temperature range. It supports 1-Wire communication and is based on...