

Reflashing the Guan Sen WiFi Irrigation Controller with ESPHome
How I reflashed the Guan Sen 2-pump WiFi irrigation kit (Tuya CB3S / BK7231N) with ESPHome via LibreTiny - including the GPIO map, the LibreTiny interrupt quirk, and an auto-off safety timer that actually saves your greenhouse.
Last summer I was on holiday, thousands of kilometres from home, when I tapped "Pump A: ON" in the Tuya app to give the greenhouse a quick top-up. A few minutes later the WiFi at home dropped.
The pumps were still on.
I had no way to turn them off. No way to see what was happening. The reservoir was maybe half full, the day was hot and dry, the pumps were inside a wooden greenhouse, and the only thought running through my head for the next several hours was the pumps are going to run dry, overheat, and set the place on fire.
They didn't. The reservoir held out. But I came home with a very clear feeling that a "smart" irrigation controller you can't turn off remotely is not actually smart - it's a relay box with extra steps.
That is why I reflashed that controller - a cheap Guan Sen 2-pump WiFi irrigation kit - with ESPHome, gave it a proper auto-off safety timer, and got it talking directly to Home Assistant over the local network. No more Tuya cloud. No more vacation panic.
The Device #
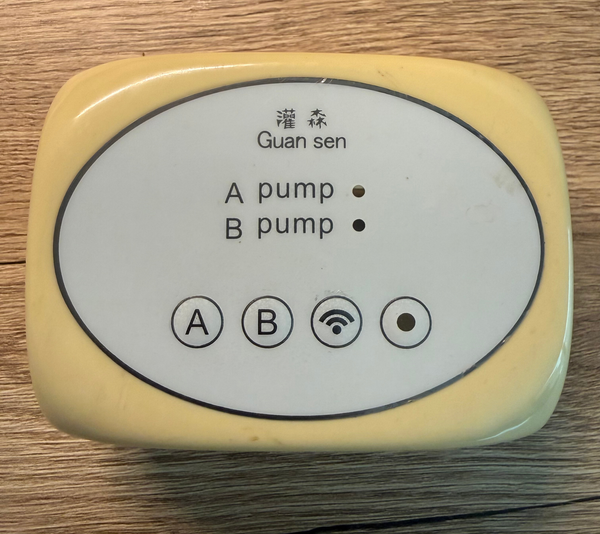
The kit in question is sold on AliExpress as the "WiFi Smart Garden Irrigation Controller Plant Automatic Drip Irrigation System Kit" under the Guan Sen brand. It's roughly $30, comes with two small 12V pumps, silicone tubing, and a plastic controller box with two physical buttons and a WiFi LED. Out of the box it pairs with the Tuya / Smart Life app and that's about it.
Mechanically it's fine. Two cheap peristaltic-style pumps, a power adapter, and enough tubing and barbed splitters to feed a few pots. The hardware is the part you actually want.
The software is the part you want to throw away.
Why Tuya Had To Go #
The stock firmware does the minimum: two on/off switches, a basic schedule, and a "share device" button. Everything goes through Tuya's cloud. If Tuya's cloud is down, your watering breaks. If your internet is down - which is what happened to me - you cannot turn the pumps off. And there is no failsafe: if you turn the pumps on and then lose connection, they will run until the reservoir is empty.
For a $30 toy that lives next to a power outlet, that's fine. For something controlling pumps that move water and run unattended? Not fine.
What I wanted instead:
- Local control only - Home Assistant on the LAN, no cloud, works when the internet is down.
- An auto-off timer that the device enforces itself - so even if WiFi drops, the pumps cannot run forever.
- Runtime tracking - I want to know, after the fact, how long each pump actually ran. If the auto-off kicked in I want to see that in the history.
ESPHome gives you all three for free, once you can get it on the device.
First Attempt: tuya-cloudcutter (Didn't Work) #
Before opening the box, I tried the polite option. tuya-cloudcutter exploits a vulnerability in some Tuya firmware versions to flash custom firmware over the air - no soldering required. It's the gold standard for de-Tuya-ing a device, when it works.
I pulled up the device in the Tuya developer app to check the firmware version. v1.0.2.
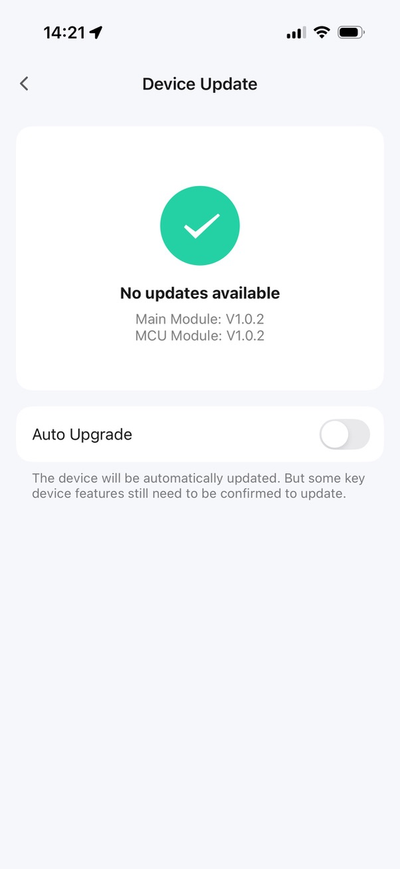
tuya-cloudcutter has a long list of supported (chip, firmware) pairs. I tried several profile combinations matching the CB3S / BK7231N chipset. Every single one failed - mostly stuck on "waiting for device to enter exploit mode", a couple aborted partway through. After half an evening of restarting the device and re-pairing it with the Tuya app between attempts, I gave up.
Lesson, if you're trying this on a more recent firmware version: try cloudcutter first, but don't burn a week on it. If it doesn't take in an hour or two, the firmware is probably patched, and the serial route is faster than chasing exploits.
Plan B: Serial Reflash via LibreTiny #
The serial route is more invasive - you have to open the device and solder onto the WiFi module's debug pins - but once you're set up it's a 30-second flash.
The framework that makes this possible is LibreTiny. LibreTiny is an Arduino/PlatformIO core for the BK72xx and RTL8710 family of chips used in pretty much every cheap Tuya WiFi module. It integrates with ESPHome via the libretiny component, so you can write a normal ESPHome YAML targeting a bk72xx: board and it just compiles.
Opening the Box #
Four screws, no clips, nothing glued shut. The whole top comes off and the pumps and circuitry are right there.
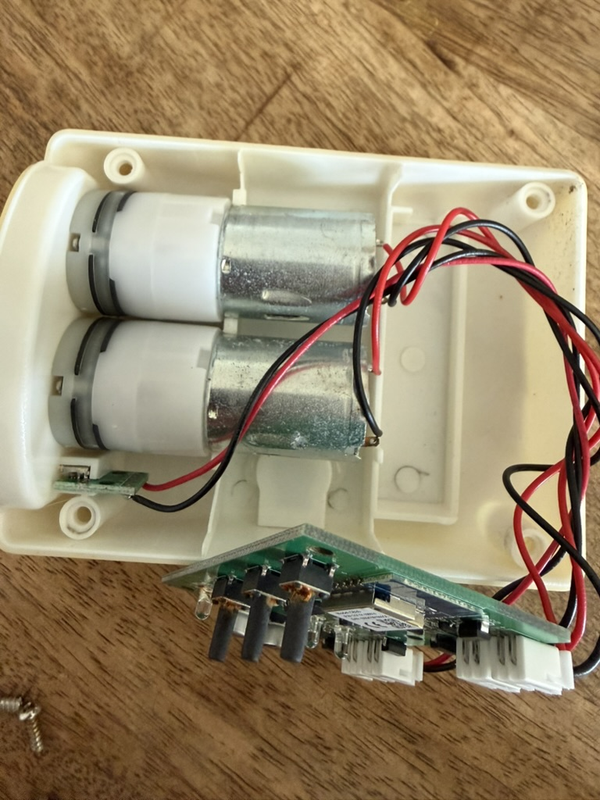
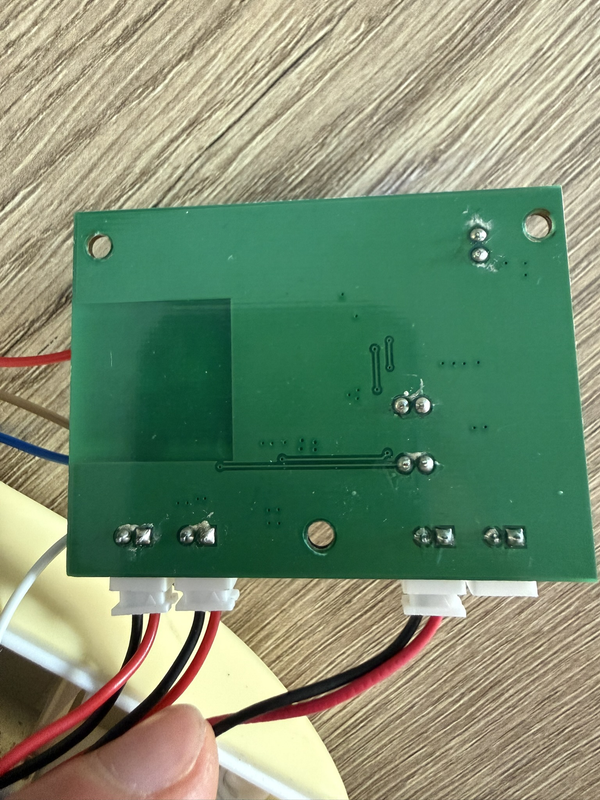
The main PCB lives at the back of the case. Two relay-driven pump outputs, a few buttons, and - the part we care about - a Tuya WiFi module soldered onto the board.
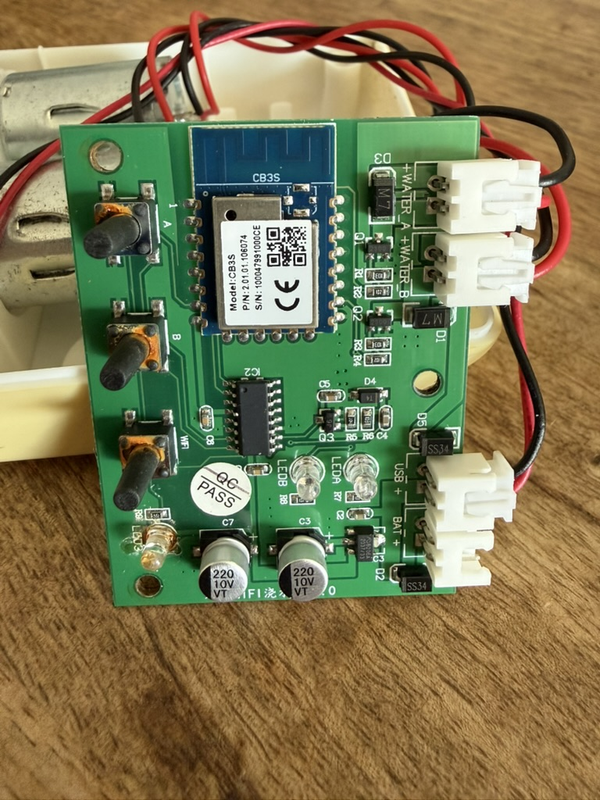
The silkscreen on the PCB itself reads 双系WIFI浇水器 V1.0 - "Dual WiFi Watering Controller V1.0". The WiFi module is a Tuya CB3S, which is a BK7231N running at 120 MHz with 2 MB of flash. Perfect candidate for LibreTiny.
Finding the Right Pins on the CB3S #
LibreTiny has a handy quick-flashing guide for the CB3S. You need four pins to flash, plus one to reset the chip into bootloader mode:
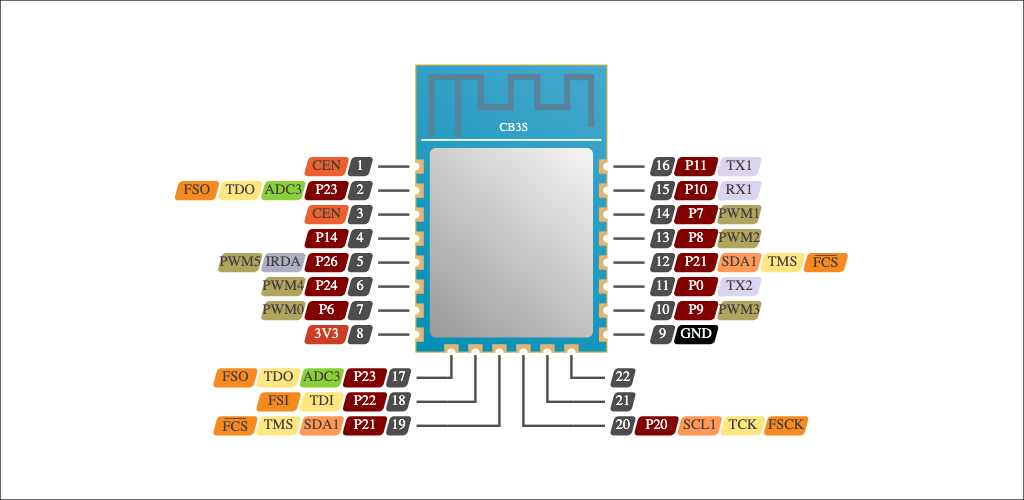
- P10 (RX1) - goes to TX of your USB-serial adapter
- P11 (TX1) - goes to RX of your USB-serial adapter
- GND - common ground
- VCC - 3.3 V power
- CEN - pulled briefly to GND to reset the chip into boot mode
One thing I learned the hard way: do not power the CB3S from your USB-serial adapter's 3.3 V rail. Most cheap CH340 / FTDI dongles can't supply enough current and the chip will brown out the moment WiFi powers up. Use a separate 3.3 V bench supply (or a known-good regulator) for VCC, and only share ground with the serial adapter.
Soldering #
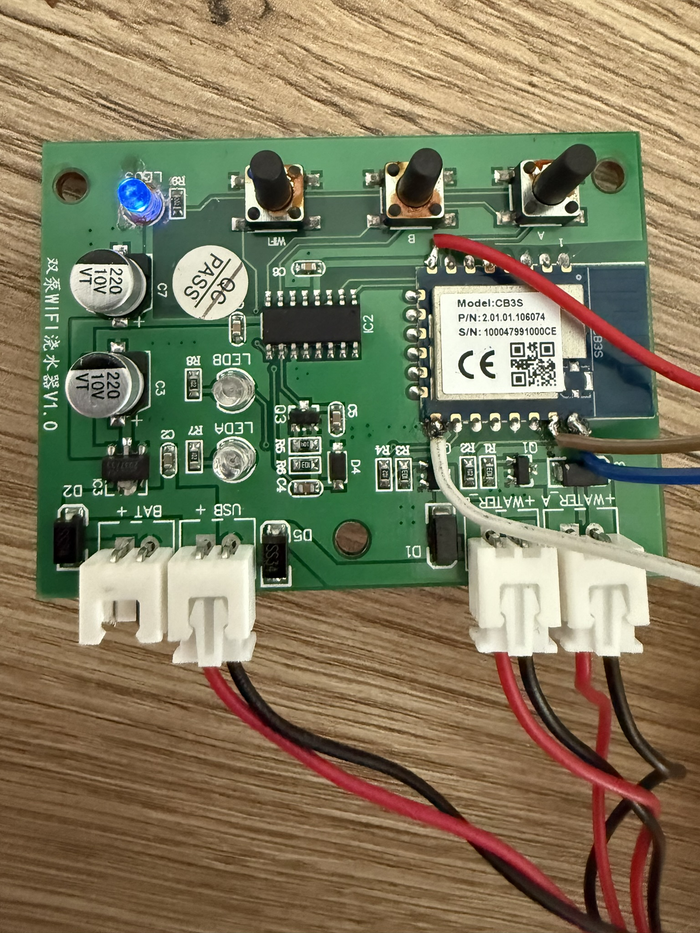
Four magnet-wire leads onto the module's edge pads. It's fiddlier than it looks - the pitch is fine and you've got pumps and a relay block right next to where you need to work - but a normal iron with a fine tip and some flux gets it done.
The Flashing Rig #
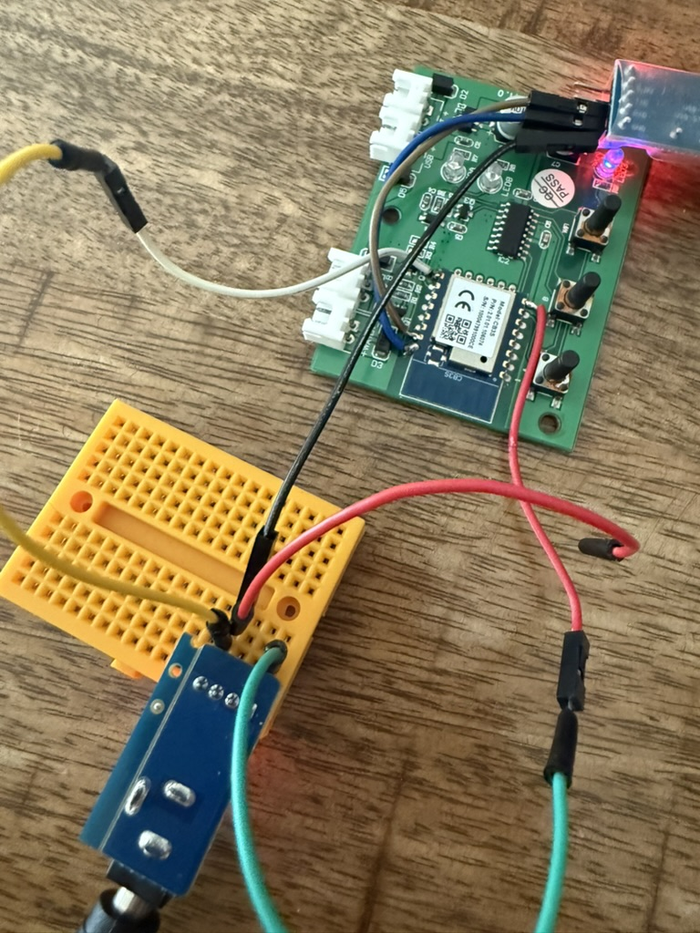
I used a USB-OTG cable from my phone to the USB-serial adapter (any laptop USB-A port works just as well), and a separate USB-C bench supply at 3.3 V for VCC.
With the wiring in place, the flash itself is a two-step routine:
1. Build a minimal firmware in ESPHome. This is the bare-minimum YAML - just enough to get on WiFi and pick up an OTA after the first flash:
esphome:
  name: pumps

bk72xx:
  board: cb3s

logger:

api:
  encryption:
    key: !secret api_encryption_key

ota:
  - platform: esphome
    password: !secret ota_password

wifi:
  ssid: !secret wifi_ssid
  password: !secret wifi_password

  ap:
    ssid: "Pumps Fallback Hotspot"
    password: !secret ap_password

captive_portal:
Compile this in the ESPHome dashboard. It will produce a firmware.bin you can find in .esphome/build/pumps/.pioenvs/pumps/.
2. Flash with ltchiptool.
cd .esphome/build/pumps/.pioenvs/pumps
ltchiptool flash write firmware.bin
ltchiptool will ask you to reset the module - that's what the CEN-to-GND tap is for. Hold CEN briefly to ground, release, and the chip drops into bootloader mode. The flash takes about 30 seconds. The first time the progress bar moved across without erroring I might have done a small fist-pump in my office.
After the flash completes, disconnect everything, put the board back in the case, and the device will boot into ESPHome and connect to your WiFi.
Mapping the GPIOs #
Now the fun part: the device is on the network, but none of the buttons or pumps work yet, because the minimal firmware doesn't know what's wired where. Time to map the GPIOs.
I poked each pin with a temporary output and binary_sensor in YAML until things lit up. After about an hour:
| Pin | Function | Direction |
|---|---|---|
| P6 | WiFi status LED | Output (inverted) |
| P9 | Pump B relay | Output |
| P14 | Pump A relay | Output |
| P24 | Button B (Pump B) | Input, active-low, pullup |
| P26 | Button A (Pump A) | Input, active-low, pullup |
A few things worth flagging:
- The front-panel "WiFi" button is NOT wired to the CB3S. There's a small secondary IC under a QC-PASS sticker near the centre of the board that handles it independently. ESPHome can't read it. You lose that button when you reflash - not a big deal because everything is now exposed to Home Assistant anyway.
- Do NOT touch P20 or P21. They're the JTAG / SWD pins on the BK7231N (TCK and TMS). I tried enabling them as GPIO during the mapping and the chip stopped booting. Recovering it required another serial reflash from the bootloader. If LibreTiny tries to use them for anything in your YAML, comment them out and ask elsewhere first.
Replicating the Stock Behaviour #
With the GPIO map in hand, the next firmware reproduces the original UX one-to-one - two pumps, two buttons, the WiFi LED - but now everything is also visible in Home Assistant over the local API:
status_led:
  pin:
    number: P6

switch:
  - platform: gpio
    name: "Pump A"
    id: pump_a
    pin: P14
    icon: "mdi:water-pump"
    restore_mode: ALWAYS_OFF

  - platform: gpio
    name: "Pump B"
    id: pump_b
    pin: P9
    icon: "mdi:water-pump"
    restore_mode: ALWAYS_OFF

binary_sensor:
  - platform: gpio
    name: "Button A"
    id: btn_a
    pin:
      number: P26
      inverted: true
      mode:
        input: true
        pullup: true
    use_interrupt: false
    filters:
      - delayed_on: 50ms
      - delayed_off: 50ms
    on_multi_click:
      - timing:
          - ON for at most 1s
          - OFF for at least 0.3s
        then:
          - switch.toggle: pump_a
      - timing:
          - ON for at least 5s
        then:
          - button.press: restart_btn

  # Button B is identical, swap P26→P24 and pump_a→pump_b
A short press toggles the corresponding pump. Hold either button for 5 seconds and the device restarts. The WiFi LED is solid when connected, blinking when reconnecting - same as stock.
restore_mode: ALWAYS_OFF is the small but important detail. The stock firmware would happily restore the previous pump state after a reboot, which is exactly what you don't want if the device just power-cycled because the WiFi router did. Boot with pumps off, always.
The One LibreTiny Quirk That Will Eat An Afternoon #
There is a known bug in LibreTiny 2025.7.x where GPIO edge interrupts are unreliable on the BK72xx chips. If you define a binary_sensor without use_interrupt: false, the button presses will register sometimes, miss other times, and you will spend hours convinced you've got a bad solder joint.
use_interrupt: false forces polling, which works perfectly. It's effectively the default on this chip family now, but make it explicit in your YAML so the next person to read it knows why. The 50 ms delayed_on / delayed_off filters debounce the polled signal.
Adding the Safety That Was Missing #
This is the part the original firmware never had - and the entire reason I went through this exercise.
Two things to add:
- An auto-off timer, per pump, enforced locally on the device. If a pump has been on for more than N minutes (default 10 in my YAML), the device turns it off, no questions asked, no network required.
- A runtime sensor, per pump, so I can see in Home Assistant how long the pump actually ran on its last cycle. If the auto-off fired, that shows up clearly in the history.
The runtime tracking uses two globals to store the millis-since-start when each pump turns on, then computes the runtime and publishes it when the pump turns off (whether from a user toggle, the button, or the auto-off):
substitutions:
  auto_off_minutes: "10"

globals:
  - id: pump_a_start
    type: unsigned long
    restore_value: no
    initial_value: '0'
  - id: pump_b_start
    type: unsigned long
    restore_value: no
    initial_value: '0'

switch:
  - platform: gpio
    name: "Pump A"
    id: pump_a
    pin: P14
    icon: "mdi:water-pump"
    restore_mode: ALWAYS_OFF
    on_turn_on:
      then:
        - lambda: 'id(pump_a_start) = millis();'
        - script.execute: pump_a_auto_off
    on_turn_off:
      then:
        - script.stop: pump_a_auto_off
        - lambda: |-
            if (id(pump_a_start) > 0) {
              float runtime = (millis() - id(pump_a_start)) / 60000.0;
              id(pump_a_runtime).publish_state(runtime);
              id(pump_a_start) = 0;
            }

script:
  - id: pump_a_auto_off
    mode: restart
    then:
      - delay: !lambda return ${auto_off_minutes} * 60 * 1000;
      - switch.turn_off: pump_a
      - logger.log: "Pump A auto-off: ${auto_off_minutes} min max runtime reached"

sensor:
  - platform: template
    name: "Pump A Last Runtime"
    id: pump_a_runtime
    unit_of_measurement: "min"
    accuracy_decimals: 1
    icon: "mdi:timer-outline"
Pump B mirrors this exactly with the relevant IDs swapped.
A few details that matter:
mode: restarton the script means that if the pump is somehow turned on twice in a row (a user toggle while the auto-off was mid-countdown), the timer restarts from zero instead of layering two delays on top of each other.restore_value: noon the globals is deliberate. After a reboot, the start time is meaningless - we want a clean slate, not a leftover millis value from before the power cycle.- The auto-off is enforced locally on the BK7231N, not in Home Assistant. That's the whole point - the safety has to work especially when the network is down. Home Assistant automations can't help you if your router just rebooted.
Plug auto_off_minutes into your YAML at whatever value matches your reservoir. Mine is set at 10 minutes - the reservoir is sized so 10 minutes of run-time empties it harmlessly. If yours is different, change one substitution and reflash via OTA.
What I Have Now #
The same $30 plastic box, but:
- It runs purely on my LAN. The Tuya cloud could shut down tomorrow and the device wouldn't care.
- It's a first-class Home Assistant device with two pump switches, two button sensors, runtime sensors, WiFi info, and the usual ESPHome diagnostics.
- If WiFi drops mid-cycle, the pumps will automatically turn themselves off after 10 minutes. Worst case is a single 10-minute over-water, not a burned-out pump or a flooded greenhouse.
- I have a per-pump runtime history. If something looks off, I can see exactly how long each cycle ran.
And - the bit I didn't expect to enjoy - the physical buttons still work exactly like they used to. Short press toggles the pump, hold for 5 s restarts the device. The whole thing feels like it left the factory this way.
The Repo #
All three YAMLs (minimal flashing config, stock-behaviour replica, and the safety build) are on GitHub here:
github.com/ESPboards/esphome-guan-sen-pumps
The repo has the full GPIO map, the LibreTiny quirks notes, and the secrets template. If you're on the same device, you should be able to clone, drop in your WiFi credentials, build, and flash.
Credits #
- LibreTiny - the framework that makes BK72xx-on-ESPHome possible at all. Tremendous work by the maintainers.
- tuya-cloudcutter - try this first; if your firmware version is supported it's far less invasive than the serial route. It just didn't happen to work on this specific v1.0.2 build.
- ESPHome and the libretiny ESPHome component - the rest of the iceberg under the YAML.
If you went through this same exercise on a different Tuya-flavoured irrigation device, I'd genuinely love to hear what GPIO map you ended up with - there's a real shortage of public pin maps for these cheap controllers. Tell me on the repo issues and I'll add it to the README.
The greenhouse, by the way, is fine.