
Secure MQTT Broker in Raspberry Docker Containers with HASS
Run a secure local MQTT Broker with TLS and certificate authentication in Docker containers. Integrate MQTT devices with the Home Assistant on Raspberry Pi
Today we are going to setup and run a local MQTT Broker with Mosquitto in Docker containers. We are going to make our MQTT connections secure by setting up TLS and certificate authentication for clients. We are then going to integrate our secure MQTT broker with a Home Assistant instance running on Raspberry Pi.
What is MQTT? #
MQTT, which stands for Message Queuing Telemetry Transport, is a lightweight and efficient messaging protocol designed for communication in constrained environments, often within the context of the Internet of Things, where devices, such as microcontrollers does not have much processing power or memory.
MQTT protocol follows a publish-subscribe model, enabling devices to send messages and subscribe to topics of interest. Let's say you have a smart thermostat (the publisher) sending temperature updates to a topic called "Home/LivingRoom/Temp". Now, your smart display (the subscriber) tunes in to that specific topic, waiting for the latest temperature news.
In a way, it's like a radio station. The station (topic) broadcasts, and anyone with a matching radio (subscriber) can catch the signal. Just that we do not want to broadcast our data to anyone, therefore we authenticate the subscribers. But we will talk about this later in this post.
MQTT Broker and Eclipse Mosquitto #
So, continuing with the analogy of a radio station, imagine we have not just one smart thermostat, but many MQTT devices (publishers) that are sending its information, let it be temperature, humidity, light brightness or anything else. All of these devices are trying to play their "song" (send their data), and they might want to do it at the same time.
If we just let every device "play their song", it will be a chaos. We need someone that would tell who can play when. And that is where the MQTT Broker comes into play.
MQTT Broker is a centralized server that takes on the responsibility of receiving, managing, and distributing messages between devices that communicate using the MQTT (Message Queuing Telemetry Transport) protocol.
Eclipse Mosquitto #
Mosquitto is a specific implementation of an MQTT broker, and it's one of the most popular open-source options out there. Developed by the Eclipse Foundation, Mosquitto serves as a reliable and lightweight broker that facilitates MQTT communication.
And well, open-source and most popular? That says it all, we will be using Mosquitto as our MQTT Broker.
Why run Mosquitto in a Docker Container? #
According to Home Assistant MQTT documentation, "The recommended setup method is to use the Mosquitto MQTT broker add-on.". But since our Home Assistant is on the Docker Container, we do not have an option for Home Assistant Plugins, as described in the Home Assistant installation.
Moreover, since we already have a Home Assistance instance running Docker Container, as described in the previous post, why not just spin-up another container besides?..
Setting up and running Mosquitto Broker #
To setup and run our local Mosquitto Broker in a Docker container, we will need to configure the Mosquitto Broker and write a little docker-compose file. Let's jump right into it.
Connect to Raspberry Pi #
First, ssh into raspberry, the same way as described in "Home Assistant in Docker Containers on Raspberry Pi" post. Make sure to replace the IP with your Raspberry's local ip address.
ssh rpi@192.168.1.10Folder and file structure #
Now, let's create the folders and empty files needed.
Create a root folder for the Mosquitto broker, we are going to call it "mosquitto" and switch to it:
mkdir mosquitto && cd mosquittoNext, create a config folder and config file:
mkdir config && touch config/mosquitto.confFinally, create an empty docker-compose.yml file:
touch docker-compose.ymlThe final folder and file structure should be like this:
- mosquitto
- config
- mosquitto.conf
- docker-compose.yml
- config
Mosquitto Config #
Even though minimal, we still need to create a config for Mosquitto Broker. Open the config/mosquitto.conf file for editing and fill in the following:
allow_anonymous true
persistence false
listener 1883
allow_anonymous: This configuration option in Mosquitto controls whether anonymous clients (clients without a username) are allowed to connect. Setting to true will allow anonymous users, which is perfect for the first test.
Disables persistence (persistence false): This means that Mosquitto won't store any persistent data between broker restarts.
Sets up a listener on the default MQTT port (1883) using listener 1883. Clients can connect to the broker on this port.
Docker compose #
The Docker Container configuration (docker compose) is pretty minimal as well. Open the docker-compose.yml file for editing and fill in the following:
version: "3.7"
services:
  mqtt5:
    image: eclipse-mosquitto
    container_name: mqtt5
    volumes:
      - ./config:/mosquitto/config/
    ports:
      - '1883:1883'
    networks:
      - default
    restart: unless-stopped
This will use an eclipse-mosquitto docker image for the container. We will name the container "mqtt5". Volumes is an important option, that will mount the config/ folder we created earlier on the docker container, meaning docker container will be able to access the config/ folder. Then we allow 1883 port and setup a default network interface.
Run Mosquitto Docker Container #
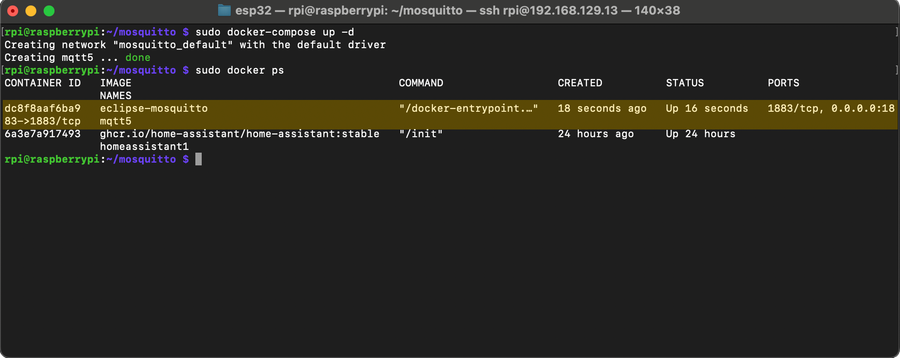
Finally we are ready to run our Mosquitto MQTT Docker Container. Before we begin, gain root permissions by typing sudo su. Run the following command to start the Docker container:
docker-compose up -dWait until it finished, and run:
docker psYou should see "Up xx seconds" under STATUS column. If you see something else, like "Restarting", there is an issue.
For troubleshooting, you can check the Mosquitto logs by running:
docker logs mqtt5Test Mosquitto Broker #
To test the Mosquitto Broker, in one terminal window we will run an MQTT Subscriber, which will Subscribe to a provided topic in one terminal. In another terminal window we will run an MQTT Publisher, which will publish MQTT messages.
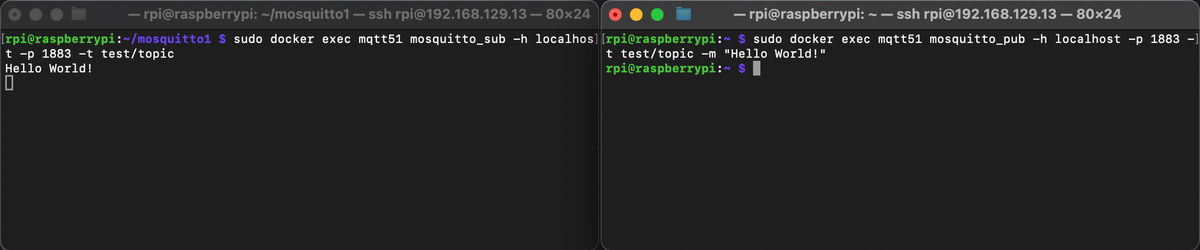
In the terminal window run the Mosquitto Subscriber command:
docker exec mqtt5 mosquitto_sub -h localhost -p 1883 -t test/topicYou should see the cursor move to next line and stay there. In might seem that it's stuck, but it is not. It actually means the MQTT Subscriber is waiting for messages.
Keep this terminal window open and open a new terminal. Ssh to Raspberry and run the Mosquitto Publisher command:
sudo docker exec mqtt5 mosquitto_pub -h localhost -p 1883 -t test/topic -m "Hello World!"On the left side, you can see an MQTT Subscriber that received a message from the MQTT Publisher that you can see on the right-side terminal.
Securing the MQTT Broker #
That is great! We have the Mosquitto MQTT Broker working! But there are a few things, we need to solve... First, we allow anyone to publish MQTT messages without the authentication, which is already a potential security thread. Second, our messages are traveling through air in plain text (unencrypted) and could easily be intercepted. We are going to fix both of these issues.
Before you continue, make sure to stop the previous MQTT Broker container:
sudo docker stop mqtt5Generate keys #
To secure our MQTT connections, we will use a TLS encryption and certificate authentication. But for this we will need to generate our own Certificate Authority (CA) certificate, as well as server and client public and private keys.
Go to mosquitto/config/ folder:
cd config/Create a new file. We will write a bash script there to generate the required certificates and keys:
touch generate-keys.shOpen the file and fill in the following:
#!/bin/bash

IP_ADDR="localhost"
INFO_CA="/C=BE/ST=Brussels/L=Brussels/O=espboards/OU=CA/CN=$IP_ADDR"
INFO_SERVER="/C=BE/ST=Brussels/L=Brussels/O=espboards/OU=Server/CN=$IP_ADDR"
INFO_CLIENT="/C=BE/ST=Brussels/L=Brussels/O=espboards/OU=Client/CN=$IP_ADDR"

function gen_CA () {
   openssl req -x509 -nodes -sha256 -newkey rsa:2048 -subj "$INFO_CA"  -days 365 -keyout ca.key -out ca.crt
}

function gen_server () {
   openssl req -nodes -sha256 -new -subj "$INFO_SERVER" -keyout server.key -out server.csr
   openssl x509 -req -sha256 -in server.csr -CA ca.crt -CAkey ca.key -CAcreateserial -out server.crt -days 365
}

function gen_client () {
   openssl req -new -nodes -sha256 -subj "$INFO_CLIENT" -out client.csr -keyout client.key
   openssl x509 -req -sha256 -in client.csr -CA ca.crt -CAkey ca.key -CAcreateserial -out client.crt -days 365
}

gen_CA
gen_server
gen_client
Save the file and grant execute permissions:
chmod +x generate-keys.shExecute the script:
./generate-keysThis will generate the required certificates and keys. You should get a list of these files:
- ca.crt
- ca.key
- ca.srl
- client.crt
- client.csr
- client.key
- server.crt
- server.csr
- server.key
Use the keys in Mosquitto #
Edit mosquitto.conf
allow_anonymous false
listener 8883

cafile /mosquitto/config/certs/ca.crt
certfile /mosquitto/config/certs/server.crt
keyfile /mosquitto/config/certs/server.key

require_certificate true
use_identity_as_username true
Change Ports in Docker Compose #
Open the docker-compose.yml for editing and change the port mapping to 8883:8883:
version: "3.7"
services:
  mqtt5:
    image: eclipse-mosquitto
    container_name: mqtt5
    volumes:
      - ./config:/mosquitto/config/
    ports:
      - '8883:8883'
    networks:
      - default
    restart: unless-stopped
Run Secure Mosquito MQTT Broker #
Run docker-compose up command, to start the secure Mosquitto MQTT Broker:
docker-compose up -dCheck if the container is running with docker ps. If you see the mqtt5 container with status "Up xx minutes", we have a success!
Testing the secure connection with MQTT Broker #
In the same way, as we have tested before, let's test the secure MQTT messages this time. In one terminal run the Mosquitto Subscriber, but this time provide the client certificate, client key and CA certificate. Remember that the paths should be paths inside docker, not your local machine. Also make sure to use the updated port (8883):
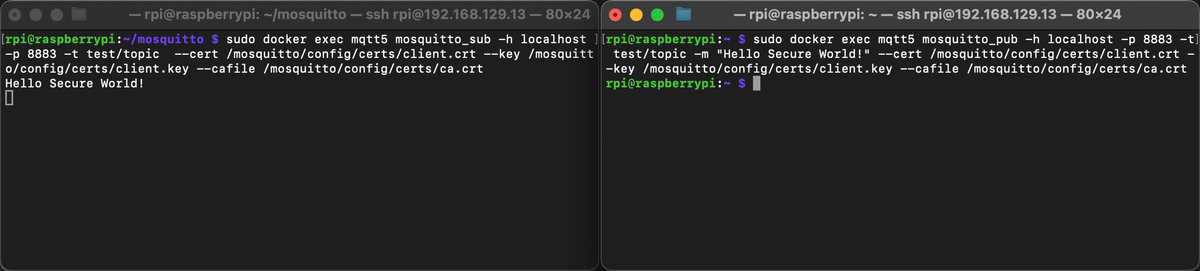
docker exec mqtt5 mosquitto_sub -h localhost -p 8883 -t test/topic --cert /mosquitto/config/certs/client.crt --key /mosquitto/config/certs/client.key --cafile /mosquitto/config/certs/ca.crtIn another terminal window run the Mosquitto Publisher. In the same way as for the Subscriber, provide the certificates and keys:
docker exec mqtt5 mosquitto_pub -h localhost -p 8883 -t test/topic -m "Hello Secure World!" --cert /mosquitto/config/certs/client.crt --key /mosquitto/config/certs/client.key --cafile /mosquitto/config/certs/ca.crtIn the image below, on the left side you see a terminal with the Mosquitto Subscribe, on the right side there is a terminal with the Mosquitto Publish. The right side terminal (Publisher) sent a secure MQTT message to the left side terminal (Subscriber).
Integrating local MQTT broker with Home Assistant #
Copy Certificates to your computer #
In your host machine (your laptop, for example), create a folder where you want to temporarily store the certificates and copy the certificates from Raspberry Pi, using the following command:
scp -r rpi@192.168.129.13:~/mosquitto/config/certs/ certs/Home Assistant Advanced Mode #
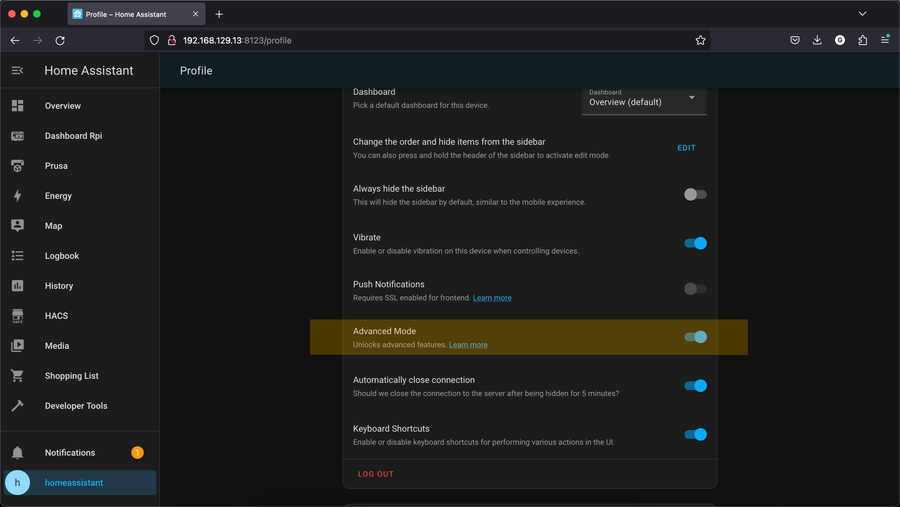
To be able to setup the integration with a secure MQTT Broker, we will need an advanced mode in Home Assistant. In Home Assistant's WEB UI, go to your user's profile and enable the "Advanced Mode"
Home Assistant MQTT Broker Integration #
- In Home Assitant's WEB UI, go to Settings -> Devices & Services
- Click "Add Integration" and search for "MQTT"
- Select "MQTT"
- In the dialog window, enter the following information
| Input | Value |
|---|---|
| Broker | localhost |
| Port | 8883 |
| Use a client certificate | Yes |
| Upload Client Certificate File | client.crt |
| Upload Private Key File | client.key |
| Broker Certificate Validation | Custom |
| Upload Custom CA Certificate File | ca.crt |
- Click Next, if the provided information is correct, you should see a success message.
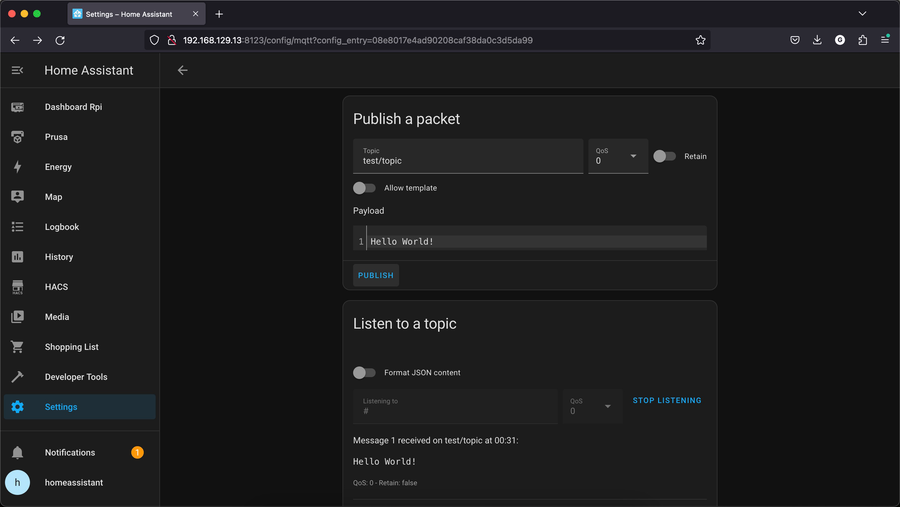
Test Home Assistant Integration with Mosquitto MQTT Broker #
Again, in Settings -> Devices & Services, find the "MQTT" service, under "Configured" devices and open it. Next to "localhost" integration entity, click "Configure".
In the opened window, under "Listen to a topic" enter a topic "test/topic" and click "Start Listening".
In the section "Publish a packet", enter the same topic "test/topic" enter a payload and click "Publish". You should see the contents of the payload being received in the "Listen to a topic" section.
Tip: You can subscribe to ALL topics, by typing '#' as a topic in the listen (subscribe).
Cleanup #
Since the client keys and other files on the server in the mosquitto/config/certs are leftovers from generating the key pairs, we want to remove them on the server (Raspberry Pi). In Raspberry Pi, open mosquito/config/certs/ folder and remove everything except these:
- ca.crt
- server.crt
- server.key
What's next? #
We have only tested the MQTT messages with a mock MQTT Subscriber and a mock MQTT Publisher. To actually make a use of our local MQTT Broker, the next logical step is to integrate an actual MQTT device, such as temperature sensor.
Conclusion #
So we have setup the MQTT Broker with Mosquitto on Docker Container and integrated it with the Home Assistant. But going through the steps achieved, we have firstly set up minimal Mosquitto Broker and tested it with the mosquitto_sub and mosquitto_pub commands. Later we have secured our Mosquitto Broker by adding TLS and certificate authentication and tested the secure communication. Finally, we have integrated the secure Mosquitto MQTT Broker with the Home Assistance instance.