
LilyGo T-Beam
ESP32 board with GPS, LoRa, and battery support - great for long-range tracking and off-grid IoT applications.

LilyGo T-Beam Pinout
17 pins · 2.54 mm pitch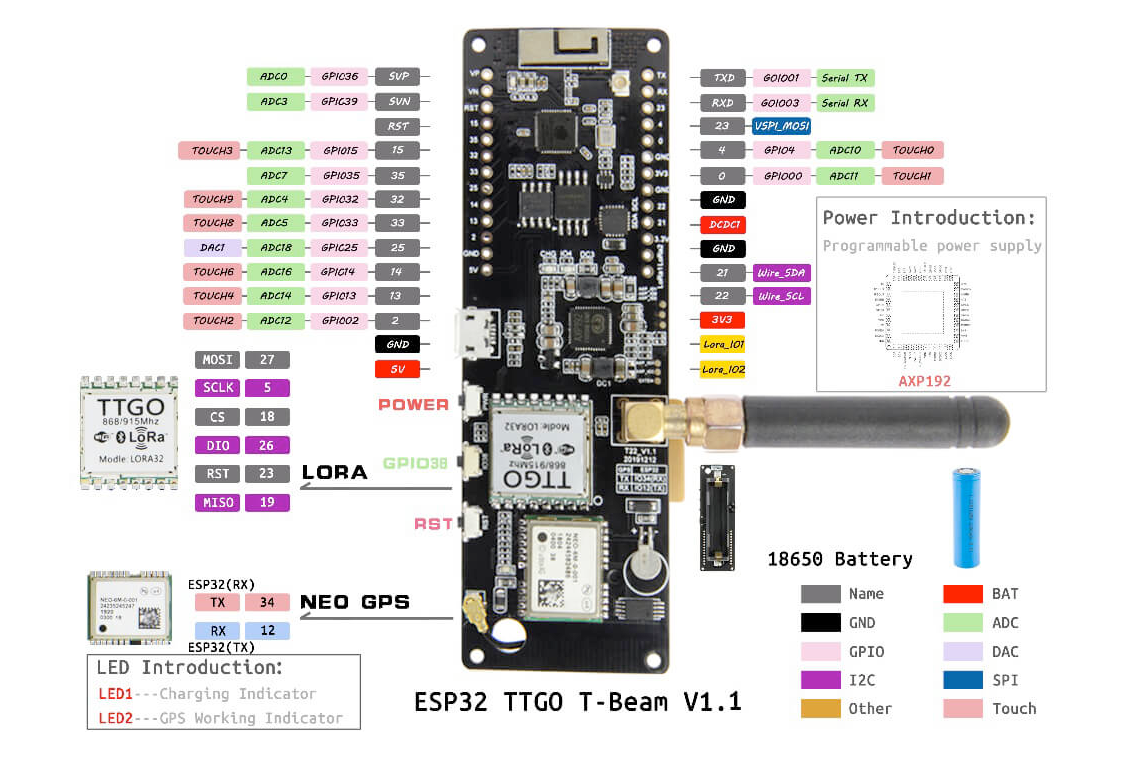
| Pin | GPIO | Labels | Status | Capabilities | Notes |
|---|---|---|---|---|---|
| 1 | 36 | VPGPIO36 | strapping | adc | Left header; SENSOR_VP, input-only, ADC1_CH0 |
| 2 | 39 | VNGPIO39 | strapping | adc | Left header; SENSOR_VN, input-only, ADC1_CH3 |
| 3 | - | RSTEN | control | - | Left header; ESP32 EN / reset, active-low |
| 4 | 15 | 15GPIO15 | strapping | adc · touch · pwm | Left header; ADC2_CH3, TOUCH3, boot strapping pin |
| 5 | 25 | 25DAC1GPIO25 | safe | adc · dac · pwm | Left header; DAC1, ADC2_CH8 |
| 6 | 14 | 14GPIO14 | strapping | adc · touch · pwm | Left header; ADC2_CH6, TOUCH6 |
| 7 | 13 | 13GPIO13 | strapping | adc · touch · pwm | Left header; ADC2_CH4, TOUCH4 |
| 8 | 2 | 2GPIO2 | strapping | adc · touch · pwm | Left header; ADC2_CH2, TOUCH2, boot strapping pin |
| 9 | - | GND | ground | - | Left header; ground |
| 10 | - | 5V | power | - | Left header; 5V / VBUS rail |
| 11 | 1 | TXGPIO1 | uart | uart · pwm | Right header; UART0 TX, shared with USB-serial (CH9102F) |
| 12 | 3 | RXGPIO3 | uart | uart · pwm | Right header; UART0 RX, shared with USB-serial (CH9102F) |
| 13 | 0 | 0GPIO0 | strapping | adc · touch · pwm | Right header; boot strapping pin, ADC2_CH1, TOUCH1 |
| 14 | - | GND | ground | - | Right header; ground |
| 15 | - | DCDC1 | power | - | Right header; AXP192 DCDC1 programmable output rail |
| 16 | - | GND | ground | - | Right header; ground |
| 17 | - | 3V3 | power | - | Right header; 3.3V rail |
Start with these
1 pins with no boot or system involvementFreely assignable - no strapping, flash, USB or JTAG duties. Ideal first picks for buttons, sensors and LEDs.
Fine - with a little care
9 pins · 9 things to knowVPGPIO36 Input-only GPIO (no output); ADC1 channel 0, Hall sensor VP. Other
Cannot be used as output; only suitable for input (e.g., analog read).
VNGPIO39 Input-only GPIO (no output); ADC1 channel 3, Hall sensor VN. Other
Cannot be used as output; only suitable for input.
15GPIO15 Bootstrapping pin; JTAG TDO; controls UART0 boot log output; also HSPICS0 (secondary SPI CS). Strapping
Keep HIGH during boot (internal PU); if LOW on reset, bootloader log is silenced and boot mode may change.
14GPIO14 JTAG mode select pin (TMS); also HSPI CLK and PWM-capable GPIO. JTAG
Used for JTAG debugging (TMS); driving it as GPIO may interfere with JTAG or produce spurious signals at boot.
13GPIO13 JTAG clock pin (TCK); also ADC2 channel 4 / Touch4 input. JTAG
Used for JTAG debugging (TCK); avoid using as GPIO if JTAG is needed.
2GPIO2 Bootstrapping pin (must be low or floating at reset); internal pull-down. Strapping
If driven HIGH on reset (while IO0 is LOW), selects an unsupported SDIO boot mode, causing boot failure.
TXGPIO1 Default UART0 TX pin for USB-serial programming and console. UART
Connected to on-board USB-UART for uploading and logs; drives serial output at boot, so using as GPIO can disrupt programming or console.
RXGPIO3 Default UART0 RX pin for USB-serial programming (console input). UART
Used for receiving data from USB-UART (programming); also pulled HIGH at boot for console communication, so using as GPIO can disrupt uploads.
0GPIO0 Bootstrapping pin (enter bootloader when low); internal pull-up. Strapping
Must be HIGH during boot for normal startup; if held LOW on reset, forces flash programming mode.
Across 17 pins (2.54 mm pitch), the LilyGo T-Beam exposes 10 GPIO plus GND, 5V, DCDC1 and 3V3 for power.
Peripheral wiring is straightforward: TX/RX on GPIO1 and GPIO3 cover serial logging and flashing.
Beyond plain digital I/O you get 8 ADC-capable pins for sensors and battery monitoring, PWM on 8 pins, 5 capacitive-touch inputs and 1 true DAC output.
9 of the exposed pins carry boot-time or system duties on the ESP32 (VP, VN, 15 and 6 more) - check the guidance above before wiring anything to them. 25 is free of any such role - the safest first picks.
Pinout notes The LilyGo T-Beam commits most of its GPIOs on-board - the SX1276 LoRa radio, NEO-6M GPS, AXP192 PMU and SSD1306 OLED between them occupy the ESP32's SPI, UART…
The LilyGo T-Beam commits most of its GPIOs on-board - the SX1276 LoRa radio, NEO-6M GPS, AXP192 PMU and SSD1306 OLED between them occupy the ESP32's SPI, UART and I²C buses. What the two side headers actually break out is a handful of free GPIOs plus power.
Usable header pins include GPIO2, GPIO13, GPIO14, GPIO15 and GPIO25 (DAC1), the input-only GPIO36/GPIO39, the UART0 TX/RX (GPIO1/3) and GPIO0 (BOOT). Power is exposed on 5V, 3.3V and the AXP192 DCDC1 rail, alongside GND.
Getting started
flash your first firmware in ~2 minutesBoard: ESP32 Dev Module Flash Size: 4MB (32Mb) Flash Mode: DIO Partition Scheme: Default 4MB with spiffs (1.2MB APP/1.5MB SPIFFS) Upload Speed: 921600
// toggle GPIO25 - wire an LED and resistor to it
void setup() {
  pinMode(25, OUTPUT);
}
void loop() {
  digitalWrite(25, HIGH); delay(500);
  digitalWrite(25, LOW);  delay(500);
}[env:lilygo_t_beam]
platform = espressif32
board = esp32dev
framework = arduino
monitor_speed = 115200
upload_speed = 921600esp32dev - or type it after board =.esp32:
board: esp32dev
variant: esp32
framework:
type: esp-idf
# blink - GPIO25
output:
- platform: gpio
pin: 25
id: led_out
light:
- platform: binary
name: "LED"
output: led_outesp32dev (same ids as PlatformIO).esptool.py --chip esp32 --port /dev/ttyACM0 \
--baud 921600 write_flash 0x1000 firmware.bin--port = your /dev/tty* (macOS/Linux) or COMx (Windows).Specifications
ESP32 · 100 × 33 mm · vs other ESP32 chips →Dimensions
About this board
Inside sits the ESP32 - a dual-core Xtensa with both Bluetooth Classic and BLE.
At $30.00 it's on the expensive side for an ESP32 board - most land around $20.
Only 10 GPIO are broken out, where most ESP32 boards manage about 24 - worth checking the pinout covers what you need.
Around the module: an OLED 0.96" 128x64 display, LoRa (SX1276), GPS (NEO-6M), battery charging (AXP192) via 18650 holder + JST-GH 2-pin and Power/Reset/User buttons.
The LilyGo T-Beam is a feature-rich ESP32-based development board designed for LoRa and GPS applications. It integrates an ESP32 dual-core processor with WiFi and Bluetooth 5, providing seamless wireless connectivity.
With an onboard LoRa transceiver (SX1262/SX1276), it enables long-range communication at frequencies 433/868/915 MHz. Additionally, the board includes a Ublox NEO-6M GPS module for precise geolocation.
Equipped with 16MB Flash and 8MB PSRAM, along with a 18650 Li-ion battery holder for portable applications, the T-Beam is a powerful tool for IoT and tracking projects.
- 18650 Li-ion battery holder on the underside (cell not included)
- V1.2 boards ship the AXP2101 PMU (AXP192 discontinued); V1.0/V1.1 use AXP192
- LoRa: SX1276 (868/915/923 MHz) or SX1278 (433 MHz) via IPEX/SMA antenna
- GPS: u-blox NEO-6M (NEO-M8N on some batches) with backup battery
- 3D WiFi antenna plus separate GPS ceramic antenna and LoRa antenna
- Earlier revisions shipped a CP2104 USB-serial chip instead of CH9102F
Where to buy
prices are typical street pricesResources
Similar boards


