
NodeMCU-32S
Breadboard-friendly ESP32 board with Wi-Fi and BLE - great for rapid prototyping, IoT applications, and Arduino-based development.

NodeMCU-32S Pinout
38 pins · 2.54 mm pitch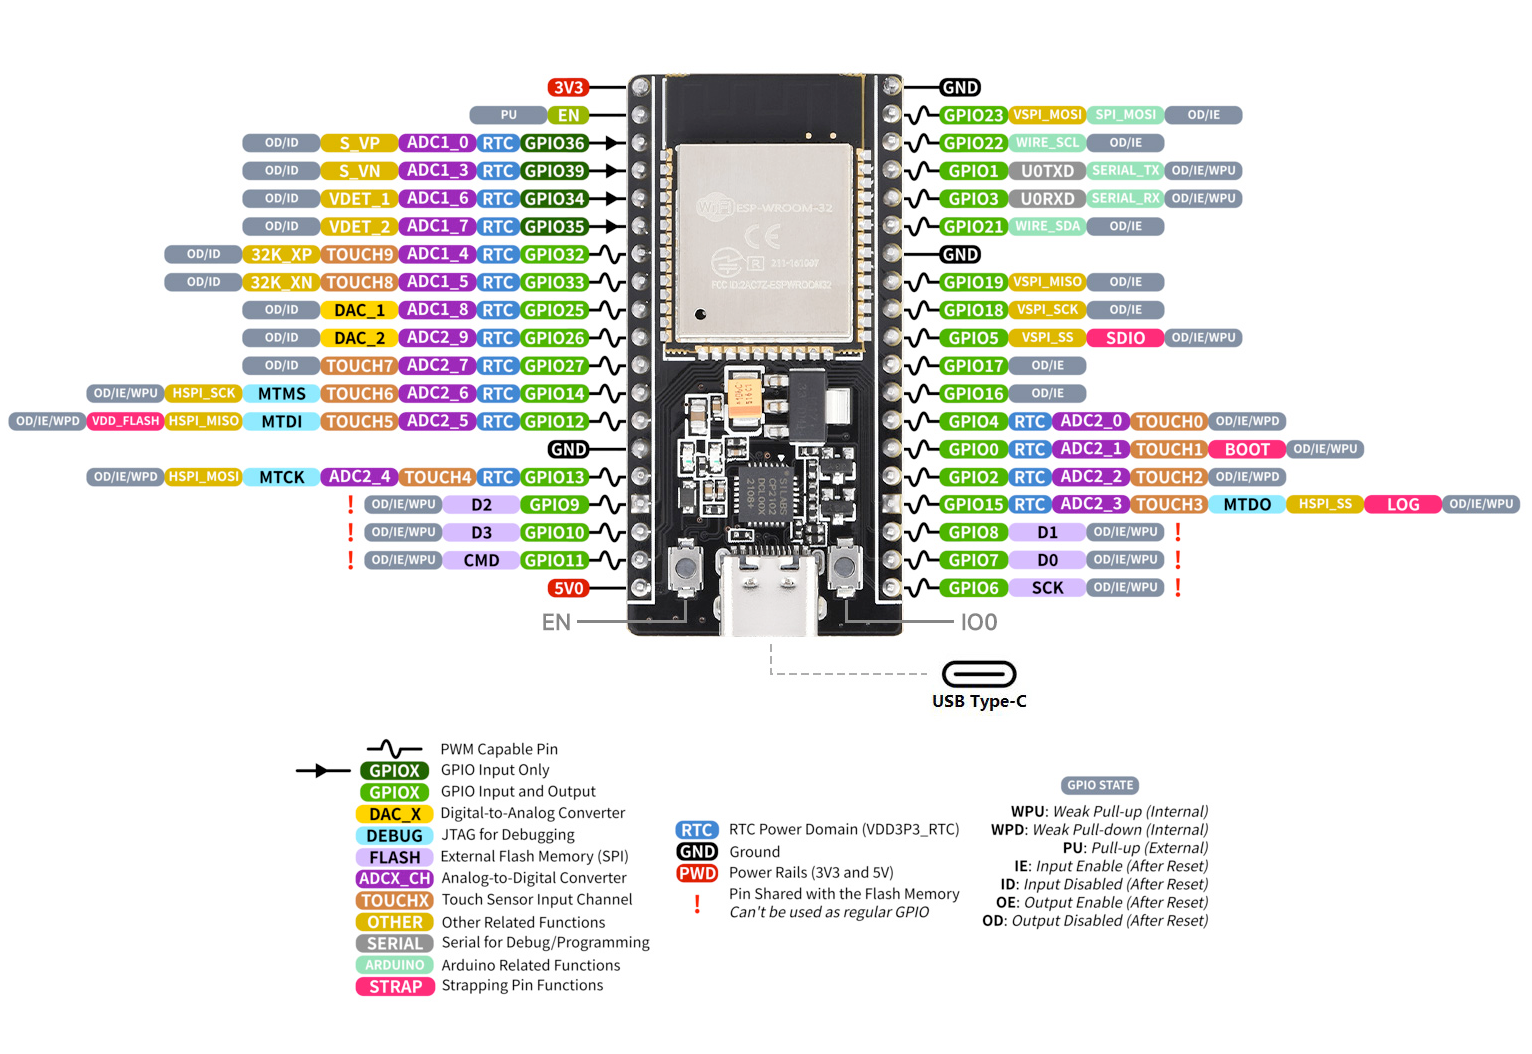
| Pin | GPIO | Labels | Status | Capabilities | Notes |
|---|---|---|---|---|---|
| 1 | - | 3V33.3V | power | - | 3.3V power output |
| 2 | - | EN | control | - | Chip enable / reset (active LOW) |
| 3 | - | GND | ground | - | Ground connection |
| 4 | 9 | D2GPIO9 | strapping | - | Connected to the module's SPI flash - do NOT use, the board will crash or fail to boot |
| 5 | 10 | D3GPIO10 | strapping | - | Connected to the module's SPI flash - do NOT use, the board will crash or fail to boot |
| 6 | 11 | CMDGPIO11 | strapping | - | Connected to the module's SPI flash - do NOT use, the board will crash or fail to boot |
| 7 | - | 5V5V0 | power | - | 5V power input for the board |
| 8 | - | GND | ground | - | Ground connection |
| 9 | - | GND | ground | - | Ground connection |
| 10 | 8 | D1GPIO8 | strapping | - | Connected to the module's SPI flash - do NOT use, the board will crash or fail to boot |
| 11 | 7 | D0GPIO7 | strapping | - | Connected to the module's SPI flash - do NOT use, the board will crash or fail to boot |
| 12 | 6 | SCKGPIO6 | strapping | - | Connected to the module's SPI flash - do NOT use, the board will crash or fail to boot |
| 13 | 2 | LED_BUILTINGPIO2 | strapping | - | On-board user LED (active-LOW) |
| 14 | 3 | IO3GPIO3 | uart | uart | UART0 RX (USB serial) |
| 15 | 1 | IO1GPIO1 | uart | uart | UART0 TX (USB serial) |
| 16 | 21 | IO21GPIO21 | safe | - | I²C SDA |
| 17 | 22 | IO22GPIO22 | safe | - | I²C SCL |
| 18 | 5 | IO5GPIO5 | strapping | spi | VSPI CS / SS |
| 19 | 23 | IO23GPIO23 | safe | spi | VSPI MOSI |
| 20 | 19 | IO19GPIO19 | safe | spi | VSPI MISO |
| 21 | 18 | IO18GPIO18 | safe | spi | VSPI SCK |
| 22 | 36 | IO36GPIO36 | strapping | adc | ADC1 Channel 0 (SVP) |
| 23 | 39 | IO39GPIO39 | strapping | adc | ADC1 Channel 3 (SVN) |
| 24 | 32 | IO32GPIO32 | safe | adc · touch | ADC1 Channel 4 / Touch 9 |
| 25 | 33 | IO33GPIO33 | safe | adc · touch | ADC1 Channel 5 / Touch 8 |
| 26 | 25 | IO25GPIO25 | safe | dac | DAC1 |
| 27 | 26 | IO26GPIO26 | safe | dac | DAC2 |
| 28 | 27 | IO27GPIO27 | safe | adc · touch | ADC2 Channel 7 / Touch 7 |
| 29 | 14 | IO14GPIO14 | strapping | touch · spi | HSPI SCK / Touch 6 |
| 30 | 12 | IO12GPIO12 | strapping | touch · spi | HSPI MISO / Touch 5 |
| 31 | 13 | IO13GPIO13 | strapping | touch · spi | HSPI MOSI / Touch 4 |
| 32 | 15 | IO15GPIO15 | strapping | adc | MTDO / ADC2 Channel 3 |
| 33 | 4 | IO4GPIO4 | strapping | adc · touch | Touch 0 / ADC2 Channel 0 |
| 34 | 16 | IO16GPIO16 | strapping | uart | UART2 RX / CLK_OUT |
| 35 | 17 | IO17GPIO17 | strapping | uart | UART2 TX |
| 36 | 0 | IO0GPIO0 | strapping | touch | BOOT-strap / Touch 1 (keep HIGH at reset) |
| 37 | 34 | IO34GPIO34 | strapping | adc | ADC1 Channel 6 |
| 38 | 35 | IO35GPIO35 | strapping | adc | ADC1 Channel 7 |
Start with these
10 pins with no boot or system involvementFreely assignable - no strapping, flash, USB or JTAG duties. Ideal first picks for buttons, sensors and LEDs.
Fine - with a little care
16 pins · 14 things to knowLED_BUILTINGPIO2 Bootstrapping pin (must be low or floating at reset); internal pull-down. Strapping
If driven HIGH on reset (while IO0 is LOW), selects an unsupported SDIO boot mode, causing boot failure.
IO3 Default UART0 RX pin for USB-serial programming (console input). UART
Used for receiving data from USB-UART (programming); also pulled HIGH at boot for console communication, so using as GPIO can disrupt uploads.
IO1 Default UART0 TX pin for USB-serial programming and console. UART
Connected to on-board USB-UART for uploading and logs; drives serial output at boot, so using as GPIO can disrupt programming or console.
IO5 Bootstrapping pin; internal pull-up; VSPI CS0 (default SPI chip-select); acts as FSPIWP (flash write-protect) on internal-flash variants. Strapping
Must be HIGH during boot; if pulled LOW at reset, alters SDIO slave timing and may prevent normal boot.
IO36 Input-only GPIO (no output); ADC1 channel 0, Hall sensor VP. Other
Cannot be used as output; only suitable for input (e.g., analog read).
IO39IO35 Input-only GPIOs with ADC1 channels - no output driver Other
Cannot be used as output; only suitable for input.
- IO39Input-only GPIO (no output); ADC1 channel 3, Hall sensor VN.
- IO35Input-only GPIO (no output driver); ADC1 channel 7.
IO14 JTAG mode select pin (TMS); also HSPI CLK and PWM-capable GPIO. JTAG
Used for JTAG debugging (TMS); driving it as GPIO may interfere with JTAG or produce spurious signals at boot.
IO12 Bootstrapping pin; JTAG TDI; sets flash voltage (VDD_SDIO); also HSPIQ (flash data line). Strapping
Keep LOW during boot (internal PD); pulling HIGH at reset selects 1.8V flash mode, causing flash brownout if 3.3V flash is used.
IO13 JTAG clock pin (TCK); also ADC2 channel 4 / Touch4 input. JTAG
Used for JTAG debugging (TCK); avoid using as GPIO if JTAG is needed.
IO15 Bootstrapping pin; JTAG TDO; controls UART0 boot log output; also HSPICS0 (secondary SPI CS). Strapping
Keep HIGH during boot (internal PU); if LOW on reset, bootloader log is silenced and boot mode may change.
IO4 Bootstrapping pin; internal pull-down; also HSPIHD (flash data line) on modules with internal flash. Strapping
Sampled at reset for boot config; should not be driven at boot (affects boot mode timing).
IO16IO17 PSRAM chip select and clock on WROVER-class modules; in-package flash lines on ESP32-U4WDH. Both also carry UART2 PSRAM
Wired to the memory die on PSRAM-equipped modules (WROVER, PICO-V3-02) and on in-package-memory chip variants (U4WDH, D0WDRH2-V3); an ordinary GPIO on a plain WROOM-32.
- IO16PSRAM CS# on WROVER-class modules and on ESP32-D0WDRH2-V3; in-package flash CS# on ESP32-U4WDH. Also UART2 RX.
- IO17PSRAM clock on WROVER-class modules; in-package flash IO1/DO on ESP32-U4WDH. Also UART2 TX.
IO0 Bootstrapping pin (enter bootloader when low); internal pull-up. Strapping
Must be HIGH during boot for normal startup; if held LOW on reset, forces flash programming mode.
IO34 Input-only GPIO (no output driver); ADC1 channel 6. Other
Cannot be used as output (no drive capability); only suitable for analog/digital input.
Only if you know the tricks
6 pins · 4 things to knowD2GPIO9D3GPIO10 SPI flash/PSRAM data lines SD2 and SD3 (flash HOLD and WP) Flash
Used by internal flash/PSRAM; typically not exposed on modules, avoid using as GPIO.
- D2Connected to SPI flash/PSRAM data 2 (SD2, flash HOLD).
- D3Connected to SPI flash/PSRAM data 3 (SD3, flash WP).
CMDGPIO11 Connected to SPI flash command/CS (CMD/CS0). Flash
Used by internal flash (chip select/command); not available for general use.
D1GPIO8D0GPIO7 SPI flash data lines SD0 and SD1 Flash
Used for internal flash/PSRAM data; not available for general GPIO.
- D1Connected to SPI flash data 1 (SD1).
- D0Connected to SPI flash data 0 (SD0).
SCKGPIO6 Connected to SPI flash clock (SCK/CLK). Flash
Used for internal flash/PSRAM communication; not available for general GPIO.
The NodeMCU-32S pinout brings out 38 pins at a 2.54 mm pitch - 32 usable GPIO alongside the 3V3, GND and 5V power rails.
On the analog side there are 9 ADC-capable pins for sensors and battery monitoring, 8 capacitive-touch inputs and 2 true DAC outputs.
If you want zero surprises, IO21, IO22, IO23, IO19 and 6 more are free of any such role - the safest first picks. 16 of the exposed pins carry boot-time or system duties on the ESP32 (LED_BUILTIN, IO3, IO1 and 13 more).
Pinout notes The NodeMCU-32S pinout gives you nearly every feature of the ESP32-WROOM-32 module in a breadboard-friendly format. Key power rails-VIN (5 V), 3V3, and…
The NodeMCU-32S pinout gives you nearly every feature of the ESP32-WROOM-32 module in a breadboard-friendly format. Key power rails-VIN (5 V), 3V3, and multiple GND pins-let you power the board itself or feed external sensors and actuators with ease.
For serial communication the board breaks out RX0 and TX0 (UART0, connected to the on-board CP2102 for USB programming) plus an extra pair, RX2 (GPIO16) and TX2 (GPIO17), for a second hardware UART. Default I²C lines are SDA (GPIO21) and SCL (GPIO22), while the default VSPI port maps to MOSI (GPIO23), MISO (GPIO19), SCK (GPIO18), and CS (GPIO5). An alternate HSPI bus (GPIO12-15) is available when you need multiple SPI devices.
On the analog side, GPIO32 - GPIO39 expose ADC1 channels, and several ADC2 channels appear on GPIO0, GPIO2, GPIO4, GPIO12-15, and GPIO25-27 (ADC2 is not usable while Wi-Fi is running). Two 8-bit DAC outputs live on GPIO25 and GPIO26, perfect for audio or reference-voltage generation. Many of these pads double as capacitive-touch inputs for sleek, button-free interfaces.
Every GPIO supports PWM for LED dimming or motor control, and special-function pins such as EN (reset) and BOOT (IO0) make flashing easy. Take note of bootstrapping pins GPIO0, GPIO2, and GPIO15; keep them in the proper state (usually pulled HIGH) during reset to ensure normal startup.
With plentiful digital I/O, rich analog capabilities, and multiple high-speed buses, the NodeMCU-32S pinout delivers the versatility needed for everything from simple sensor nodes to complex connected gadgets-all while staying compact enough for quick prototyping.
Getting started
flash your first firmware in ~2 minutesBoard: ESP32 Dev Module Flash Size: 4MB (32Mb) Flash Mode: DIO Partition Scheme: Default 4MB with spiffs (1.2MB APP/1.5MB SPIFFS) Upload Speed: 921600
// toggle GPIO21 - wire an LED and resistor to it
void setup() {
  pinMode(21, OUTPUT);
}
void loop() {
  digitalWrite(21, HIGH); delay(500);
  digitalWrite(21, LOW);  delay(500);
}[env:nodemcu-32s]
platform = espressif32
board = esp32dev
framework = arduino
monitor_speed = 115200
upload_speed = 921600esp32dev - or type it after board =.esp32:
board: esp32dev
variant: esp32
framework:
type: esp-idf
# blink - GPIO21
output:
- platform: gpio
pin: 21
id: led_out
light:
- platform: binary
name: "LED"
output: led_outesp32dev (same ids as PlatformIO).esptool.py --chip esp32 --port /dev/ttyACM0 \
--baud 921600 write_flash 0x1000 firmware.bin--port = your /dev/tty* (macOS/Linux) or COMx (Windows).Good to know
board-specific quirks worth 60 seconds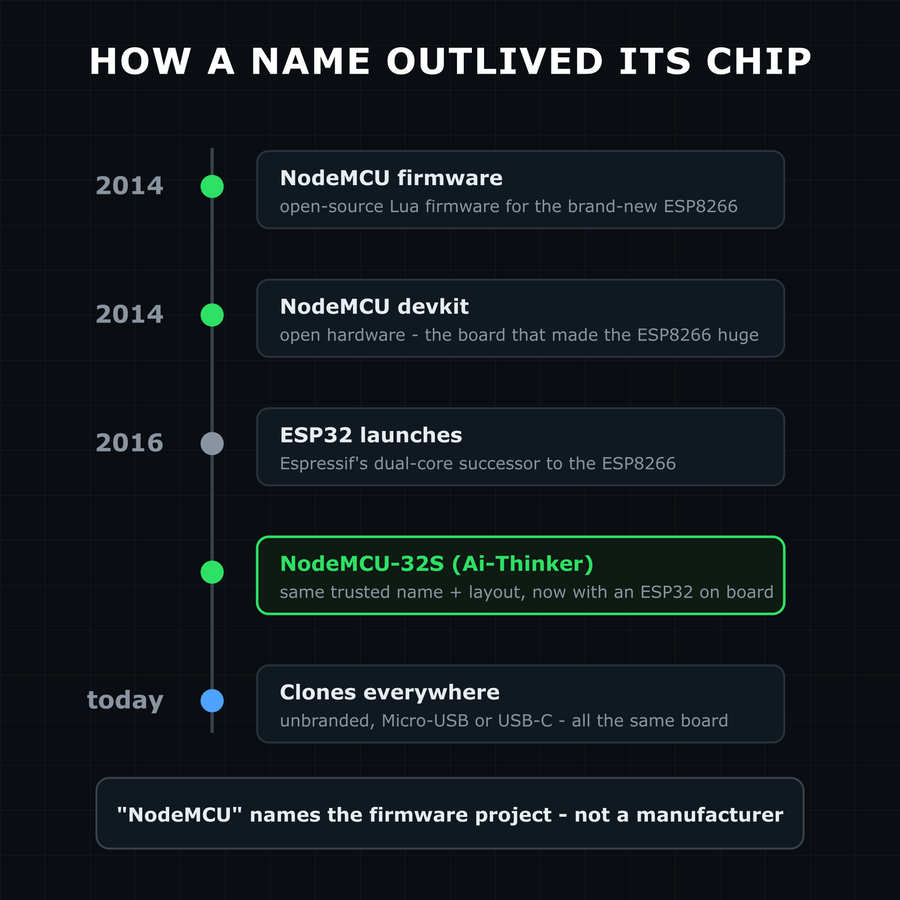
NodeMCU started in 2014 as an open-source Lua firmware for the ESP8266, joined weeks later by an open-hardware devkit - the board that arguably made the ESP8266 a phenomenon. "NodeMCU" strictly names that firmware project, not a manufacturer. When the ESP32 launched, Ai-Thinker - maker of the ESP-12 modules on most original NodeMCUs - carried the familiar name and layout over to the NodeMCU-32S. For a generation of…
NodeMCU started in 2014 as an open-source Lua firmware for the ESP8266, joined weeks later by an open-hardware devkit - the board that arguably made the ESP8266 a phenomenon. "NodeMCU" strictly names that firmware project, not a manufacturer.
When the ESP32 launched, Ai-Thinker - maker of the ESP-12 modules on most original NodeMCUs - carried the familiar name and layout over to the NodeMCU-32S. For a generation of ESP8266 tinkerers this was the natural upgrade path, which made it one of the first ESP32 boards to go mainstream.
Despite the name, almost nobody runs Lua on these today - Arduino, ESPHome and MicroPython all work the same on this board as on any other ESP32. The name survives because the layout earned it.
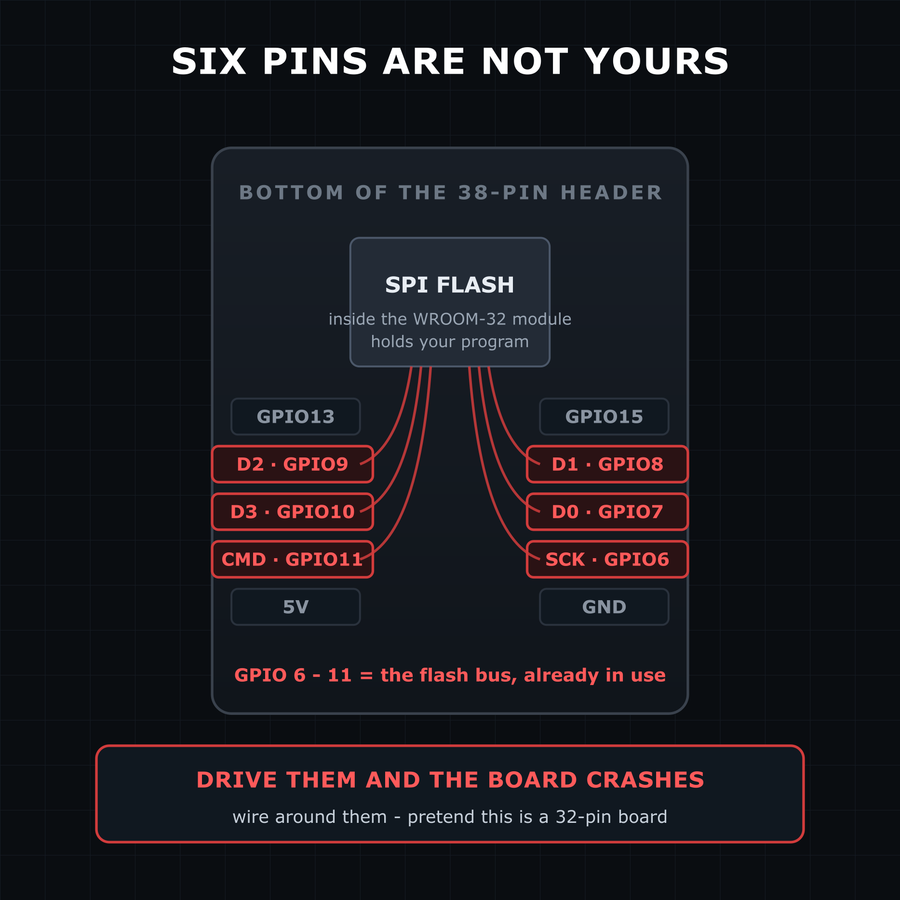
The main thing the 38-pin layout adds over the 30-pin DevKit V1 is also its main trap: it breaks out GPIO6-11 (labeled SCK, CMD, D0-D3), and those six pins are wired to the WROOM-32 module's internal SPI flash. They are not spare IO - drive them and the chip loses contact with its own program memory: crashes, boot loops, or a board that looks dead. They sit at the bottom of both pin rows, right where you'd naturally…
The main thing the 38-pin layout adds over the 30-pin DevKit V1 is also its main trap: it breaks out GPIO6-11 (labeled SCK, CMD, D0-D3), and those six pins are wired to the WROOM-32 module's internal SPI flash. They are not spare IO - drive them and the chip loses contact with its own program memory: crashes, boot loops, or a board that looks dead.
They sit at the bottom of both pin rows, right where you'd naturally keep wiring. Skip them and pretend the board has 32 pins - see Espressif's GPIO documentation.
A board that stopped booting after you wired it up is far more likely a strap-pin or flash-pin conflict than a dead board. Disconnect everything and flash again before binning it.
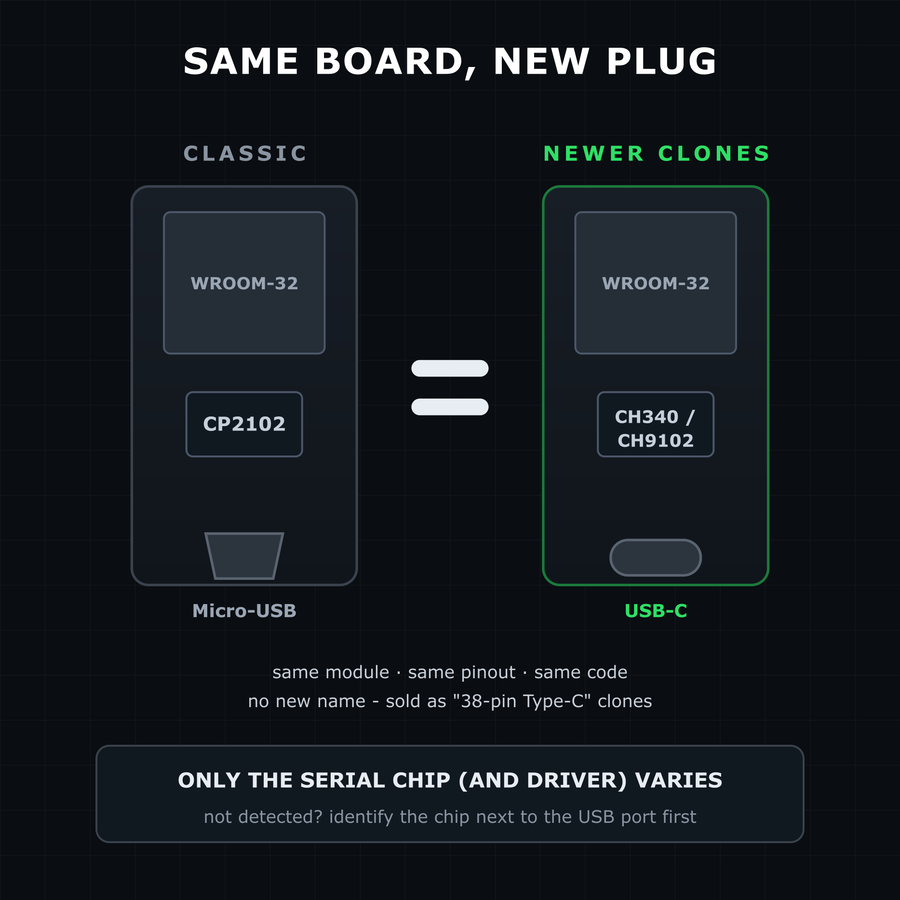
Newer NodeMCU-32S-style boards increasingly ship with a USB-C connector instead of Micro-USB - sometimes still silkscreened NodeMCU-32S, sometimes sold as a nameless "ESP32 38-pin Type-C" DevKitC-style clone. There's no new official name and no functional difference: same module, same pinout, same code. What does quietly vary between revisions is the USB-serial chip - CP2102 on the original design, CH340 or CH9102…
Newer NodeMCU-32S-style boards increasingly ship with a USB-C connector instead of Micro-USB - sometimes still silkscreened NodeMCU-32S, sometimes sold as a nameless "ESP32 38-pin Type-C" DevKitC-style clone. There's no new official name and no functional difference: same module, same pinout, same code.
What does quietly vary between revisions is the USB-serial chip - CP2102 on the original design, CH340 or CH9102 on many newer clones. If the board isn't detected on first plug-in, identify that chip and install its driver; our CH340 vs CP2102 guide shows how to tell them apart.
Got an unbranded 38-pin board and not sure what it is? The 38-pin generic clone guide covers identifying the common variations.
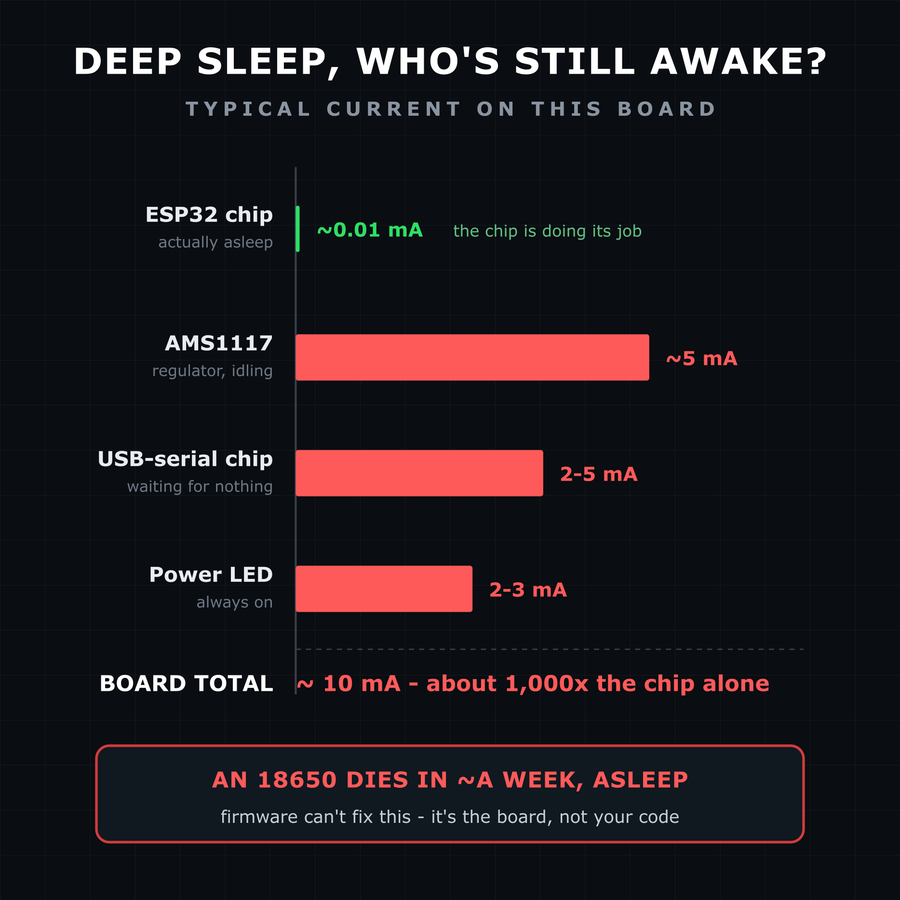
The ESP32 chip deep-sleeps at around 10 µA, but DevKit-style boards like this one measure around 5-10 mA in deep sleep - the linear regulator idles at several mA, and the USB-serial chip and power LED stay powered no matter what your firmware does. This measurement guide breaks the numbers down. At that draw an 18650 cell is dead in roughly a week of pure sleeping. Prototype here, then move battery…
The ESP32 chip deep-sleeps at around 10 µA, but DevKit-style boards like this one measure around 5-10 mA in deep sleep - the linear regulator idles at several mA, and the USB-serial chip and power LED stay powered no matter what your firmware does. This measurement guide breaks the numbers down.
At that draw an 18650 cell is dead in roughly a week of pure sleeping. Prototype here, then move battery projects to a bare module or a board built for low quiescent current.
Specifications
ESP32 · 48.26 × 25.4 mm · vs other ESP32 chips →Dimensions
About this board
At its core is the ESP32 - a dual-core Xtensa with both Bluetooth Classic and BLE.
Expect to pay about $8.00 - less than the ~$20 most ESP32 boards go for.
32 GPIO are broken out - more than most ESP32 boards, so the pin budget is rarely the constraint.
Onboard you'll find EN/Boot buttons.
The NodeMCU-32S is one of the first ESP32 boards that went mainstream - and the name is the reason. It inherits it from the original NodeMCU project of 2014: Lua firmware plus an open-hardware devkit that made the ESP8266 famous. When the ESP32 arrived, Ai-Thinker carried the trusted name and layout over with the NodeMCU-32S, and thousands of ESP8266 users upgraded to it without a second thought.
Like every long-lived ESP32 board, the version you buy today is most likely an unbranded clone of Ai-Thinker's design - same ESP32-WROOM-32 module, same 38-pin layout. Newer units often swap the Micro-USB connector for USB-C and the CP2102 serial chip for a CH340 or CH9102; none of that changes how the board works, and this page applies to all of them.
Compared to the slimmer 30-pin DevKit V1, the 38-pin layout exposes extra GPIOs (and the six flash pins you must leave alone - see below). An on-board EN (reset) and BOOT button, auto-reset circuitry, and dual rows of pins make it a classic bench prototyping board: plug in, flash, wire up.
Where to buy
prices are typical street pricesResources
Similar boards


