
SweetPea ESP-210
Compact ESP8266 board with USB, LiPo charging, and onboard regulator - great for portable applications.

ESP8266
MCU
160MHz
clock
4MB
flash
~80KB
SRAM
17· 1 ADC
GPIO
Wi-Fi
radio
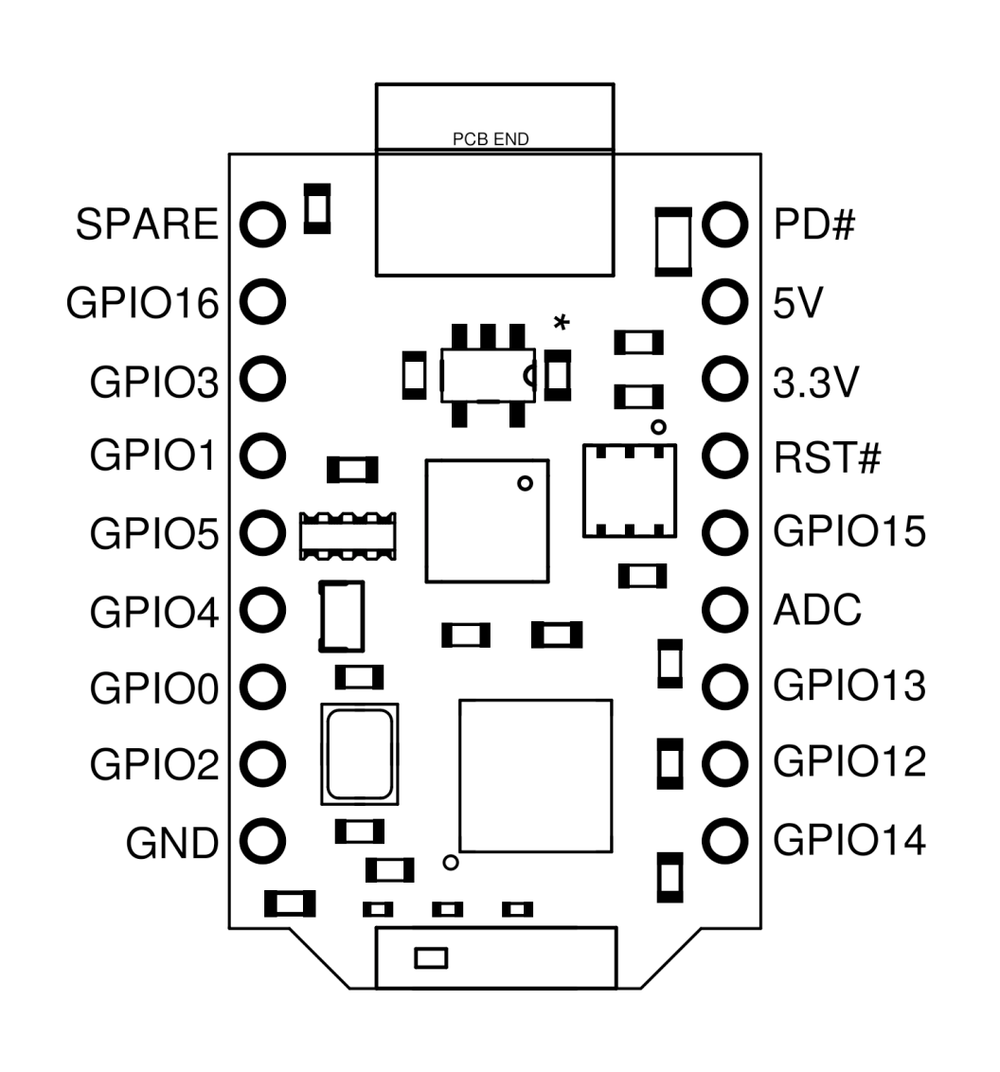
SweetPea ESP-210 Pinout
Getting started
flash your first firmware in ~2 minutes1
Connect over USB
Install your USB-serial driver (CH340 / CP210x) if no port appears. Not detected? Hold BOOT while plugging in.
2
Match & flash
Set the Tools options shown, then click Upload.
3
Verify it runs
GPIO2 toggles - wire an LED and resistor to it, or change the pin to your board's own LED.
Set these in Tools · leave everything else at default
Arduino IDE 2.x - Tools Copy
Board: "Generic ESP8266 Module"▸
Flash Size: "4MB (32Mb)"▸
CPU Frequency: "160 MHz"▸
Upload Speed: "921600"▸
▸ every other Tools option - leave at default
Board: Generic ESP8266 Module
Flash Size: 4MB (32Mb)
CPU Frequency: 160 MHz
Upload Speed: 921600
Find it: Tools ▸ Board ▸ ESP8266 Boards ▸ Generic ESP8266 Module
// toggle GPIO2 - wire an LED and resistor to it
void setup() {
  pinMode(2, OUTPUT);
}
void loop() {
  digitalWrite(2, HIGH); delay(500);
  digitalWrite(2, LOW);  delay(500);
}
Specifications
ESP8266Compute
MCU
ESP8266
Clock
160 MHz
SRAM · Flash
~80 KB · 4 MB
Radio
Wi-Fi
802.11 b/g/n
Bluetooth
-
Antenna
PCB
I/O
GPIO · ADC
17 · 1
UART · I²C · SPI
2 · 1 (software) · 1
PWM
-
Power
USB
Micro-USB
Serial
-
Boot address
0x0000
Electrical
Input
5V via USB · 3.3V logic
Consumption
-
Regulator
-
Flashing
Upload · OTA
esptool · esp_ota
Flash · Boot mode
QIO · -
Sketch · Data
- · 80 KB
The SweetPea ESP-210 uses esptool for firmware uploads, esp_ota for over-the-air (OTA) updates. Flash mode is QIO.
About this board
At its core is the Espressif ESP8266 - a single-core Xtensa L106 running at up to 160 MHz with roughly 80 KB of usable RAM and integrated 802.11 b/g/n Wi-Fi paired with 4 MB of flash.
Development uses the familiar ESP8266 toolchain - the Arduino core, MicroPython, or Espressif's SDK - with esptool for flashing and OTA update support, so the large ecosystem of ESP8266 libraries and tutorials applies directly.
Resources
Similar boards


