
ENS160 Digital Metal-Oxide Multi-Gas Sensor
The ENS160 is a digital MOX gas sensor optimized for indoor air quality monitoring. It provides accurate measurements of TVOC and eCO₂ levels, along with AQIs, making it ideal for applications in building automation, HVAC systems, and air purifiers. The sensor supports both I²C and SPI interfaces, allowing for flexible integration into various microcontroller platforms.

ENS160 pinout
The ENS160 has 8 pins supporting I²C or SPI communication with additional control signals.
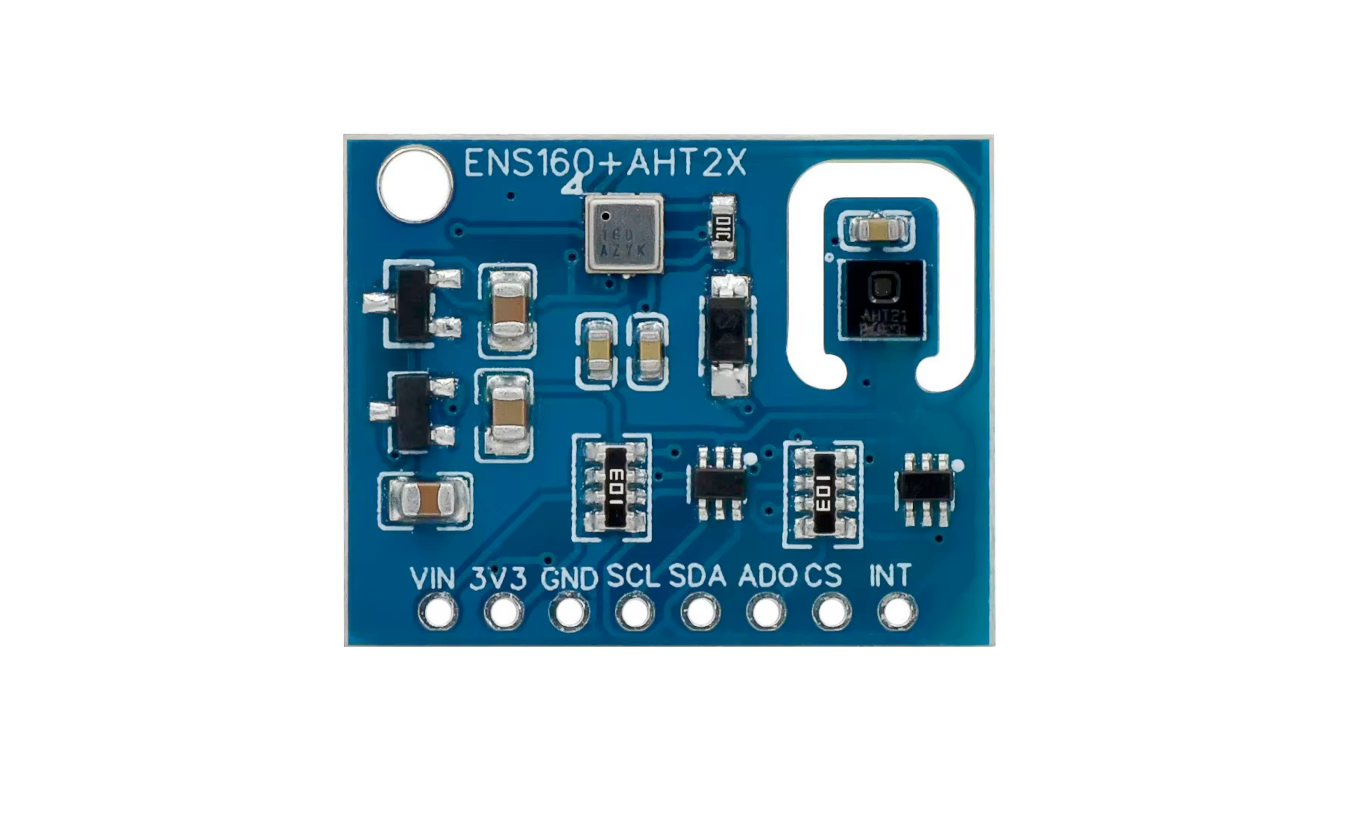
| Pin | Type | Description | Notes |
|---|---|---|---|
| VIN | Power | Power supply input (1.71V-1.98V for VDD; 1.71V-3.6V for VDDIO). | Use 3.3V for most breakout boards with onboard regulation. |
| GND | Power | Ground connection. Connect to system ground. | |
| SDA | I2C | I²C data line. Bidirectional data communication. | Connect to ESP32 GPIO 21. Requires pull-up resistor. |
| SCL | I2C | I²C clock line. Clock signal for I²C communication. | Connect to ESP32 GPIO 22. Requires pull-up resistor. |
| INT | Interrupt | Interrupt output (optional). Indicates data ready or threshold events. | Active low. Connect to GPIO for interrupt-driven operation. |
| WAKE | Control | Wake-up control input. Used for power management. | Pull high for normal operation. |
| ADDR | Address | I²C address selection. Connect to GND (0x52) or VDD (0x53). | Default varies by module. |
| CS | Control | Chip select for SPI mode. Tie to VIN (3.3V) for I²C mode - low selects SPI. | Must be high (VIN) for I²C operation. |
I²C address: 0x52 (ADDR to GND) or 0x53 (ADDR to VDD)
Measures TVOC, eCO₂, and AQI (Air Quality Index)
Four independent MOX sensor elements with hotplate control
Superior gas selectivity vs CCS811
Detects: ethanol, toluene, H₂, NO₂, and more
On-chip humidity/temperature compensation
Wiring the ENS160 to ESP32
To interface the ENS160 with an ESP32 via I²C, connect VIN to 3.3V, GND to ground, SDA to GPIO 21, SCL to GPIO 22, CS to VIN (for I²C mode - low selects SPI), and WAKE to VIN.
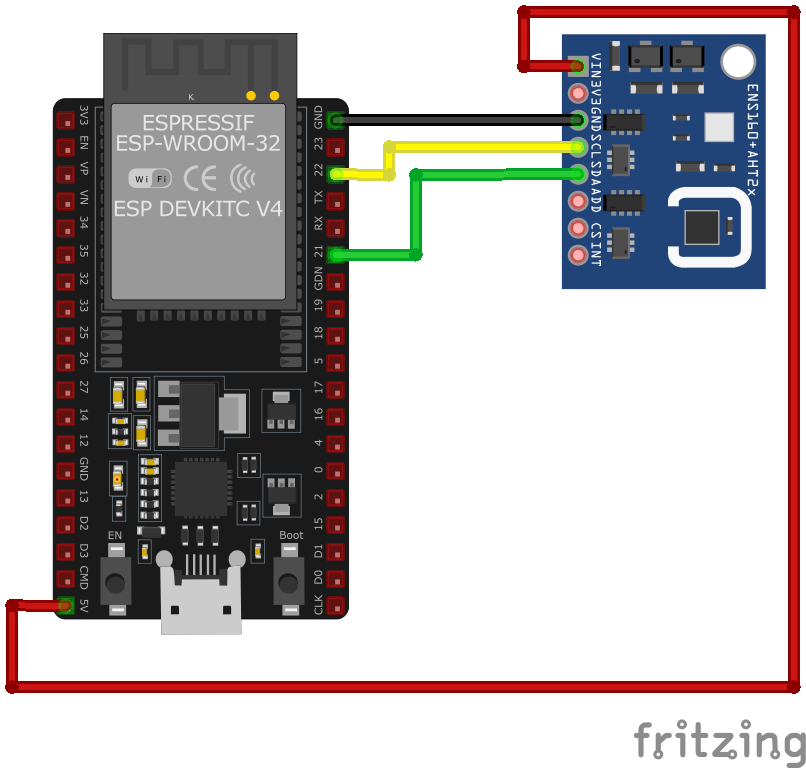
| ENS160 pin | ESP32 pin | Purpose |
|---|---|---|
| VIN | 3.3V | Power supply. Use 3.3V (breakout boards have regulation). |
| GND | GND | Ground connection. |
| SDA | GPIO 21 | I²C data line. Add 4.7kΩ pull-up resistor. |
| SCL | GPIO 22 | I²C clock line. Add 4.7kΩ pull-up resistor. |
| CS | VIN (3.3V) | Chip select. Must be high (VIN) for I²C mode - low selects SPI. |
| WAKE | VIN (3.3V) | Wake control. Pull high for continuous operation. |
| ADDR | GND or VIN | Address select. GND=0x52, VIN=0x53. |
| INT | Optional GPIO | Interrupt output for data ready indication. · optional |
I²C pull-up resistors (4.7kΩ) required on SDA and SCL
Default I²C address: 0x52 or 0x53 (check your module)
CS pin must be tied high (VIN/3.3V) for I²C operation - pulling it low selects SPI (many breakout boards pull it high already)
WAKE pin must be pulled high for normal operation
Use ScioSense_ENS160 or DFRobot_ENS160 library
Warm-up time: 1 hour for optimal accuracy
Combine with AHT21/SHT sensor for humidity/temp compensation
Add decoupling capacitor (100nF) close to VIN pin for stability
ENS160 code examples
// Requires library: "ENS160 - Adafruit Fork"
#include <Wire.h>
#include "ScioSense_ENS160.h"

ScioSense_ENS160 ens160(ENS160_I2CADDR_1); // 0x53 (ADDR high); use ENS160_I2CADDR_0 for 0x52

void setup() {
    Serial.begin(115200);
    Wire.begin();
    if (!ens160.begin()) {
        Serial.println("Failed to initialize ENS160 sensor!");
        while (1);
    }
    ens160.setMode(ENS160_OPMODE_STD); // standard gas-sensing mode
}

void loop() {
    if (ens160.available()) {
        ens160.measure(true);
        Serial.print("eCO2: ");
        Serial.print(ens160.geteCO2());
        Serial.print(" ppm, TVOC: ");
        Serial.print(ens160.getTVOC());
        Serial.print(" ppb, AQI: ");
        Serial.println(ens160.getAQI());
    }
    delay(1000);
}
The example uses the maintained "ENS160 - Adafruit Fork" library (its header keeps the original ScioSense_ENS160.h name). The sensor is created at address 0x53 (ENS160_I2CADDR_1, ADDR pin high - use ENS160_I2CADDR_0 for 0x52), put into standard gas-sensing mode with setMode(ENS160_OPMODE_STD), and each cycle measure() refreshes the values read by geteCO2(), getTVOC() and getAQI() (UBA index 1-5). Give the sensor a warm-up period after power-on before trusting the readings.
// Requires the esp_ens160 driver from the ESP Component Registry:
//   idf.py add-dependency "k0i05/esp_ens160^1.2.7"

#include <stdio.h>
#include "freertos/FreeRTOS.h"
#include "freertos/task.h"
#include "driver/i2c_master.h"
#include "ens160.h"

#define SDA_GPIO GPIO_NUM_21
#define SCL_GPIO GPIO_NUM_22

void app_main(void)
{
    i2c_master_bus_config_t bus_config = {
        .clk_source = I2C_CLK_SRC_DEFAULT,
        .i2c_port = I2C_NUM_0,
        .sda_io_num = SDA_GPIO,
        .scl_io_num = SCL_GPIO,
        .flags.enable_internal_pullup = true,
    };
    i2c_master_bus_handle_t bus = NULL;
    ESP_ERROR_CHECK(i2c_new_master_bus(&bus_config, &bus));

    ens160_config_t config = I2C_ENS160_CONFIG_DEFAULT;
    ens160_handle_t sensor = NULL;
    ESP_ERROR_CHECK(ens160_init(bus, &config, &sensor));

    while (1) {
        ens160_air_quality_data_t data;
        if (ens160_get_measurement(sensor, &data) == ESP_OK)
            printf("AQI-UBA %d, TVOC %u ppb, eCO2 %u ppm\n",
                   data.uba_aqi, data.tvoc, data.eco2);
        else
            printf("Could not read data from sensor\n");
        vTaskDelay(pdMS_TO_TICKS(2000));
    }
}
ESP-IDF ships no ENS160 driver of its own, so this example uses the k0i05/esp_ens160 driver from the ESP Component Registry. Install it into your project first with idf.py add-dependency "k0i05/esp_ens160^1.2.7", then build as usual.
The driver uses ESP-IDF's modern i2c_master API, so the code first creates an I2C master bus and then hands it to ens160_init(). ens160_get_measurement() returns the UBA air-quality index (1 = excellent to 5 = unhealthy), TVOC in ppb and eCO2 in ppm. The default configuration expects the ENS160 at address 0x53; if your breakout pulls ADDR low, set config.i2c_address = I2C_ENS160_DEV_ADDR_LO (0x52) before calling ens160_init(). Give the sensor a few minutes of warm-up before trusting the readings.
i2c:
  sda: GPIO21
  scl: GPIO22

sensor:
  - platform: ens160_i2c
    eco2:
      name: "eCO2"
    tvoc:
      name: "TVOC"
    aqi:
      name: "Air Quality Index"
    address: 0x53
    update_interval: 1s
Since ESPHome 2024.6 the platform is split by bus - ens160_i2c here, with the sensor at address 0x53 (ADDR pin high; use 0x52 with ADDR low) on the default I2C pins. eCO2, TVOC and the AQI each become entities. For best accuracy pair it with a temperature/humidity sensor and add compensation: options.
[env:esp32dev]
platform = espressif32
board = esp32dev
framework = arduino
monitor_speed = 115200
lib_deps =
adafruit/ENS160 - Adafruit Fork @ ^3.0.1#include <Arduino.h>
#include <Wire.h>
#include "ScioSense_ENS160.h"
ScioSense_ENS160 ens160(ENS160_I2CADDR_1); // 0x53 (ADDR high); use ENS160_I2CADDR_0 for 0x52
void setup() {
Serial.begin(115200);
Wire.begin();
if (!ens160.begin()) {
Serial.println("Failed to initialize ENS160 sensor!");
while (1);
}
ens160.setMode(ENS160_OPMODE_STD); // standard gas-sensing mode
}
void loop() {
if (ens160.available()) {
ens160.measure(true);
Serial.print("eCO2: ");
Serial.print(ens160.geteCO2());
Serial.print(" ppm, TVOC: ");
Serial.print(ens160.getTVOC());
Serial.print(" ppb, AQI: ");
Serial.println(ens160.getAQI());
}
delay(1000);
}This PlatformIO example interfaces with the ENS160 sensor using SDA (GPIO21) and SCL (GPIO22). The sensor is initialized with the I²C address set to 0x53. eCO₂, TVOC, and AQI values are retrieved in the loop() and printed to the Serial Monitor every second.
from machine import I2C, Pin
import time

# ENS160 I2C address
ENS160_ADDR = 0x53

# Register addresses
DATA_ECO2 = 0x22
DATA_TVOC = 0x24
DATA_AQI = 0x26

# Initialize I2C
i2c = I2C(0, scl=Pin(22), sda=Pin(21))

# Function to read 16-bit register
def read_register(addr, reg):
    data = i2c.readfrom_mem(addr, reg, 2)
    return (data[0] << 8) | data[1]

while True:
    eco2 = read_register(ENS160_ADDR, DATA_ECO2)
    tvoc = read_register(ENS160_ADDR, DATA_TVOC)
    aqi = i2c.readfrom_mem(ENS160_ADDR, DATA_AQI, 1)[0]

    print(f"eCO2: {eco2} ppm, TVOC: {tvoc} ppb, AQI: {aqi}")
    time.sleep(1)
This MicroPython script interfaces with the ENS160 sensor over I²C using SDA (GPIO21) and SCL (GPIO22). It reads eCO₂, TVOC, and AQI data by accessing the corresponding registers. The read_register() function retrieves 16-bit data from the sensor. The main loop continuously fetches and prints the sensor values every second.
ENS160 specifications
About the ENS160
The ENS160 is ScioSense’s follow-up to the CCS811, and it is explicitly marketed - by ScioSense and by module vendors alike - as that older part’s replacement now that the CCS811 is obsolete. Where the CCS811 has a single metal-oxide element, the ENS160 packs four independent MOX elements with their own hotplate control, which the datasheet credits for better gas selectivity and steadier output across humidity and ozone. Like the CCS811, though, its eCO2 output is a VOC-derived estimate rather than a direct CO2 measurement - for the real thing, an NDIR sensor like the MH-Z19 is the right part, the same tradeoff that applies to Bosch’s BME680 when it is run through BSEC.
What makes the ENS160 genuinely easier to use is that the eCO2, TVOC and AQI numbers are computed on-chip: ScioSense’s own datasheet describes on-chip heater drive control and data processing with no external libraries needed, unlike Bosch’s BME680/BME688, which need the closed-source BSEC library just to turn a raw resistance into a comparable number. The chip exposes both I2C and SPI, so it drops into either bus depending on what a project already has free.
There are two warm-up periods worth planning around. A one-hour “Initial Start-up” runs exactly once in the sensor’s life, the first time it is ever powered on, since the raw resistance signals shift the most in that first stretch; a shorter 3-minute “Warm-up” then applies after every later power-cycle or idle period. The catch is that the one-hour milestone is only saved to non-volatile memory after 24 hours of continuous operation - power the sensor off before that, and the next boot restarts the first-ever hour from scratch.
ENS160 troubleshooting
Compilation Error: 'TwoWire::begin(uint8_t&, uint8_t&)'
›
Issue: When compiling code for the ENS160 sensor, the following error occurs: no matching function for call to 'TwoWire::begin(uint8_t&, uint8_t&)'.
Possible causes include the sensor library attempting to call a non-standard Wire.begin() function with two arguments, which is not supported by all platforms.
Solution: Modify the library code to use the standard Wire.begin() function without arguments. Specifically, in the ScioSense_ENS160.cpp file, locate the _i2c_init() function and replace its contents with a single call to Wire.begin();. This change ensures compatibility across different platforms.
ENS160 Readings Unavailable in ESPHome
›
Issue: The ENS160 sensor intermittently reports unavailable readings in ESPHome, with log messages indicating: ENS160 readings unavailable - Normal Operation but readings not ready.
Possible causes include insufficient power supply stability, especially when the sensor is combined with other components like the AHT21.
Solution: Enhance the power supply stability by adding a supplemental capacitor to the sensor's power lines. This addition helps prevent voltage dropouts and ensures consistent sensor operation.
ENS160 Fails to Initialize with WiFi Enabled on ESP32
›
Issue: When using the ENS160 sensor with an ESP32, enabling WiFi causes the sensor to report zero or no data on all channels.
Possible causes include resource conflicts or timing issues between the WiFi module and the I2C communication used by the sensor.
Solution: Investigate potential conflicts between the WiFi and I2C peripherals on the ESP32. Ensure that the I2C bus is properly configured and consider adjusting the I2C clock speed. Additionally, test the setup with WiFi disabled to confirm that the issue is related to WiFi interference.
ENS160 Not Detected on I2C Bus
›
Issue: The ENS160 sensor is not recognized on the I2C bus, leading to initialization failures.
Possible causes include incorrect I2C address configuration or improper wiring.
Solution: Verify the sensor's I2C address, which can be either 0x52 or 0x53, depending on the state of the address selection pin (ASW). Ensure that the ASW pin is set correctly to match the expected address in your code. Additionally, check all wiring connections for correctness and secure contact.
Where to buy the ENS160

Resources
Similar sensors


