
SHTC3 Temperature and Humidity Sensor
The SHTC3 sensor offers precise temperature and humidity measurements in a compact and energy-efficient package. It is designed for low-power IoT applications and features Sensirion's CMOSens® technology for high accuracy and long-term stability.

SHTC3 pinout
The SHTC3 has a simple 4-pin I²C interface for ultra-compact temperature and humidity sensing:
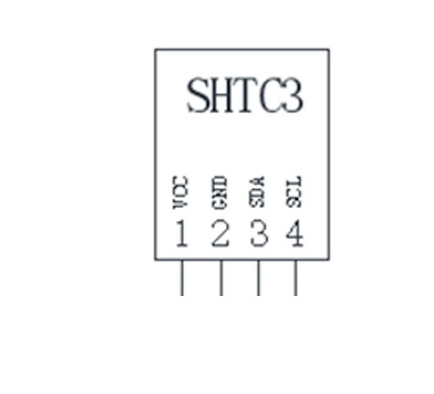
| Pin | Type | Description | Notes |
|---|---|---|---|
| VDD | Power | Power supply voltage | 1.62V to 3.6V (ultra-low power) |
| GND | Power | Ground reference | |
| SDA | Communication | I²C Serial Data Line | Bidirectional data |
| SCL | Communication | I²C Serial Clock Line | Master clock signal |
Interface: I²C (Two-Wire Interface) for simple connectivity
I²C Address: 0x70 (fixed, not configurable)
Pull-up Resistors: 10kΩ recommended on SDA and SCL lines
Power: Ultra-low voltage operation (1.62V-3.6V)
Energy Efficient: Designed for battery-powered IoT applications
Wiring the SHTC3 to ESP32
To interface the SHTC3 sensor with an ESP32 using I²C:
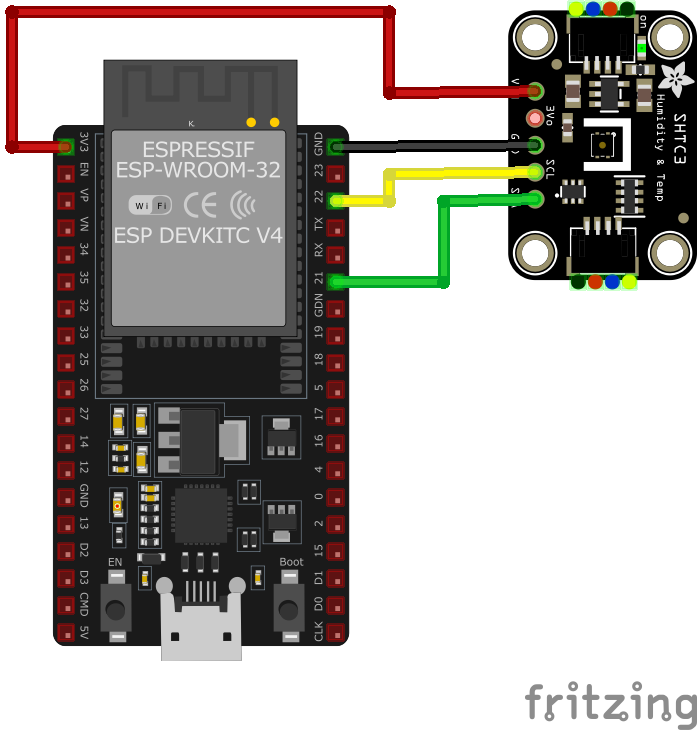
| SHTC3 pin | ESP32 pin | Purpose |
|---|---|---|
| VDD | 3.3V | Power supply |
| GND | GND | Ground |
| SDA | GPIO21 | I²C data line (default) |
| SCL | GPIO22 | I²C clock line (default) |
Pull-up Resistors: Use 10kΩ resistors between SDA/SCL and VDD for reliable communication
I²C Pins: GPIO21 (SDA) and GPIO22 (SCL) are default but can be changed in ESPHome config
Low Power: Ideal for battery-powered devices with minimal current draw
Single Address: Fixed I²C address 0x70 (no address conflicts with most other sensors)
SHTC3 code examples
#include <Wire.h>
#include "Adafruit_SHTC3.h"

Adafruit_SHTC3 shtc3;

void setup() {
  Serial.begin(115200);
  if (!shtc3.begin()) {
    Serial.println("Couldn't find SHTC3 sensor!");
    while (1) delay(10);
  }
  Serial.println("SHTC3 initialized");
}

void loop() {
  sensors_event_t humidity, temp;
  if (!shtc3.getEvent(&humidity, &temp)) {
    Serial.println("Failed to read sensor data");
    return;
  }
  Serial.print("Temperature: "); Serial.print(temp.temperature); Serial.println(" °C");
  Serial.print("Humidity: "); Serial.print(humidity.relative_humidity); Serial.println(" %");
  delay(2000);
}
This Arduino sketch demonstrates how to use the SHTC3 sensor with the Adafruit SHTC3 library. It initializes the sensor, configures it for data reading, and retrieves temperature and humidity values every 2 seconds. The readings are printed to the Serial Monitor.
#include <stdio.h>
#include "freertos/FreeRTOS.h"
#include "freertos/task.h"
#include "driver/i2c.h"

#define I2C_MASTER_SCL_IO    22    /*!< GPIO number for I2C master clock */
#define I2C_MASTER_SDA_IO    21    /*!< GPIO number for I2C master data */
#define I2C_MASTER_NUM       I2C_NUM_0 /*!< I2C master port */
#define I2C_MASTER_FREQ_HZ   100000     /*!< I2C master clock frequency */
#define SHTC3_SENSOR_ADDR    0x70       /*!< SHTC3 I2C address */

static esp_err_t i2c_master_init(void) {
    i2c_config_t conf = {
        .mode = I2C_MODE_MASTER,
        .sda_io_num = I2C_MASTER_SDA_IO,
        .scl_io_num = I2C_MASTER_SCL_IO,
        .sda_pullup_en = GPIO_PULLUP_ENABLE,
        .scl_pullup_en = GPIO_PULLUP_ENABLE,
        .master.clk_speed = I2C_MASTER_FREQ_HZ,
    };
    ESP_ERROR_CHECK(i2c_param_config(I2C_MASTER_NUM, &conf));
    return i2c_driver_install(I2C_MASTER_NUM, conf.mode, 0, 0, 0);
}

void read_shtc3_sensor() {
    uint8_t data[6];
    uint8_t wakeup[] = {0x35, 0x17};  // Wake-up command - the SHTC3 sleeps by default
    uint8_t measure[] = {0x7C, 0xA2}; // Measure T first, clock stretching, normal mode
    uint8_t sleep[] = {0xB0, 0x98};   // Back to sleep to save power

    i2c_master_write_to_device(I2C_MASTER_NUM, SHTC3_SENSOR_ADDR, wakeup, 2, pdMS_TO_TICKS(1000));
    vTaskDelay(pdMS_TO_TICKS(1)); // Wake-up time is ~240 us
    i2c_master_write_to_device(I2C_MASTER_NUM, SHTC3_SENSOR_ADDR, measure, 2, pdMS_TO_TICKS(1000));
    vTaskDelay(pdMS_TO_TICKS(20));
    i2c_master_read_from_device(I2C_MASTER_NUM, SHTC3_SENSOR_ADDR, data, 6, pdMS_TO_TICKS(1000));
    i2c_master_write_to_device(I2C_MASTER_NUM, SHTC3_SENSOR_ADDR, sleep, 2, pdMS_TO_TICKS(1000));

    uint16_t temp_raw = (data[0] << 8) | data[1];
    uint16_t hum_raw = (data[3] << 8) | data[4];

    float temperature = -45 + 175 * ((float)temp_raw / 65535.0);
    float humidity = 100 * ((float)hum_raw / 65535.0);

    printf("Temperature: %.2f °C, Humidity: %.2f %%\n", temperature, humidity);
}

void app_main() {
    ESP_ERROR_CHECK(i2c_master_init());

    while (1) {
        read_shtc3_sensor();
        vTaskDelay(pdMS_TO_TICKS(2000));
    }
}
The SHTC3 powers up in sleep mode, so every cycle sends the wake-up command 0x3517 first, then the measurement command 0x7CA2 (temperature first, clock stretching, normal mode), reads six bytes, and puts the sensor back to sleep with 0xB098 to save power. Temperature and humidity use the standard Sensirion conversions from the 16-bit raw values. The sensor sits at address 0x70 on the default I2C pins (SDA GPIO21, SCL GPIO22).
i2c:
  sda: GPIO21
  scl: GPIO22

sensor:
  - platform: shtcx
    temperature:
      name: "Room Temperature"
    humidity:
      name: "Room Humidity"
    update_interval: 60s
ESPHome's platform for the SHTC3 is shtcx (it covers the SHTC1 and SHTC3), at the fixed address 0x70 on the default I2C pins. The component handles the sensor's sleep/wake cycle automatically.
[env:esp32dev]
platform = espressif32
board = esp32dev
framework = arduino
lib_deps =
    adafruit/Adafruit SHTC3 Library @ ^1.0.0
monitor_speed = 115200#include <Wire.h>
#include "Adafruit_SHTC3.h"
Adafruit_SHTC3 shtc3;
void setup() {
Serial.begin(115200);
if (!shtc3.begin()) {
Serial.println("Couldn't find SHTC3 sensor!");
while (1) delay(10);
}
Serial.println("SHTC3 initialized.");
}
void loop() {
sensors_event_t temp, humidity;
if (!shtc3.getEvent(&humidity, &temp)) {
Serial.println("Failed to read sensor data");
return;
}
Serial.print("Temperature: ");
Serial.print(temp.temperature);
Serial.println(" °C");
Serial.print("Humidity: ");
Serial.print(humidity.relative_humidity);
Serial.println(" %");
delay(2000);
}This PlatformIO code uses the Adafruit SHTC3 library to initialize and interface with the SHTC3 sensor. It retrieves temperature and humidity values and prints them every 2 seconds to the Serial Monitor.
from machine import I2C, Pin
from time import sleep

# Initialize I2C interface
i2c = I2C(0, scl=Pin(22), sda=Pin(21))

# SHTC3 I2C address
SHTC3_ADDR = 0x70

# Command for measurement
MEASURE_CMD = b'\x7C\xA2'

while True:
    try:
        i2c.writeto(SHTC3_ADDR, MEASURE_CMD)
        sleep(0.02)  # Wait for measurement to complete
        data = i2c.readfrom(SHTC3_ADDR, 6)
        raw_temp = (data[0] << 8) | data[1]
        raw_hum = (data[3] << 8) | data[4]
        temperature = -45 + 175 * (raw_temp / 65535.0)
        humidity = 100 * (raw_hum / 65535.0)
        print("Temperature: {:.2f} °C".format(temperature))
        print("Humidity: {:.2f} %".format(humidity))
    except Exception as e:
        print("Error reading SHTC3: ", e)
    sleep(2)
This MicroPython script interfaces with the SHTC3 sensor using I2C. It sends a measurement command, reads the raw data, processes it, and prints temperature and humidity values to the console every 2 seconds.
SHTC3 specifications
About the SHTC3
The SHTC3 trades some flexibility for size and low-voltage headroom: a 2 mm x 2 mm x 0.75 mm DFN package, a fixed I2C address of 0x70 (handy since it can’t collide with the 0x44/0x45 used by the SHT3x/SHT85 family or the 0x40 used by the older SHT2x line), and a 1.62 V to 3.6 V supply aimed squarely at coin-cell and LiPo-powered wearables. Accuracy is ±0.2 degC and ±2 %RH - respectable, though a step behind the SHT4x generation’s best numbers - and unlike those parts it powers up asleep, needing an explicit wake command before every measurement and drawing only about 0.3 to 0.6 uA while idle.
It replaced the earlier SHTC1 with a wider voltage range and better accuracy while keeping the same tiny footprint, and Sensirion still sells it as a current, actively supported part rather than a legacy one - it’s just not the newest option. The SHT40 covers similar ground with a lower voltage floor (1.08 V) and no separate sleep/wake handshake to manage in code, at the cost of a larger 1.5 mm square package.
For a battery build where board space is the binding constraint - wearables, small sensor tags - the SHTC3 is still a reasonable pick; for anything where a couple of extra millimeters don’t matter, the SHT40 is simpler to drive.
SHTC3 troubleshooting
Communication Failure with ESPHome
›
Issue: When using the SHTC3 sensor with ESPHome, the following error message appears in the logs: [E][shtcx:059]: Communication with SHTCx failed!. This issue leads to the sensor failing to provide temperature and humidity data on the dashboard.
Possible causes include the sensor not handling restarts properly, resulting in communication failures.
Solution: The SHTC3 sensor may require a power cycle to re-establish communication. Disconnecting and reconnecting the sensor's power supply can help. Additionally, ensure that the sensor's connections are secure and that the I2C bus is properly configured.
Sensor Misidentified as SHTC1 in ESPHome
›
Issue: The SHTC3 sensor is incorrectly detected as an SHTC1, leading to improper initialization and data retrieval.
Possible causes include the sensor's identification register returning a value that is not correctly interpreted by the ESPHome integration.
Solution: Update ESPHome to the latest version, as recent updates may have addressed this identification issue. If the problem persists, consider manually specifying the sensor type in the configuration or reaching out to the ESPHome community for further assistance.
Intermittent I2C Communication with Multiple Device
›
s
Issue: When the SHTC3 sensor shares the I2C bus with other devices, communication may hang, causing the microcontroller to become unresponsive.
Possible causes include bus contention or insufficient handling of I2C communication timeouts.
Solution: Implement a timeout mechanism in the I2C read operations to prevent indefinite blocking. Additionally, ensure that each device on the I2C bus has a unique address and that proper pull-up resistors are in place.
Initialization Failure After Microcontroller Reset
›
Issue: Following a microcontroller reset, the SHTC3 sensor fails to initialize, resulting in errors during sensor setup.
Possible causes include the sensor remaining in sleep mode and not responding to initialization commands.
Solution: Modify the initialization sequence to include a wake-up command before any further communication with the sensor. This adjustment ensures that the sensor is active and ready to receive commands after a reset.
Where to buy the SHTC3

Resources
Similar sensors


