
ESP Bird: Flappy Bird-Inspired Game on ESP32-S3 SuperMini + OLED
Build a mini Flappy Bird clone using an ESP32-S3 SuperMini, SSD1306 OLED, and a button. Game logic, graphics, and fun on a tiny screen!
In the previous post, we wired up an ESP32-S3 SuperMini, connected it to an SSD1306 OLED display, and added a pushbutton for input. We displayed text and used the button to increment a counter-a solid start for building interactive interfaces.
Now we’re turning that setup into a game: ESP Bird, a tiny Flappy Bird-inspired clone that runs entirely on a 128x64 pixel screen. One button controls the bird’s flight. The challenge? Navigate through moving obstacles without crashing into them-or the ground.
Despite the small screen size and lack of color or sound, this kind of game works surprisingly well on an SSD1306. It’s all about timing, gravity, and just enough pixel magic to make it fun.
But the 128x64 OLED comes with some constraints:
- 📏 Very limited resolution-no room for complex sprites
- ⏱️ No hardware acceleration-animations need to be efficient
- ⬛ Monochrome only-just black and white pixels
Still, with careful design and a tight game loop, we can squeeze in gravity, pipes, collision detection, and scoring into this tiny setup. Let’s build it!
Parts Required #
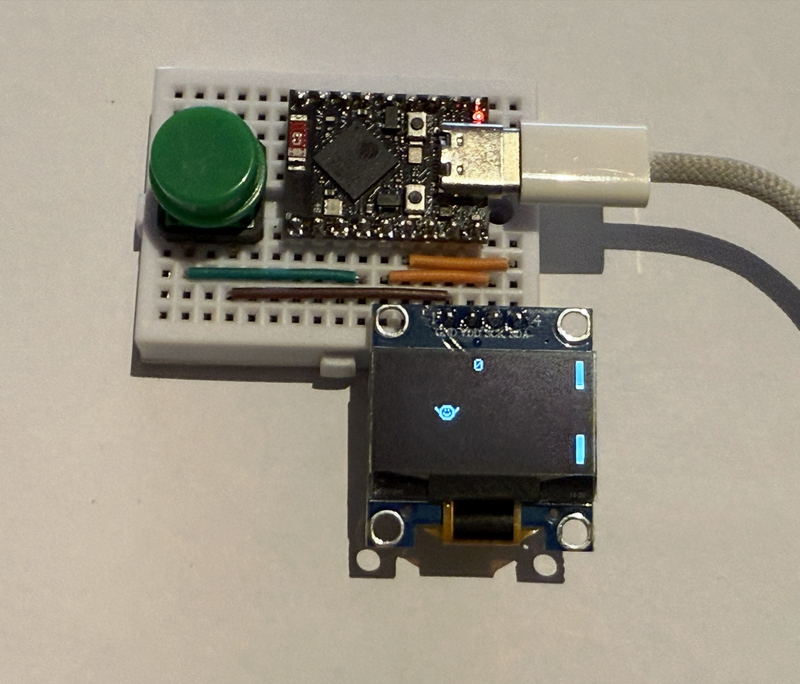
You only need a handful of components to follow along with this project. We keep the same components an wiring as in the previous post How to Use ESP32-S3 SuperMini with SSD1306 OLED and Button".
- ESP32 Board

ESP32-S3 Super Mini Development Board
- SSD1306 OLED Display (128x64, I2C)

SSD1306 OLED Module
- Tactile Pushbutton

12x12mm Pushbuttons
- Breadboard and Jumper Wires (optional but helpful)

Breadboard and Jumper Wires
🎮 Game Design Breakdown #
Before diving into code, let’s break down how ESP Bird will actually work under the hood. The goal is to replicate the core mechanics of Flappy Bird-just stripped down to fit a 128×64 screen, a single button, and no frills.
🐤 Bird Movement and Physics #
Here’s how ESP Bird works at a high level-simple mechanics, tuned for the tiny 128×64 OLED screen:
🐤 Bird Physics: Gravity and Jumping
The bird constantly falls due to gravity. Pressing the button gives it a quick flap upward. It’s all about timing your jumps to stay airborne and navigate tight gaps.🧱 Obstacle Generation: Vertical Pipes with Gaps
Pairs of pipes scroll across the screen from right to left. Each set has a randomly positioned gap the bird must fly through. As you survive, more pipes come at you.💥 Collision Detection: Ground, Ceiling, and Pipes
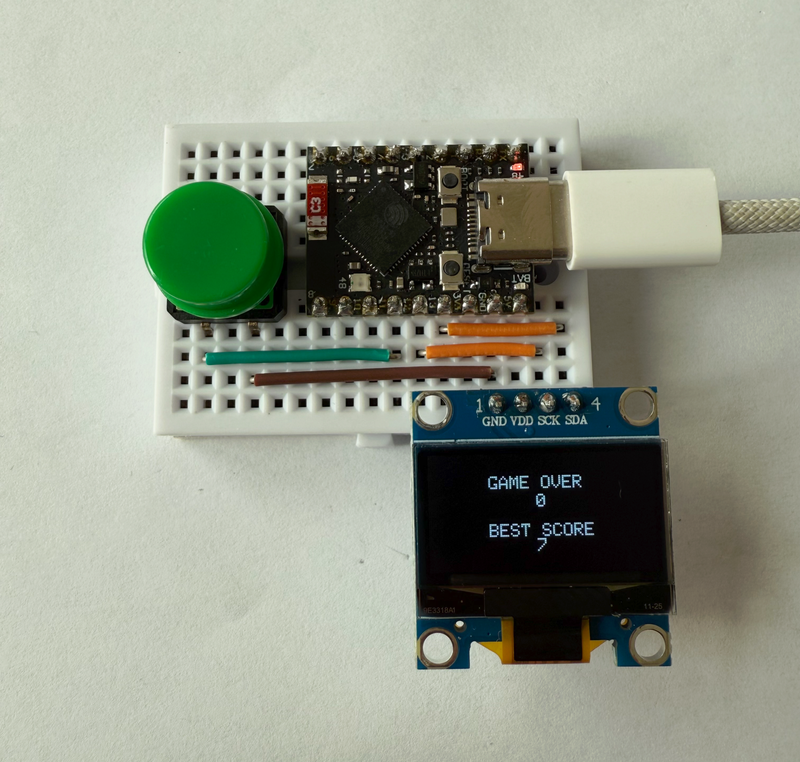
If the bird hits the top or bottom of the screen-or crashes into a pipe-it’s game over. Collision is based on simple rectangle overlaps.🏆 Score Tracking
You earn a point each time you pass through a set of pipes. The game also tracks your best score and shows it on the Game Over screen.
Simple, fast, and fun-just like the original Flappy Bird, but shrunk down for microcontroller magic.
🖼️ Graphics and Rendering #
Even with just 128×64 pixels and a monochrome screen, you can pull off some pretty decent visuals. Here's how ESP Bird handles graphics:
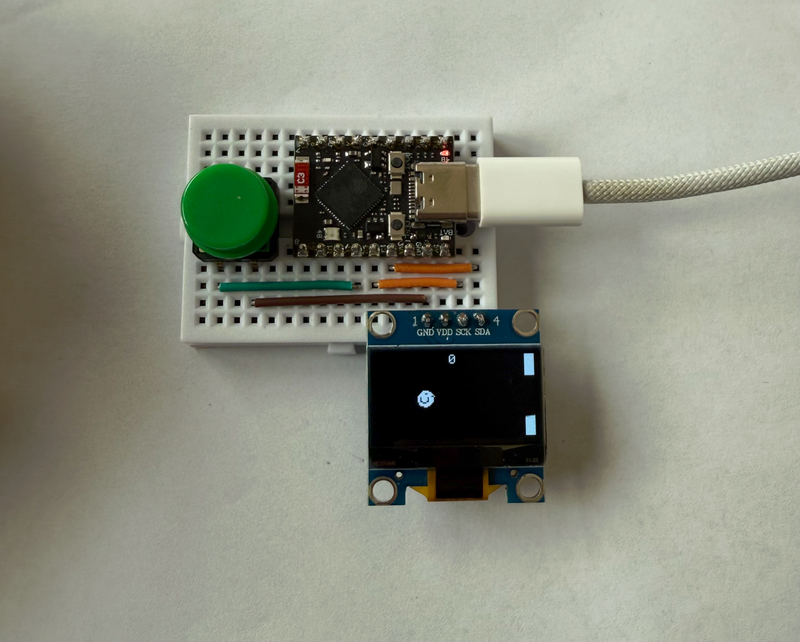
🕊️ Bird Sprite
The bird is drawn using a small 16×16 bitmap (not just a square!), animated by swapping between two frames to simulate flapping. It’s positioned near the left side of the screen for consistent gameplay focus.🧱 Pipes
Pipes are drawn as filled rectangles-top and bottom-leaving a gap in the middle for the bird to fly through. They scroll from right to left, giving that classic Flappy Bird look.🔢 Score Display
The current score is drawn at the top of the screen usingsetCursor()andprint(). When the game ends, the score and high score are shown at the center using larger text.🔁 Screen Refresh Strategy
Each frame:- Call
clearDisplay()to wipe the screen - Redraw everything: bird, pipes, score
- Call
display()to update the OLED with the new frame
- Call
This full redraw approach is fast enough for smooth gameplay on the SSD1306, and keeps things clean without leftover pixels or artifacts.
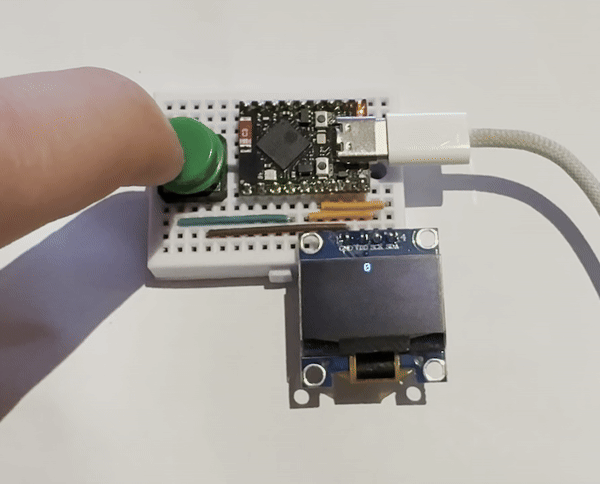
🕹️ Button Input as Jump Control #
ESP Bird keeps it simple with just one button-the same one we used in the previous setup. No touchscreen, no joystick-just one input that controls everything.
Re-using the Button
The button is still connected to a GPIO pin withINPUT_PULLUP. Pressing it triggers a “flap,” giving the bird an upward boost. It’s mapped directly to the physics logic, so each press affects gravity and velocity.Debouncing and Timing
No need for complicated debounce logic here. The game loop runs fast enough that adelay(FRAME_DELAY)(50 ms) between frames naturally smooths out most bounce noise. Button reads are simple, and the timing feels responsive.
The result? Smooth, predictable jumping-just like in the original Flappy Bird. Tap to fly, and don’t blink too long between jumps!
🔄 Game Loop Logic #
The heart of ESP Bird is a simple but effective game loop. It keeps everything moving and in sync, even on a tiny display with limited resources.
Basic Loop Flow
Each iteration ofloop()runs one cycle of the game:- Update game state (bird position, pipe movement, collisions)
- Render the frame: draw bird, pipes, and score
- Delay for a fixed time (
FRAME_DELAY = 50 ms) to control frame rate
Frame Rate and Physics Step
The game runs at ~20 frames per second. Gravity, velocity, and pipe movement are all based on simple frame-step logic-no floating point math or timers needed. It’s fast and smooth enough for this style of gameplay.Restarting After Game Over
When the bird crashes, the game switches to a "Game Over" screen. The player must press the button once to acknowledge the score, and again to start a new game. This gives a moment of pause before jumping back into the chaos.

🧾 Full Code Walkthrough #
Here's the complete code for ESP Bird - our Flappy Bird-style game running on an ESP32-S3 SuperMini with SSD1306 OLED and a single button.
You can also find the full project on GitHub:
👉 ESPBird on Github
#include <SPI.h>
#include <Wire.h>
#include <Adafruit_GFX.h>
#include <Adafruit_SSD1306.h>

// Bird sprite dimensions
#define BIRD_SIZE 16

// GPIO pins
#define I2C_SDA 13
#define I2C_SCL 12
#define BUTTON_PIN 11

// OLED display settings
#define OLED_WIDTH 128 // OLED width,  in pixels
#define OLED_HEIGHT 64 // OLED height, in pixels
Adafruit_SSD1306 oled(OLED_WIDTH, OLED_HEIGHT, &Wire, -1);

// Bitmaps for bird animation
static const unsigned char PROGMEM bird_frame1[] = {
  B00000000, B00000000,
  B00000000, B00000000,
  B00001111, B10000000,
  B00011111, B11100000,
  B00111100, B11110000,
  B01111111, B11111000,
  B11111111, B11100100,
  B11011111, B01111000,
  B11011111, B01111000,
  B11011111, B01111000,
  B11001110, B01111000,
  B01110001, B11110000,
  B01111111, B11100000,
  B00111111, B11000000,
  B00000111, B00000000,
  B00000000, B00000000
};

static const unsigned char PROGMEM bird_frame2[] = {
  B00000000, B00000000,
  B00000000, B00000000,
  B00001111, B10000000,
  B00011111, B11100000,
  B00111100, B11110000,
  B01111111, B11111000,
  B11110001, B11100100,
  B11101110, B11111000,
  B11011111, B01111000,
  B11011111, B01111000,
  B11111111, B11111000,
  B01111111, B11110000,
  B01111111, B11100000,
  B00111111, B11000000,
  B00000111, B00000000,
  B00000000, B00000000
};


// Game settings
#define FRAME_DELAY 50

// Game states
#define STATE_START 0
#define STATE_PLAYING 1
#define STATE_GAMEOVER 2

int current_state = STATE_START;
int birdX = OLED_WIDTH / 4;
int birdY, gravity;
int score, bestScore;

int wallX[2];
int gapY[2];
#define GAP_SIZE 30
#define WALL_THICKNESS 10

void setup() {
  Serial.begin(9600);

  // Setup I2C on custom pins
  Wire.begin(I2C_SDA, I2C_SCL);

  if (!oled.begin(SSD1306_SWITCHCAPVCC, 0x3C)) {
    Serial.println(F("OLED Initialization Failed"));
    for (;;);
  }

  oled.clearDisplay();
  oled.setTextColor(WHITE);

  pinMode(BUTTON_PIN, INPUT_PULLUP);

  randomSeed(analogRead(10));
}

void loop() {
  if (current_state == STATE_PLAYING) {
    updateGame();
  } else if (current_state == STATE_GAMEOVER) {
    showGameOver();
  } else {
    showStartScreen();
  }
  delay(FRAME_DELAY);
}

void updateGame() {
  oled.clearDisplay();

  // Flap mechanism
  if (digitalRead(BUTTON_PIN) == LOW) gravity = -4;

  gravity++;
  birdY += gravity;

  birdY = constrain(birdY, 0, OLED_HEIGHT - BIRD_SIZE);
  if (birdY == OLED_HEIGHT - BIRD_SIZE) gravity = -2;

  // Bird animation
  const unsigned char *sprite = (gravity < 0 && random(2)) ? bird_frame1 : bird_frame2;
  oled.drawBitmap(birdX, birdY, sprite, BIRD_SIZE, BIRD_SIZE, WHITE);

  // Walls logic
  for (int i = 0; i < 2; i++) {
    oled.fillRect(wallX[i], 0, WALL_THICKNESS, gapY[i], WHITE);
    oled.fillRect(wallX[i], gapY[i] + GAP_SIZE, WALL_THICKNESS, OLED_HEIGHT - gapY[i] + GAP_SIZE, WHITE);

    wallX[i] -= 4;

    if (wallX[i] < -WALL_THICKNESS) {
      wallX[i] = OLED_WIDTH;
      gapY[i] = random(10, OLED_HEIGHT - GAP_SIZE - 10);
    }

    if (wallX[i] == birdX) {
      score++;
      bestScore = max(bestScore, score);
    }

    if ((birdX + BIRD_SIZE > wallX[i] && birdX < wallX[i] + WALL_THICKNESS)
        && (birdY < gapY[i] || birdY + BIRD_SIZE > gapY[i] + GAP_SIZE)) {
      current_state = STATE_GAMEOVER;
    }
  }

  oled.setCursor(OLED_WIDTH / 2 - 6, 0);
  oled.print(score);
  oled.display();
}

void showGameOver() {
  wipeScreen();
  oled.setCursor(OLED_WIDTH / 2 - 30, OLED_HEIGHT / 2 - 20);
  oled.print(F("GAME OVER"));

  oled.setCursor(OLED_WIDTH / 2 - 3, OLED_HEIGHT / 2 - 10);
  oled.print(score);

  oled.setCursor(OLED_WIDTH / 2 - 30, OLED_HEIGHT - 26);
  oled.print(F("BEST SCORE"));

  oled.setCursor(OLED_WIDTH / 2 - 3, OLED_HEIGHT - 18);
  oled.print(bestScore);

  oled.display();

  while (digitalRead(BUTTON_PIN) == LOW);

  birdY = OLED_HEIGHT / 2;
  gravity = -4;
  score = 0;
  wallX[0] = OLED_WIDTH;
  gapY[0] = OLED_HEIGHT / 2 - GAP_SIZE / 2;
  wallX[1] = OLED_WIDTH + OLED_WIDTH / 2;
  gapY[1] = random(10, OLED_HEIGHT - GAP_SIZE - 10);

  while (digitalRead(BUTTON_PIN) == HIGH);

  wipeScreen();
  current_state = STATE_PLAYING;
}

void showStartScreen() {
  oled.clearDisplay();
  oled.setCursor(OLED_WIDTH / 2 - 30, OLED_HEIGHT / 2 - 8);
  oled.print(F("ESP BIRD"));
  oled.setCursor(OLED_WIDTH / 2 - 42, OLED_HEIGHT / 2 + 8);
  oled.print(F("Press to Start"));
  oled.display();

  if (digitalRead(BUTTON_PIN) == LOW) {
    wipeScreen();
    birdY = OLED_HEIGHT / 2;
    gravity = -4;
    score = 0;
    wallX[0] = OLED_WIDTH;
    gapY[0] = OLED_HEIGHT / 2 - GAP_SIZE / 2;
    wallX[1] = OLED_WIDTH + OLED_WIDTH / 2;
    gapY[1] = random(10, OLED_HEIGHT - GAP_SIZE - 10);
    current_state = STATE_PLAYING;
  }
}

void wipeScreen() {
  oled.clearDisplay();
  oled.display();
}
You can drop this into the Arduino IDE, upload it to your board, and you’re ready to flap!
⚠️ If you run into any issues-like a blank screen or unresponsive button - double-check your wiring and code setup. You can refer back to the previous post for detailed instructions on getting the OLED and button working with the ESP32-S3 SuperMini.
🎨 Customizing the Bird Sprite #
Want to give your bird a personal touch? You totally can. ESP Bird uses a simple 16×16 monochrome bitmap for the bird sprite-so customizing it is as easy as updating a few bytes.
To make this process easier, we created a handy Monochrome Bitmap Tool that lets you draw and export sprites for your OLED projects.
🧠 Features: #
- ✏️ Draw by clicking directly on the canvas-pixel by pixel
- 🖼️ Render binary input to preview your custom sprite
- 📤 Generate binary output compatible with
Adafruit_GFX::drawBitmap() - 📐 Supports 8×8, 16×16, and 32×32 sprites
- 🧩 All-in-one interface-single canvas, no install needed
You can create a flapping duck, a pixel dragon, or even your own face-just sketch it out, copy the generated array, and replace bird_frame1[] and bird_frame2[] in your code.
🖼️ Copying a Sprite #
If you want to visualize the current ESP Bird sprite, you can easily do that by copying the binary data of a bird frame into the Monochrome Bitmap Tool
Here’s the binary data for the bird_frame1 sprite:
static const unsigned char PROGMEM bird_frame1[] = {
  B00000000, B00000000,
  B00000000, B00000000,
  B00001111, B10000000,
  B00011111, B11100000,
  B00111100, B11110000,
  B01111111, B11111000,
  B11111111, B11100100,
  B11011111, B01111000,
  B11011111, B01111000,
  B11011111, B01111000,
  B11001110, B01111000,
  B01110001, B11110000,
  B01111111, B11100000,
  B00111111, B11000000,
  B00000111, B00000000,
  B00000000, B00000000
};
When you paste this binary data into the tool and click Render Binary, it will generate a visual representation of the sprite, like this:
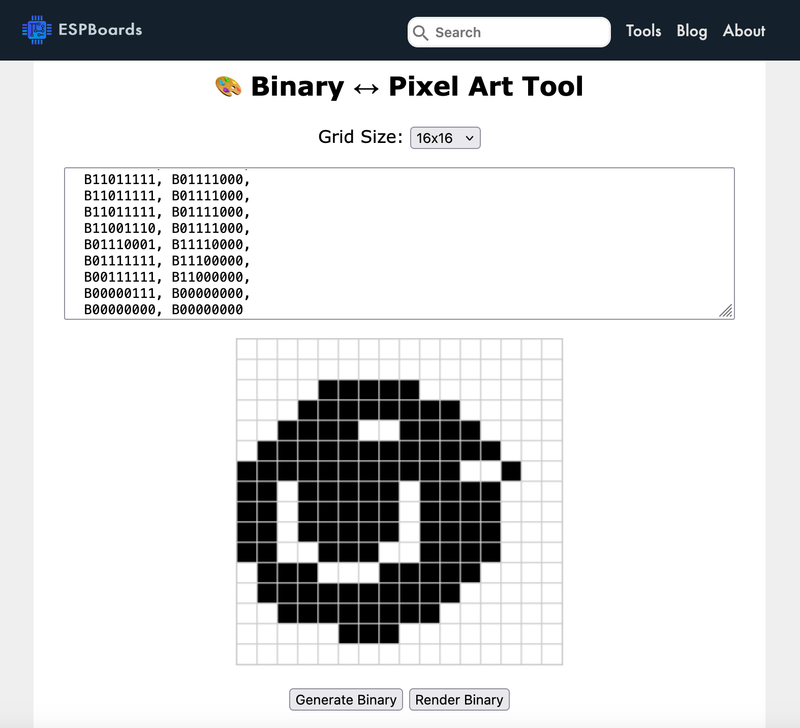
This visual is helpful when you're adjusting or designing new sprites for your projects. You can draw your bird or other elements in the tool and directly export the data to be used in your Arduino sketch!
✏️ Tip: Try tweaking the binary values to create your own designs and animate the bird with different frames.
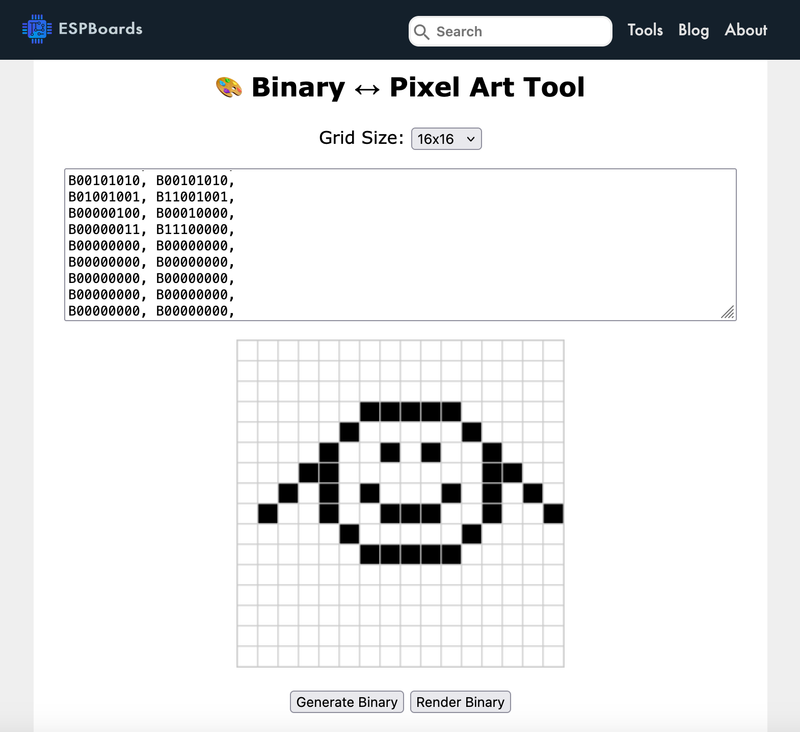
😄 Drawing and Flying a Smiley Bird #
Let’s wrap it up with a fun customization example-replacing the bird with a smiley face you draw yourself.
🧑🎨 Step 1: Draw in the Bitmap Tool #
Head over to the Monochrome Bitmap Tool and:
- Set the canvas to 16×16
- Draw a simple smiley face (two eyes and a curve)
- Add hands or "wings"
- Click "Generate Binary"
Here’s what a basic smiley might look like:
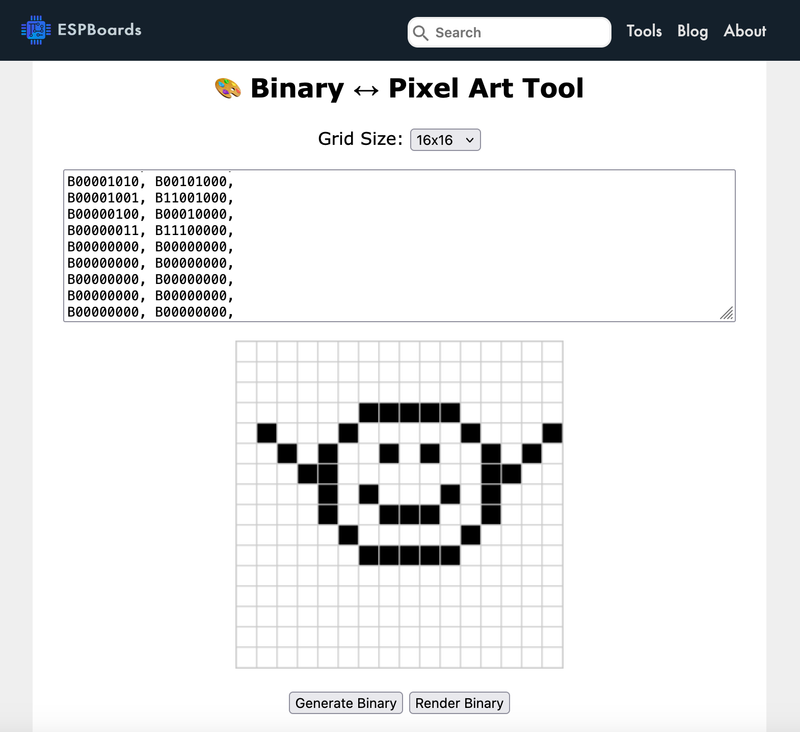
Also, you might want to create a second sprite to have some kind of animation:
📋 Step 2: Copy the Output to Code #
After hitting “Generate Binary,” copy the result and paste it into your code, replacing the original bird_frame1[] and bird_frame2[]. Example:
static const unsigned char PROGMEM bird_frame1[] = {
    B00000000, B00000000,
    B00000000, B00000000,
    B00000000, B00000000,
    B00000011, B11100000,
    B01000100, B00010001,
    B00101001, B01001010,
    B00011000, B00001100,
    B00001010, B00101000,
    B00001001, B11001000,
    B00000100, B00010000,
    B00000011, B11100000,
    B00000000, B00000000,
    B00000000, B00000000,
    B00000000, B00000000,
    B00000000, B00000000,
    B00000000, B00000000
};

static const unsigned char PROGMEM bird_frame2[] = {
    B00000000, B00000000,
    B00000000, B00000000,
    B00000000, B00000000,
    B00000011, B11100000,
    B00000100, B00010000,
    B00001001, B01001000,
    B00011000, B00001100,
    B00101010, B00101010,
    B01001001, B11001001,
    B00000100, B00010000,
    B00000011, B11100000,
    B00000000, B00000000,
    B00000000, B00000000,
    B00000000, B00000000,
    B00000000, B00000000,
    B00000000, B00000000
};
✍️ Pro tip: You can animate the smiley by drawing a second version with blinking eyes or a different expression!
🚀 Step 3: Upload and Fly #
Upload your updated sketch to the ESP32-S3 SuperMini. When the game starts, your smiley sprite is now flying through pipes, bouncing around the screen.
This simple tweak shows how flexible the bitmap system is. You're not just stuck with the default bird-you can turn ESP Bird into anything: a ghost, a spaceship, a cat, even your own pixel avatar.
🧩 Wrapping Up #
You’ve just built a full-featured mini-game - ESP Bird - running entirely on an ESP32-S3 SuperMini and a 128×64 OLED. From physics to rendering, it’s all happening in real time with just a button for control. Pretty cool for a microcontroller project, right?
🛠️ What You’ve Built #
- A gravity-based flying mechanic with button input
- Scrolling pipe obstacles with random gaps
- Collision detection and scoring
- Start and Game Over screens
- Basic sprite animation on a monochrome display
🚀 Ideas for Mods & Upgrades #
- 🎵 Add a buzzer for jump and crash sounds-or a vibration motor for haptic feedback
- 🐥 Create character select with different sprites and animations
- ⏩ Adjust pipe speed to increase difficulty over time
- 🏆 Show high scores across sessions using EEPROM or flash memory
You now have a solid game engine running on minimal hardware. Modify it, remix it, and make it yours.
Don’t forget to check out the previous post if you need help with wiring or display setup. Or explore more ideas using the ESP32-S3 SuperMini-there’s a lot more this tiny board can do.
Game on! 🐤✨