
Home Assistant access from Internet with Cloudflare Tunnel
In case you do not have access to your router settings, access your Home Assistant from Internet without Port Forwarding, using Cloudflare Tunnel cloud service
In the previous post, we set up the Home Assistant and integrated our first ESP32 board through ESPHome. We now have the hub for our smart house, to which we will connect all our smart home items, as Home Assistant provides easy integration for plenty of devices. However, we can connect to our Home Assistant hub from LAN only, meaning we can check the stats and control our smart home only when we are at home and connected to the home network.
For many applications, not having public internet access to your smart home, eliminates the whole point of it. For example, if you have a camera and leave some pets alone at home, you might want to check it when you're outside. If you have the smart temperature control at home, you might want to warm your house up, before returning from holidays. Or even if you're at home, but your phone is not connected to the WiFi, but connected to the 4G mobile network instead, you still want to access your smart home! You see where we're going... We need to access home assistant remotely from the Internet.
In this tutorial we will go through several steps to secure our Cloudflare tunnel:
- Home Assistant Internet Access Options
- Traffic Tunnelling Cloud Services
- Setting up Cloudflare Tunnel
- Securing the Cloudflare tunnel (Important!)
- Conclusion
How to Access Home Assistant Remotely? #
When it comes to remote access to Home Assistant from the internet, we have multiple options. After all, we just need to access the Home Assistant Web UI, which we could look at as a simple HTTP server. We just need to be a little creative here, and we soon come up with ideas about VPN, proxy tunnels and more. All of these ideas are good, but, as always, has its advantages and disadvantages. The most popular options would be:
- Home Assistant Cloud
- Port Forwarding
- VPN
- Tunneling
Let's take a closer look at each of the options.
1. Home Assistant Cloud #
The Home Assistant team provides the Home Assistant Cloud services, where you connect your Home Assistant instance to the cloud and gain public internet access through the cloud. You can check more at Nabu Casa, the official provider of Home Assistant.
While this is surely the easiest option to set up, it is not necessarily the best. By utilizing the Remote UI, a feature of Home Assistant Cloud, you can easily access your Home Assistant remotely. You can set it up through the Home Assistant Web UI with a few clicks.
However, it comes at a price. First, money-wise, the cloud subscription costs 65 USD annually, or 75 EUR, if you are in Europe. Second, connecting to the cloud, means we are depending on the third-party service. All the requests will go through a third party, which could mean less privacy. Also, if the third-party service would become unavailable, we would lose our remote access and would have no control in terms of restoring it.
Advantages
- Easiest setup
- Native cloud integration
Disadvantages
- Paid service
- Third-party
2. Port Forwarding #
Since we are already running our own infrastructure (in our case on Raspberry Pi), we don't want to depend on the third-party, because we can set up and control the public access ourselves.
The most common approach, without depending on any third party, would be Port Forwarding. You would need to set up port forwarding on your router, to allow public internet access on port 8123 and forward the traffic to our Home Assistant instance on Raspberry Pi.
The setup differs on every router from different manufacturers but should be fairly easy, as it is a common operation. Consult your router's manufacturer manual for detailed instructions.
Advantages
- Easy setup
- Self-hosted
Disadvantages
- Not very secure
- Needs access to router settings
3. VPN #
There are several problems with the previous approach: 1. it is not very secure, as we allow the traffic for everyone on the internet, 2. we need access to the router settings, which not all ISPs (Internet Service Providers) allow. While for the VPN setup, you will still need to access the router settings and open some ports, we can make the access more secure, by utilizing the VPN.
The setup will be a bit harder, as you still need to do some port forwarding (For the VPN this time, not the Home Assistant instance), but should not be very difficult with out-of-the-box solutions, like OpenVPN or Wireguard.
Advantages
- Secure
- Self-hosted
Disadvantages
- Harder to setup
- Needs access to router settings
4. Tunneling #
Sometimes, the Internet Service Provider does not allow end-users to modify the router settings at all, including the port forwarding. Also, we do not want to depend on the third-party service and pay for it. What's then?... It's not all lost, we still have another option - the Tunneling services.
Tunneling software that lets you quickly and securely direct traffic to your locally running services without forwarding the ports. It works by installing the Tunnel Connector on your home network (in our case, on Raspberry Pi, running the Home Assistant) and connecting it to the cloud tunnel service provider. Traffic from the internet will be routed, or "tunneled", to the tunnel connector, which in turn will access the service running on your local network.
Advantages
- Secure, if set up correctly
- Doesn't need router settings access
Disadvantages
- Harder to setup
- Third-party service
So, which Option to Choose? #
We have reviewed several options for internet access to our Home Assistant instance, and as you can see, there is no best option. All of the options have their own advantages and disadvantages. Depending, if you want to spend more time setting up your infrastructure, or you would better pay some money and have an easy installation, if you have access to your router settings and more, you will have to choose the option that suits you best.
When it comes to our specific case, where we are running the Home Assistant in Raspberry Pi, we are willing to spend some time on setting up our infrastructure, do not want to depend on third parties, nor to pay money for their services, but still want a secure connection from the internet to our Home Assistant instance. The logical choice would be a VPN - secure, fairly easy to set up and we can manage the infrastructure ourselves.
However, we have a problem... Our ISP does not allow modifying the router settings, including port forwarding. Moreover, the router is vendor-locked to the ISP and cannot be replaced easily. Oh, I hate the monopoly ISPs... But that's the thing with monopolies, you have to deal with it. Therefore the option we have left is Tunnelling.
Traffic Tunnelling Cloud Services #
There are many cloud services, that offer traffic tunneling. Each comes with its pluses and minuses. We are not going to go into very much detail about the options. You can choose the one that suits you best, as most of the modern cloud service providers offer the same features as our choice - Cloudflare.
One of the main reasons we chose Cloudflare is advanced security and the reason that they offer a free plan for everything we need. Add this to the easy setup and we have a winner.
Please note, that even though Cloudflare has free tier plans, you will still need to add your credit/debit card to the Cloudflare account, to be able to use their free cloud services. It will not be charged!
Setting up Cloudflare Tunnel #
Before you begin, you will need to create a Cloudflare Account and have a public Domain Name. Also, we assume that you have the same infrastructure that we built in the previous post.
Prerequisites #
- Domain Name
- Cloudflare Account
Steps #
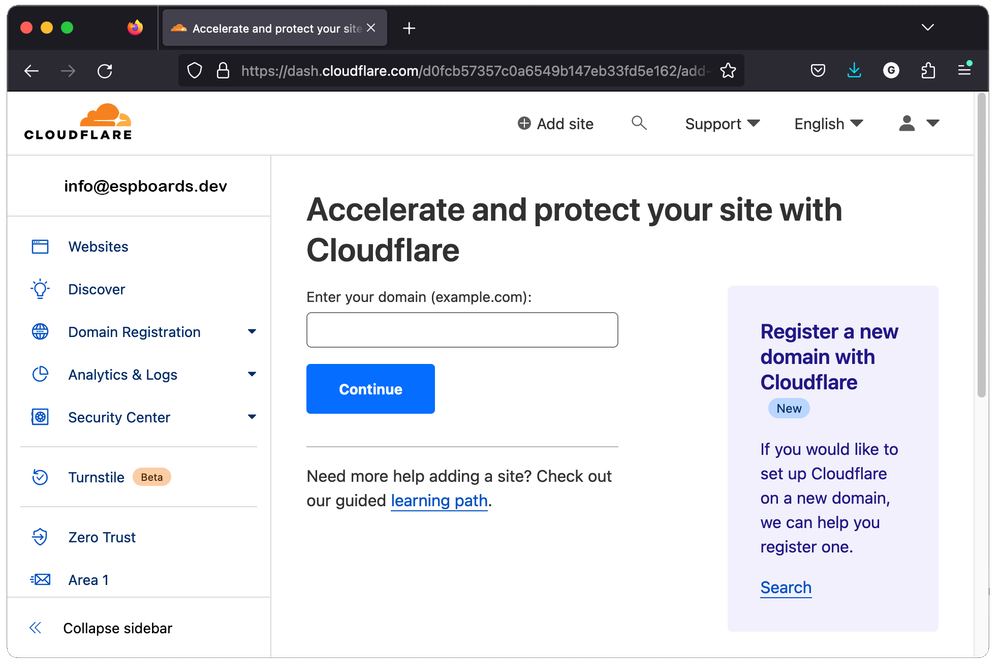
- Add your Domain to Cloudflare
If your domain name is not registered in Cloudflare, you need to add it to Cloudflare first, to be able to use it later for the public tunnel access.
Login to your Cloudflare account and go to "Websites" -> "Add a site". Enter your domain name and click "Continue", and select the free plan.
- Setup Domain Nameservers
If your domain is not hosted on Cloudflare, you will need to set your domain's Name Servers (NS) to Cloudflare servers. You will need to go to your Domain Name provider and replace the current Name Servers with Cloudflare's ones. Follow the instructions provided by Cloudflare and consult your domain's provider manual, if you need help.
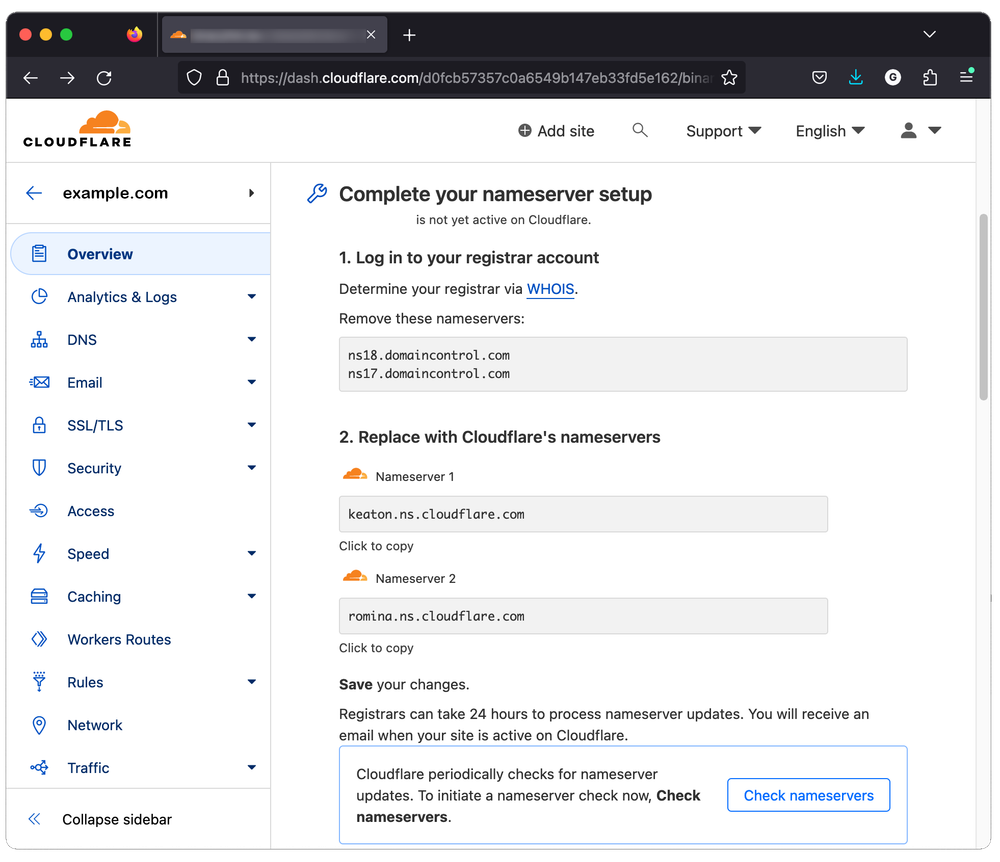
- Check Nameservers
After you have changed the name servers of your domain, click “Check nameservers” on the Cloudflare dashboard. If the settings are correct, you will see a confirmation message.
Please note the registrars can take 24 hours to process nameservers updates. After the updates have been confirmed, you will receive an email from Cloudflare.
Click the “Back” button next to your domain name in the top-left corner. Under “Websites” you should see your domain name marked as “Active”. Your domain is ready to be used in Cloudflare services.
- Create a new Tunnel
To create a new tunnel, on the left-side menu, select "Access" -> "Tunnels". Click "Create new tunnel", enter the tunnel name of your choice and go next.
- Setup Cloudflare Tunnel Connector
Since this is a continuation of the previous post, where we set up Home Assistant to be running inside the Docker container, we assume that you have the Docker ready.
In the Cloudflare dashboard, in the section "Choose your environment" and select "Docker". "docker run" command will be provided for you. We will use it in a moment. 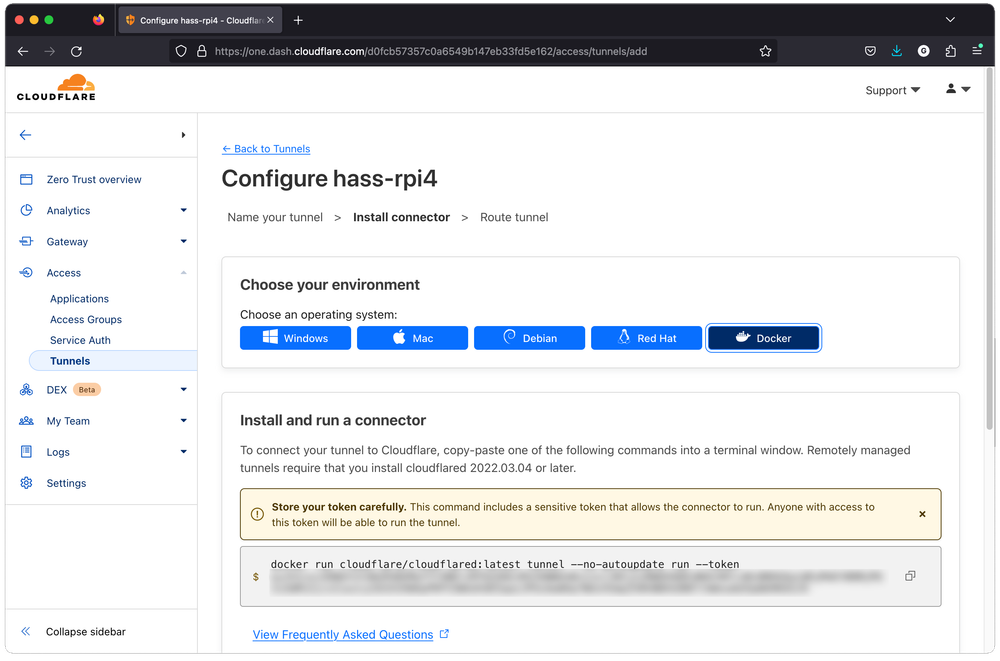
cd ~/
mkdir cloudflare && cd cloudflare- Copy the
docker runcommand from Cloudflare and run it on your Raspberry Pi.
docker run --name cloudflare cloudflare/cloudflared:latest tunnel --no-autoupdate run --token <YOUR_TOKEN>After running the "docker run" command, the Docker container will be started. It should output some logs in the console. Look for the line “INF ICMP proxy will use x.x.x.x. as a source for IPv4", where “x.x.x.x” is the local IP address the Cloudflare Tunnel Connector is using. In our case, it is “172.17.0.2”. Take note of this IP address, we will need it later.
- Restart the Tunnel Container
Now, that we have taken note of the IP address, we will run the Docker container with Connector in a detached mode.
- Click "ctrl+c" to exit from the Connector Docker Container.
- Check the name of the Cloudflare Tunnel Connector Container. Type the following command and look for the "Name" of the Connector Container.
docker ps -a- In our case, the name of the Cloudflare Tunnel Connector Container is "
cloudflare"
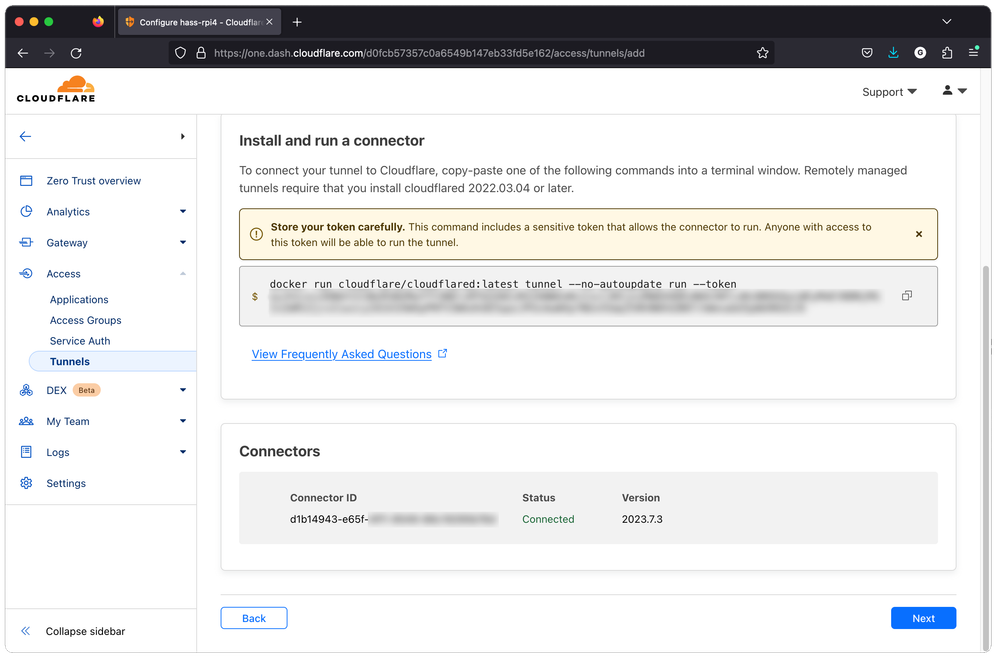
docker start cloudflare- Check the Connector Status After successfully running the Cloudflare Tunnel Connector inside Docker Container, you should see a new Connector appear under “Connectors” with the status "Connected". Click "Next".
- Add Public Hostname for the Connector
Next, we will add the public hostname for our Connector. Select your Domain from the list. If you want, you can add a Path or Subdomain for your domain. In our case, we enter "hass" as a subdomain, because want to access the Home Assistant dashboard by going to “hass.example.com”.
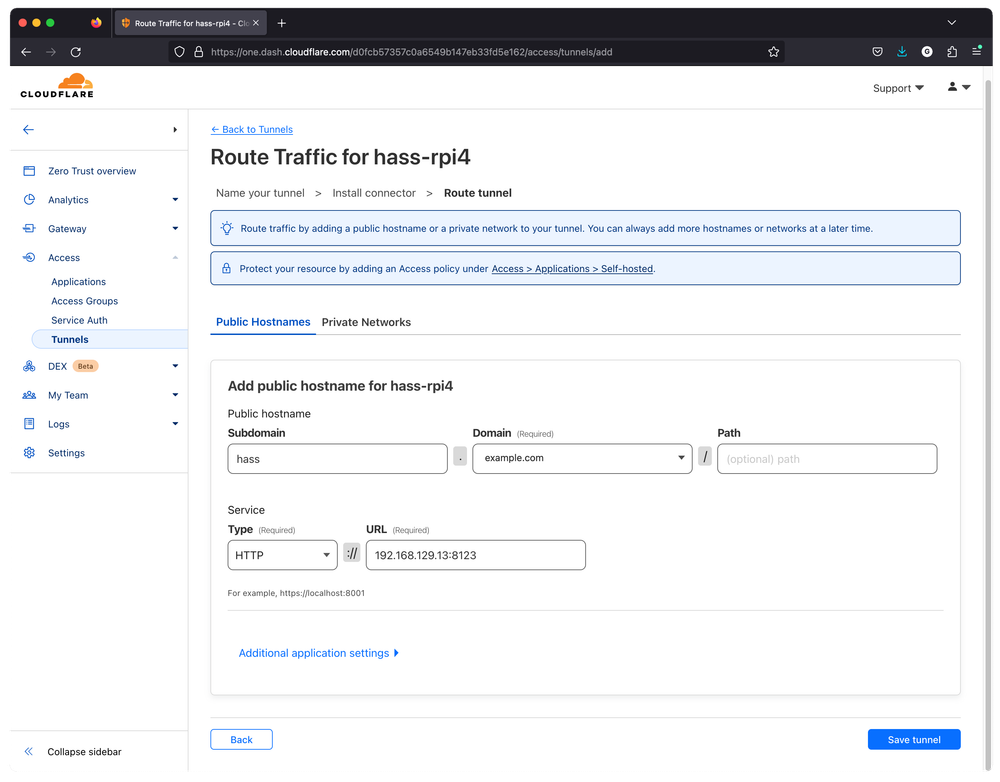
Under "Service", select Type as “HTTP” and enter the URL you use to access the Home Assistant Dashboard from your computer.
Save the tunnel. The setup of the Cloudflare Tunnel Connector is finished!
- Test the Cloudflare Tunnel
To test your new tunnel, grab a device that is on another network, for example, your phone with a mobile data connection (4G/5G) and open the address you entered when setting up the public hostname, in our case “hass.example.com”.
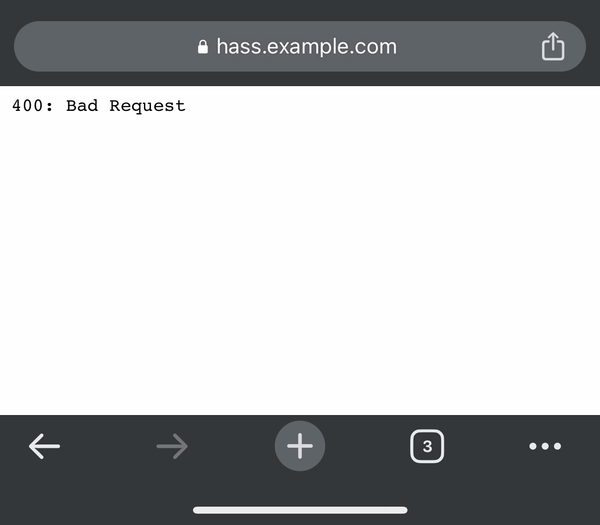
“400: Bad Request”, doesn’t look good, does it? Well, yes and no… The response that we see (“400: Bad Request”) is coming from our Home Assistant instance! Therefore, the Cloudflare tunnel is actually working fine and is redirecting us to the Home Assistant running in our Raspberry Pi!
- Allowing Cloudflare Tunnel Connections to Home Assistant
We are getting close, but the Home Assistant is blocking requests coming from proxies/reverse proxies by default. Therefore we need to tell the Home Assistant to allow requests coming from our Cloudflare Tunnel. That’s the reason we took note of Cloudflare Tunnel Connector's local IP address earlier (step 6).
- Edit Home Assistant Configuration
Let's open the Home Assistant configuration on our Raspberry Pi. With the SSH connection to Raspberry Pi, type
cd ~/homeassistantAnd edit the "configuration.yaml" file, by adding the following to the top of the file:
http:
  use_x_forwarded_for: true
  trusted_proxies:
    - 172.17.0.0/24
Make sure to replace the IP address of the Cloudflare Tunnel Connector IP that you have taken note of earlier. If the last number in the IP address is not 0, change it to 0. For example, our IP was “172.17.0.2”, therefore we enter “172.17.0.0/24”.

- Restart the Home Assistant
For the changes to be applied, we need to restart the Home Assistant. We can do that through the Home Assistant Web Interface. Open your Home Assistant interface in the browser and go to "Settings" -> "System".
Select the Power Icon on the top-right corner and click Restart.
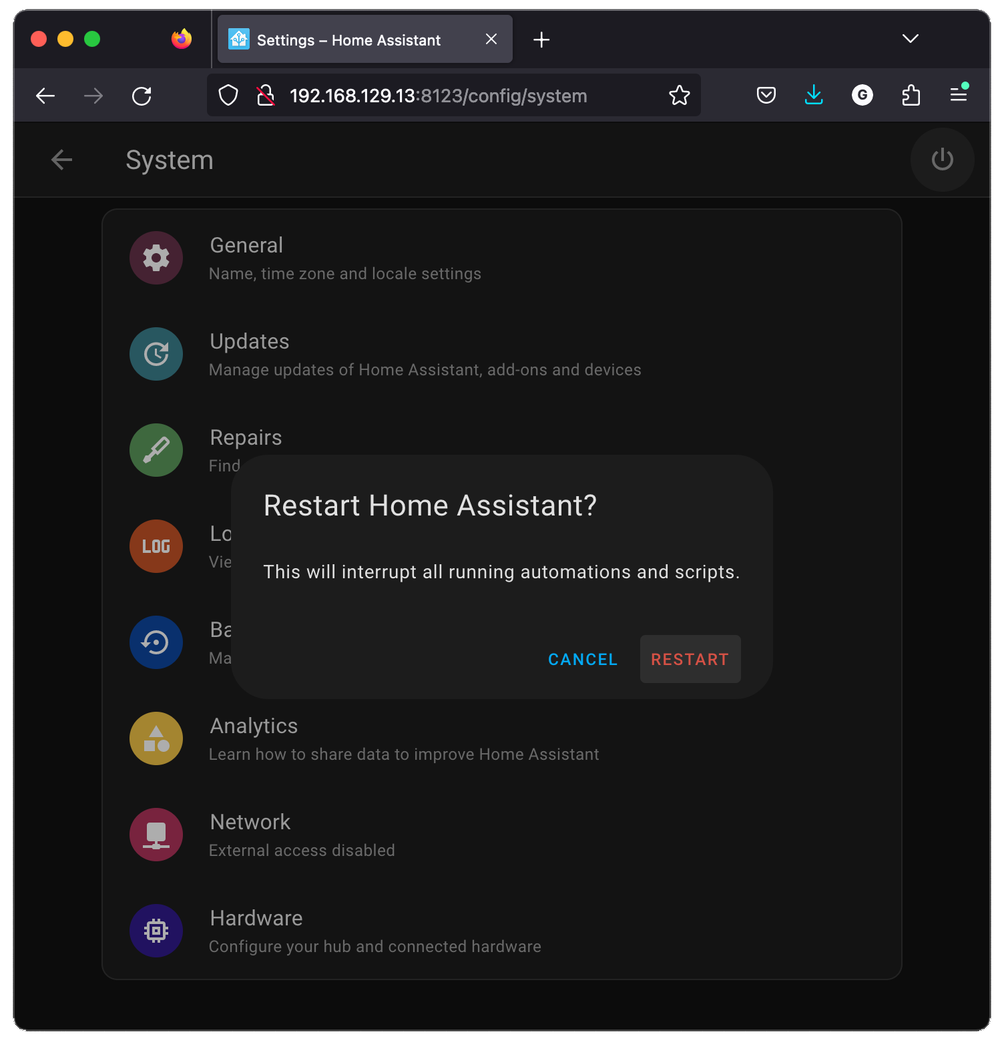
Your Home Assistant instance will restart and should be available again in a few minutes.
- Test the Tunnel Again
Once again, grab your phone or other device, that is connected to a different network than your home, open the browser and refresh the page (in our case hass.example.com).
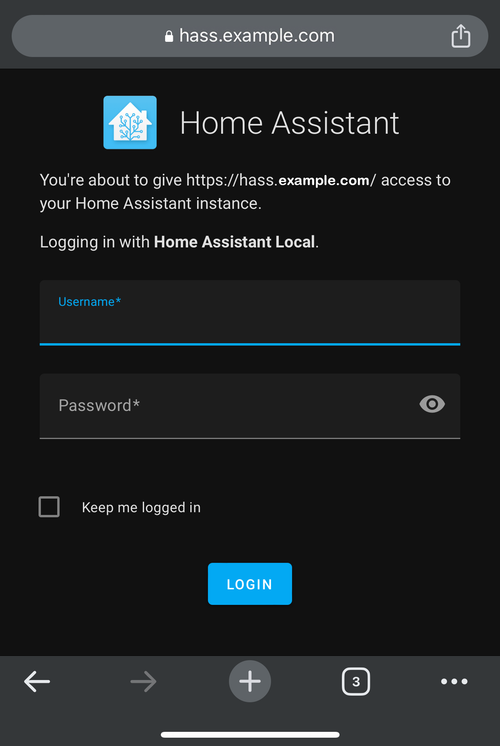
You can now access the Home Assistant from outside of our LAN network through the Cloudflare Tunnel! Congratulations! But we are not done, we need to secure our tunnel.
Securing the Cloudflare tunnel (Important!) #
Since we will be accessing our Home Assistant instance from the internet, we want to make sure the traffic is encrypted and is using HTTPS protocol. The good thing is, that Cloudflare manages the SSL certificates for our domains automatically, therefore we do not have to worry about HTTPS, as it should be set up automatically, but we still need to increase the security.
Also, we have made our Cloudflare Tunnel instance publicly accessible. With the vast amount of malicious bots and scanners running on the internet, people with bad intentions could find your website address. Even though the Home Assistant Web UI is protected with a password, the baddies should not even reach the Home Assistant instance at all.
Securing the Domain #
As mentioned before, because have pointed the domain nameservers to Cloudflare, they manage the SSL certificates for us by default, therefore you should already be able to access your Home Assistant instance through the Cloudflare tunnel with HTTPS protocol.
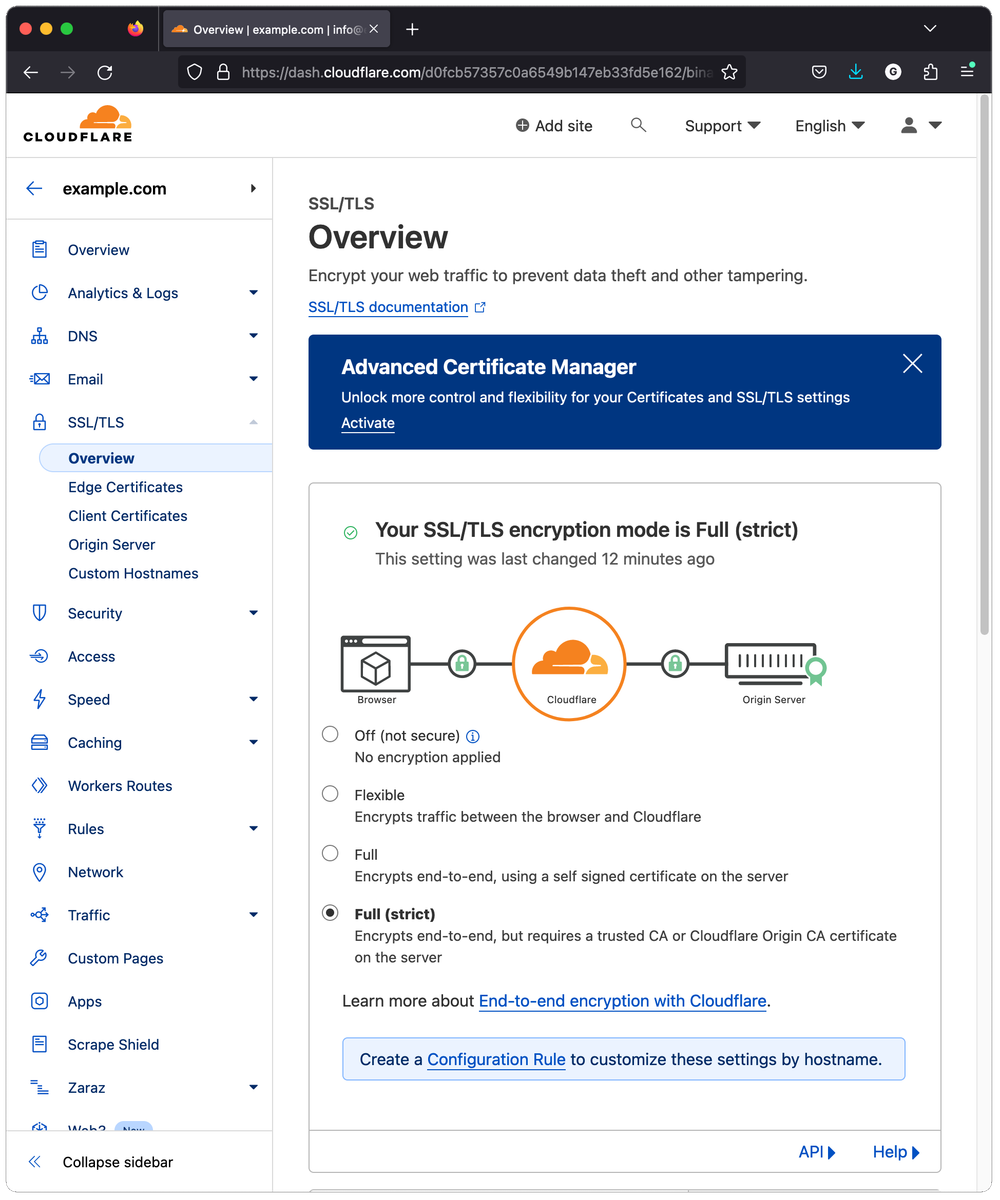
In Cloudflare Dashboard, go to "Websites" and select your domain. Go to "SSL/TLS" -> "Overview" and set the "Encryption mode" to "Full (strict)", so the traffic is fully encrypted.
Our access to Home Assistant is working perfectly fine with HTTPS now, but it also works with HTTP and we want to avoid that. In CloudFlare Dashboard, go to "SSL/TLS" -> "Edge Certificates".
The first thing you will notice is the list of SSL certificates generated by Cloudflare, which even takes care of creating the backup certificate for us. Also, you can see the certificate expiration date, but you don't need to worry about that, because Cloudflare will renew them automatically when it is time to do so.
Scroll down a bit and enable "Always Use HTTPS", this will make sure that all the HTTP requests to our Home Assistant are redirected to HTTPS.
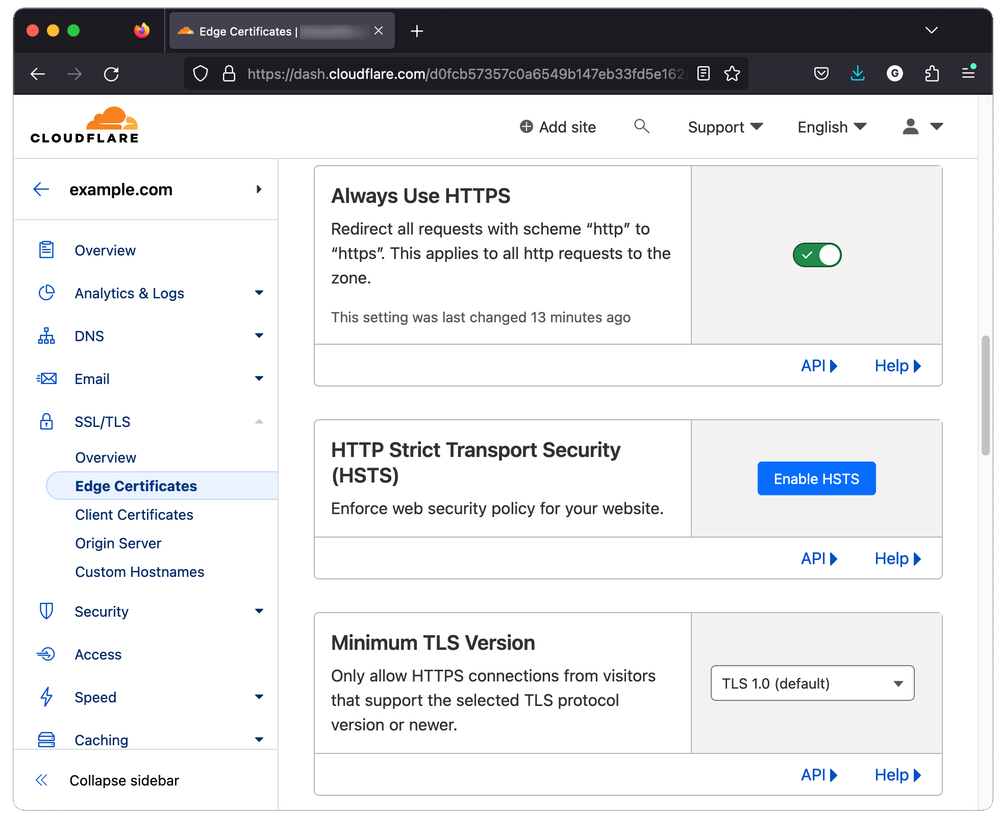
Also, make sure the "Opportunistic Encryption", "TLS 1.3", and "Automatic HTTPS Rewrites" are enabled. They should be enabled by default, but please double-check to make sure.
Securing the Tunnel #
Currently, everyone on the internet, who knows the address of your website, can access your Home Assistant instance. With scanners and bots running on the internet, someone will likely figure out the address sooner or later. When it happens, we don't want them to actually access the Home Assistant instance and block them before they even reach the Home Assistant login page.
We're in luck because Cloudfront provides the right tools we need to achieve this. We are going to implement another authentication with SSO (Single-sign-on) before the Cloudfront will try to access the tunnel.
- Add New Login Method
In Cloudfront, under "Zero Trust", go to "Settings" -> "Authentication" and under "Login methods", click "Add new".
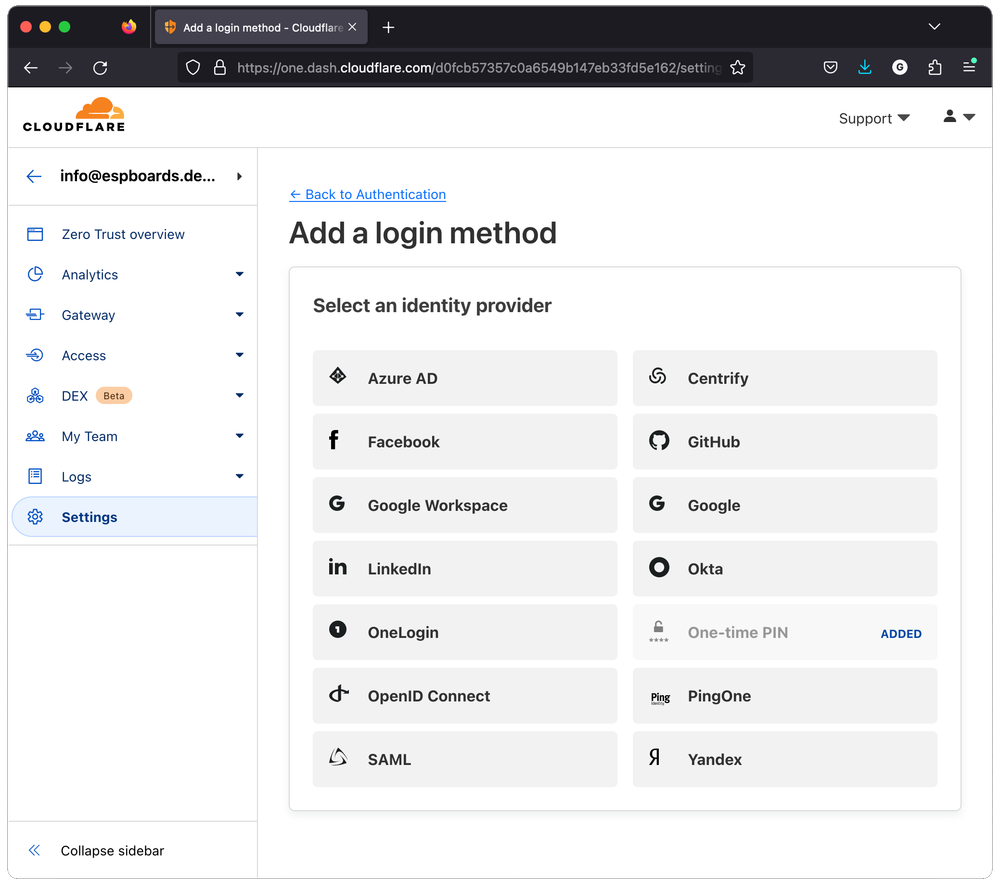
You can choose any identity provider from the list that you prefer, or you can even add multiple. In this tutorial, we are going to use the GitHub. Click on "GitHub" and follow the instructions provided. You will need to log in to your GitHub account and create a new OAuth application.
- Create Cloudflare Zero Trust Application and Security Policies
When you're finished with setting up the identity providers, go to "Access" -> "Applications" and add a new application. Select "Self-hosted" and click next. Enter the application name of your choice and provide the application domain you use to access the Home Assistant through Cloudflare tunnel, in our case hass.example.com. Scroll down and under “Identity providers”, unselect “Accept all available identity providers” and select “GitHub” only.
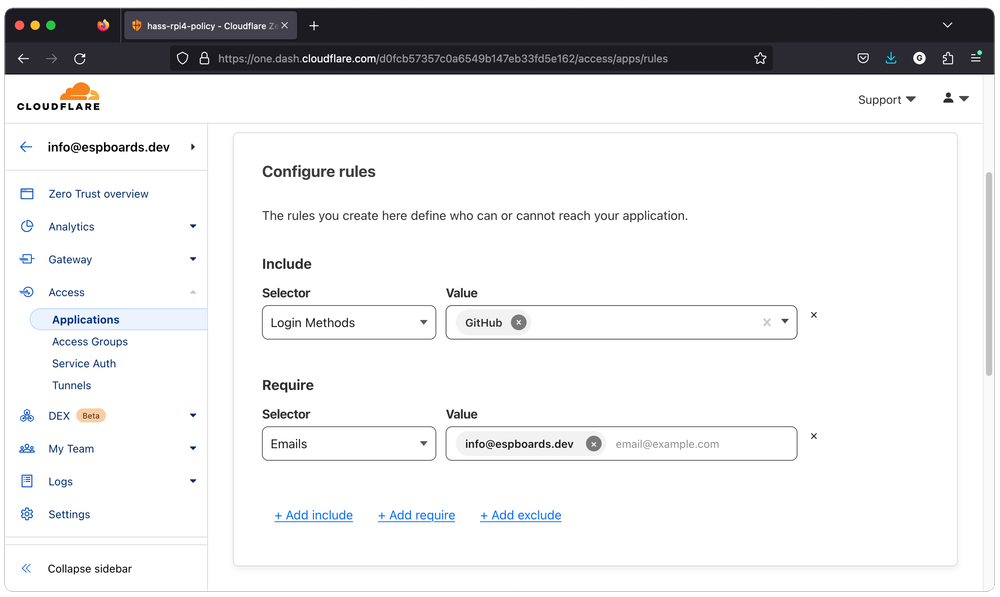
Next, we are going to include the security policy for our application. Enter the Policy name of your choice and select Action to "Allow". Below, in the "Configure rules" section, you could allow or block certain IPs, allow traffic only from specific countries, etc. That could be very useful, as you should make the list of who can access your Home Assistant instance as short as possible.
As we want to be able to access our smart home, while traveling, we cannot restrict the location to our home. Also, since our 4G network operator does not provide a static IP, therefore when accessing from mobile, the IP is always different, therefore we cannot whitelist the IP. What we can and should do though, is allow only ourselves with the GitHub authentication.
Under "Configure rules", create a new "Allow" rule - Selector "Login Methods" => "GitHub" only. Create a new "Require" rule, Selector "Emails" => your GitHub account email address.
- Test Security Policies
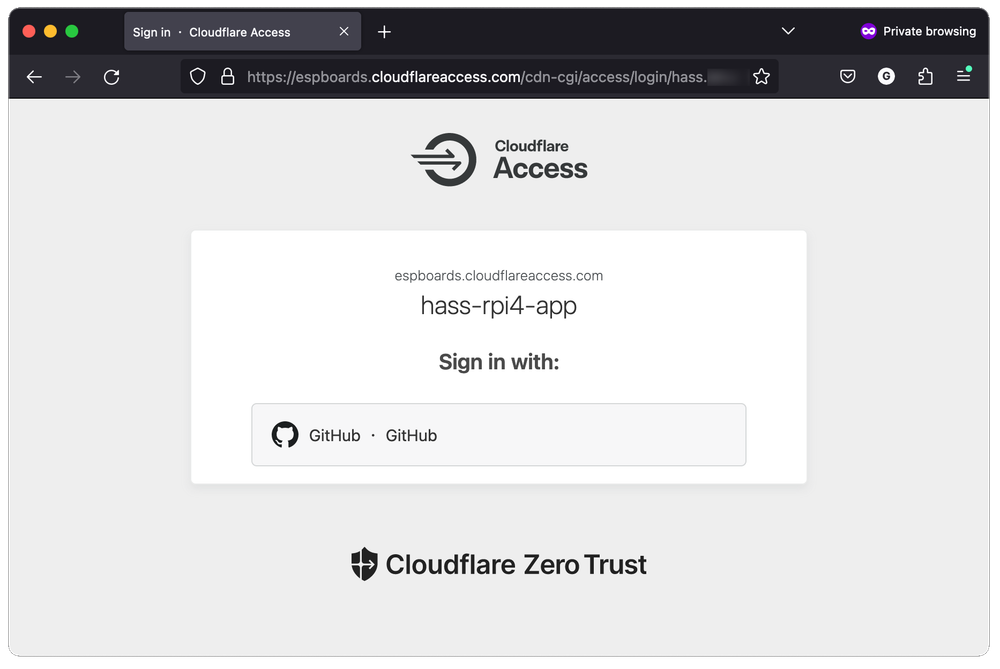
To test our new security setup, simply open your Home Assistant in the web browser (in our case hass.example.com). Instead of the Home Assistant Login Page or Dashboard, you used to see before, you should now see the Cloudflare Zero Trust Access page with GitHub as a sign-in option.
Login with your GitHub account with the email you have provided in the security policy. You should now see the Home Assistant dashboard as you used to, before the security setup.
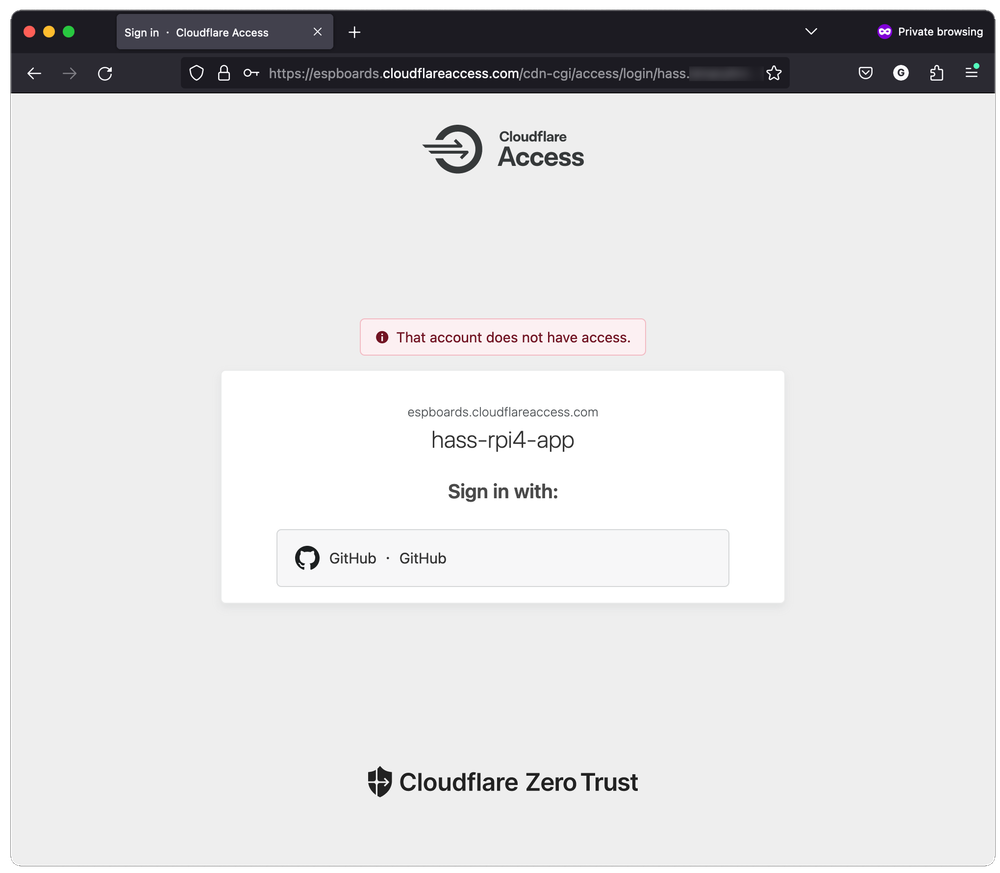
OK, so we have tested the happy scenario for ourselves. But we still don't know if other people cannot access our Home Assistant after simply logging in with GitHub. To test this out, open a private window in your browser. Enter your Home Assistant URL and you will see the Cloudflare Access page again. Select "GitHub" and log in with a different GitHub account. In case you don't have one, you will have to create it for the sake of this test. You should get an error this time because we only allow access only with one email address.
Monitoring #
Even though we have implemented security policies, it is important to see if the policies are working in the real world. Cloudflare doesn't let us down again - they provide extensive logging and analytics for website security. Even though Cloudflare actually provides even more tools for logging and analytics, we are going to look at two of the most important for our case of the application.
- Domain Access Logs
In Cloudflare Dashboard, go to "Analytics & Logs" -> "Account Analytics". Here, you can see how many times your domain was visited, the countries from which it was accessed and more.
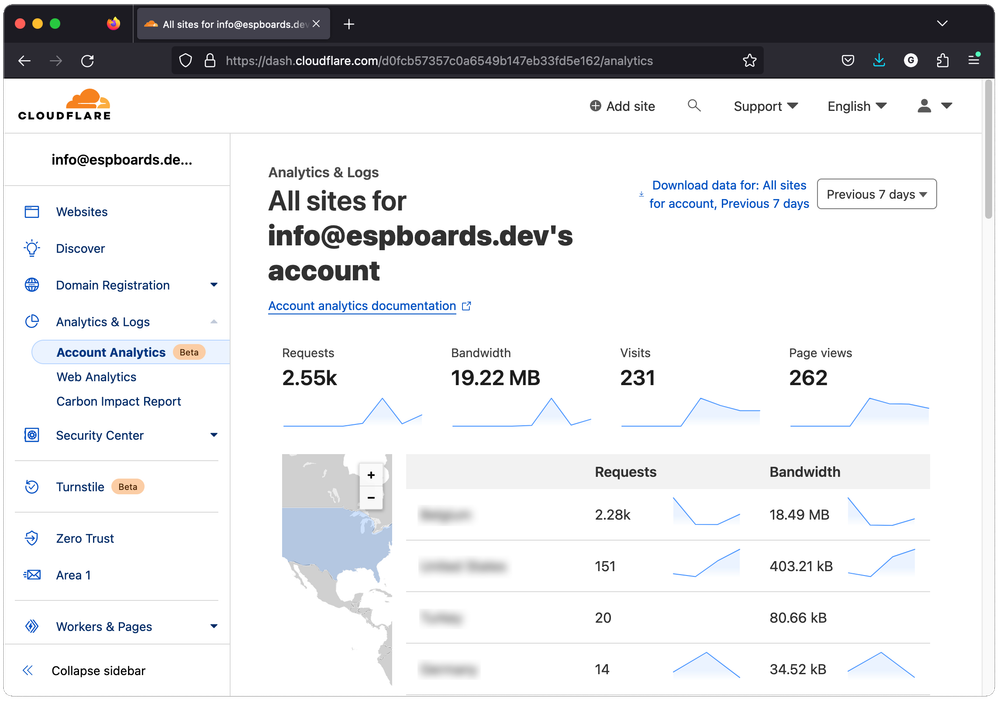
As you can see, there have been multiple requests to access our domain from different countries over the last 7 days. Well, that is not good! This might be just scanners running on the internet, or bots, but in the long term, looks like we might be susceptible to attack. But there is no reason to worry yet. Let's look at another log in Cloudflare.
- Zero Trust Access Logs
Go to "Zero Trust" and select "Logs" -> "Access". Here you will see the authentication requests to the Cloudflare Access application we created earlier (Where we have to log in with GitHub).
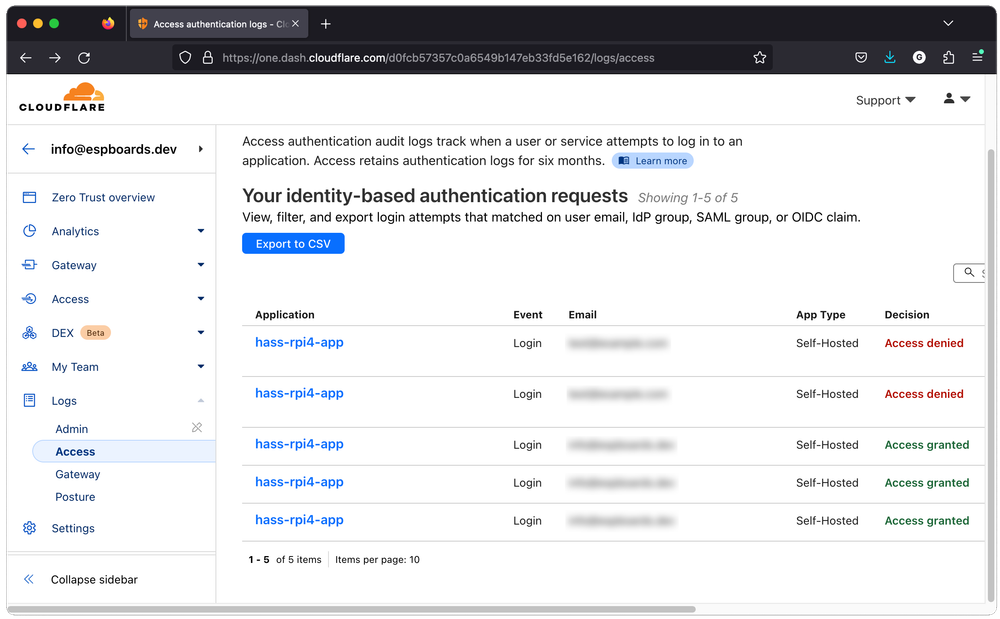
We can see that the only authentication requests that have been are actually from us and our testing. We have logged in with a valid GitHub account 3 times and 2 times we tried the wrong GitHub account and the access was denied.
Conclusion #
Finally, we have set up the Cloudflare Tunnel to allow us "tunneling" our traffic from the internet to our Home Assistant instance without touching our router settings, as we don't have access to it. We have learned how to set up the Cloudflare Tunnel Connector and tested the connection from the 4G network.
Since we have opened our Home Assistant Web UI to the internet, anyone knowing the URL could access it. To avoid this we have implemented some security policies to minimize the list of devices that can access the Home Instance.
Also, the traffic is now flowing through the internet, instead of just LAN, and could be easily intercepted. To counter this we took advantage of the automatic Cloudflare's SSL certificates management and made sure that all the traffic is encrypted.