
Measure Standing Desk Height with ESP32, TOF200C and Home Assistant
Build a non-invasive standing desk height tracker using the TOF200C ToF sensor, ESP32-C3 SuperMini, and ESPHome. Integrate with Home Assistant for automations - no desk modification required.
I’ve always wanted a way to monitor the height of my standing desk automatically, ideally without modifying the desk itself. While there are some great Home Assistant community solutions that tap directly into the desk controller, they typically require wiring into the control box - something I wasn’t keen on doing this time.
So instead, I built a totally non-intrusive solution using a small Time-of-Flight sensor mounted under the desk, an ESP32-C3 SuperMini, and ESPHome to report the height directly into Home Assistant.
The whole setup fits into a tiny 3D-printed case that sticks under the desk. From there, it continuously measures the distance to the floor and sends updates to Home Assistant. If you're just getting started with Home Assistant, check out this guide to running it on a Raspberry Pi using Docker.
Components Used #
This project only needs a few compact and affordable components:

TOF200C Time-of-Flight sensor

ESP32-C3 SuperMini board

Soldered wiring

Custom case (Optional)
I designed a minimal enclosure to mount the sensor and ESP32 neatly under the desk surface. It keeps the setup discreet and out of the way. You can get it from our Etsy Store.
Each enclosure is carefully designed and tested to ensure perfect fit and functionality. Made with premium materials for durability and aesthetics.
Together, these parts create a plug-and-play desk height sensor - no need to hack into motor controllers or dig into firmware.
Assembling the Hardware #
Before flashing any firmware, you'll want to assemble the hardware and get everything neatly packed into the case. Here's how I put it together:
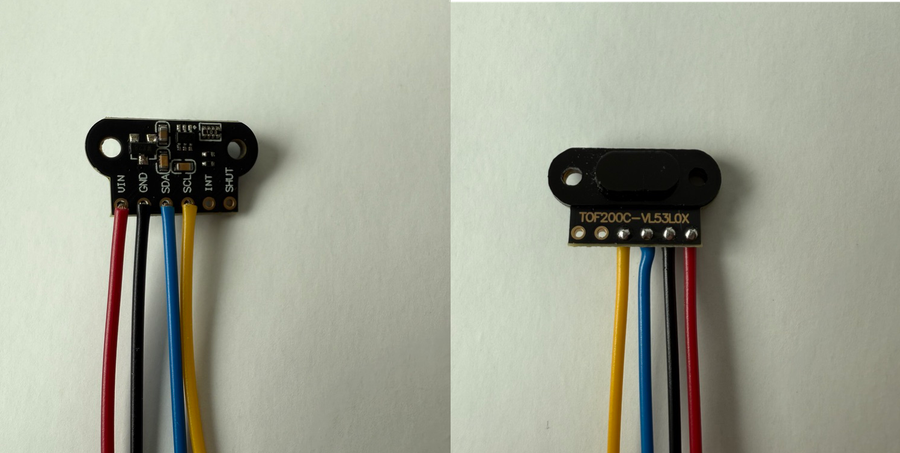
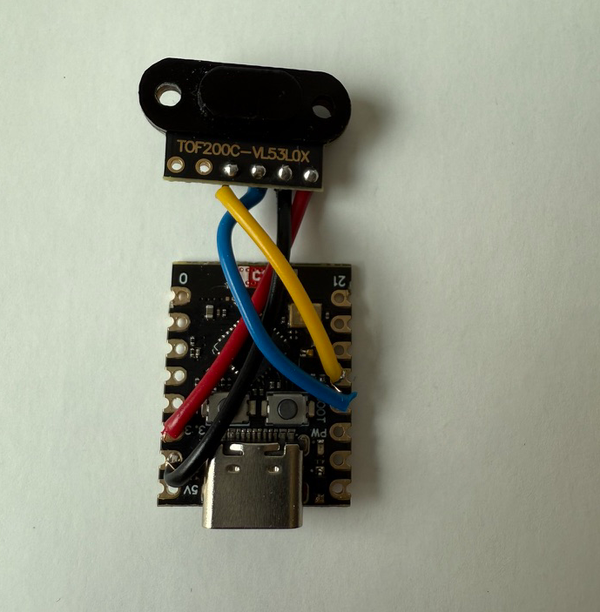
- Solder wires to the TOF200C
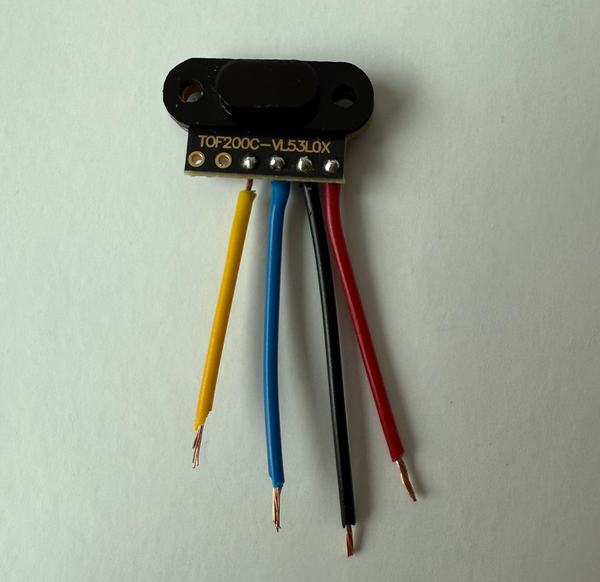
Flip the sensor and solder four wires to the backside pads:VIN,GND,SDA, andSCL. I used 24 AWG, pre-tinned flexible wire to make routing easier inside the case. But you can definitely use thinner wires, which would make the assembly even easier.
- Insert components into the enclosure
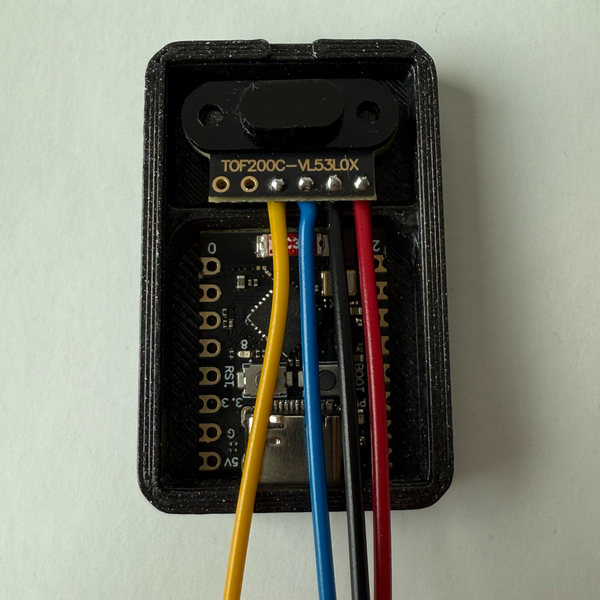
Place the TOF200C and the ESP32-C3 SuperMini into your 3D-printed case. At this stage, don't secure them permanently-just position them to measure the needed wire lengths.
- Measure and cut wires
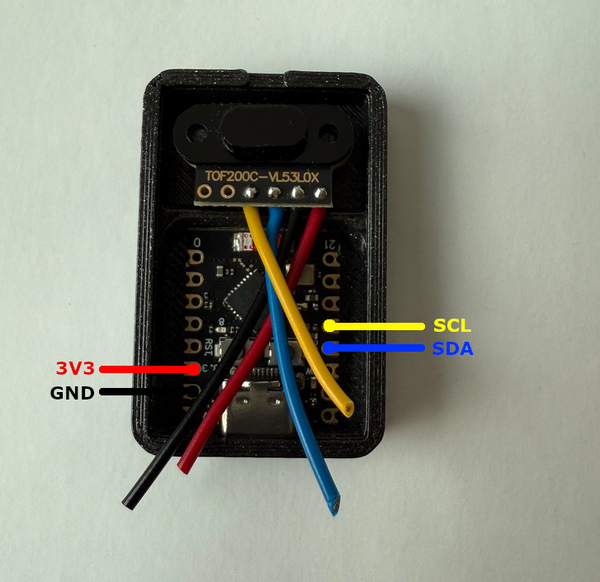
Route the wires from the TOF200C to the ESP32, aligning:- 3V3 → VIN
- GND → GND
- GPIO8 → SDA
- GPIO9 → SCL
Mark and trim the wires to length so they fit cleanly inside the case. I added around 1cm to the length of GPIOs for easy stripping and soldering.
- Remove components from the case
Strip roughly 3–5 mm of insulation from each wire end, twisting any stranded conductors to keep them neat, then lightly tin both the exposed wire tips and the ESP32 or sensor pads/pins with a small amount of solder. Tinning these surfaces first speeds up the final joint and results in a cleaner, more reliable connection.
- Solder wires to the ESP32-C3
Attach each wire to its corresponding pin on the upper side of the ESP32-C3 SuperMini. Make sure to double-check the pinout.
- Final assembly
Slide both components back into the enclosure. As you insert them, carefully guide the wires to minimize vertical stacking - this helps everything fit snugly in the case. Route them so they lay flat and avoid obstructing any components.

⚠️ Make sure none of the wires press against the BOOT or RESET buttons on the ESP32-C3. These need to stay unblocked.
Push the back of the SuperMini gently into a notch in the case to help holding it in place.
- Close it up
Snap the lid back on the case. You're ready to flash ESPHome!
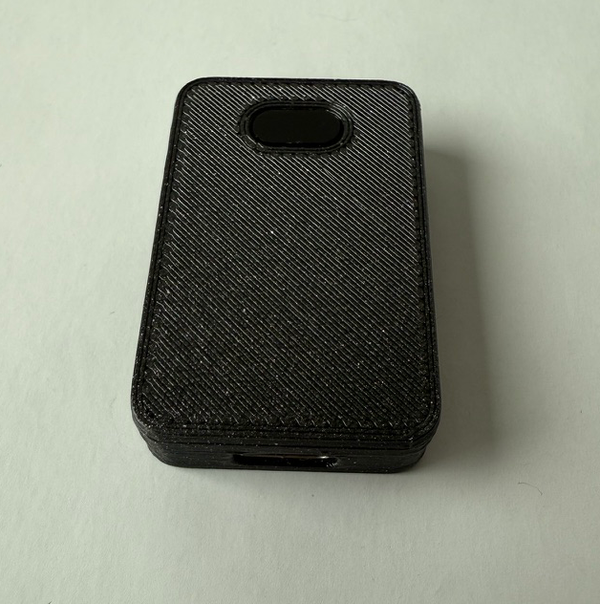
This setup makes it easy to mount under the desk and keeps everything tidy and out of sight.
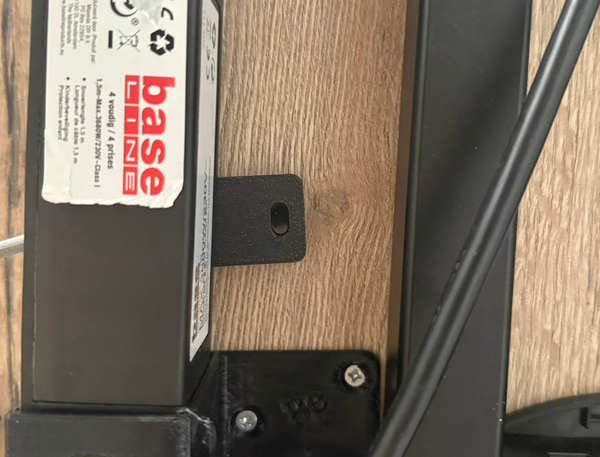
- Mount and power up
Use double-sided tape or screws to attach the enclosure under your desk, with the sensor facing directly downward toward the floor. Once mounted, plug in a USB-C cable to power the ESP32-C3.
Setting Up ESPHome #
If you haven’t already used ESPHome before, this guide walks you through the basics of getting your first board flashed and connected. For this project, I flashed the ESP32-C3 SuperMini using the native USB-C port and uploaded the following configuration:
esphome:
  name: tof200
  friendly_name: tof200

esp32:
  board: esp32-c3-devkitm-1
  framework:
    type: esp-idf

# Enable logging
logger:

# Enable Home Assistant API
api:
  encryption:
    key: "xxx"

ota:
  - platform: esphome
    password: "xxx"

wifi:
  ssid: !secret wifi_ssid
  password: !secret wifi_password

  # Enable fallback hotspot (captive portal) in case wifi connection fails
  ap:
    ssid: "Tof200 Fallback Hotspot"
    password: "xxx"

captive_portal:

i2c:
  sda: 8
  scl: 9
  scan: true
  id: bus_a

sensor:
  - platform: vl53l0x
    id: desk_height
    name: "VL53L0x Distance"
    update_interval: 5s
💡 Important: Make sure to enter your actual Wi-Fi SSID and password in the
secrets.yamlfile, or replace the!secretplaceholders directly in the config for testing.
A few notes:
- I’m using the
esp-idfframework instead of Arduino for better performance and stability on the C3. - The
vl53l0xplatform is used here, which is compatible with the TOF200C since it’s based on the same VL53L0X chip. - I’ve set the update interval to every 5 seconds, which is fast enough for tracking desk movements in near real-time.
Once the device is flashed and connected to Wi-Fi, go to Settings → Devices & Services → Add Integration in Home Assistant, you should see a new ESPHome device in the list. Select it and add it to your Home Assistant.
Displaying the Height in Home Assistant #
Once you've added the ESPHome device to Home Assistant, you can start displaying the desk height on your dashboard and track changes over time.
Dashboard Card #
Create a new Entity Card and select your desk height sensor (either the raw VL53L0X reading or a calibrated version if you've added a template sensor). This gives you a live view of the current desk position.
For example:
- Sensor:
sensor.desk_height(template-calibrated) - Icon: Choose something like
mdi:deskormdi:ruler

History Graph #
To visualize movement over time, add a History Graph Card and include the same entity. This is useful for spotting trends in your daily activity-how often you're switching between sitting and standing, or how long you’ve remained in each posture.
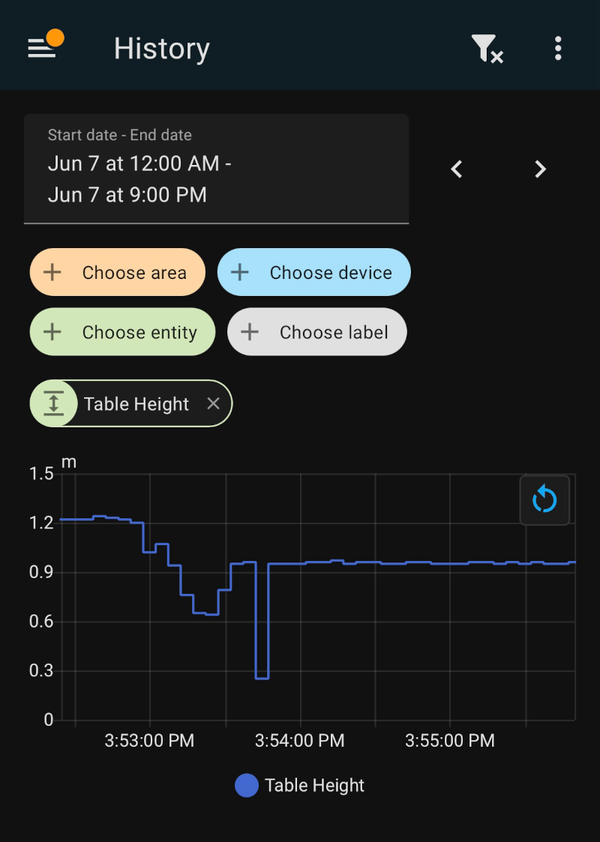
This visual feedback makes it easy to keep track of your habits or debug any quirks with the sensor placement or readings.
Calibrating for Desk Height #
Mounting the sensor under the desk facing downward gives you the raw distance from the sensor to the floor. In my setup, the readings were surprisingly accurate right out of the box-no calibration needed.
But if you want to map these readings to an exact desk height (or adjust for the sensor's offset from the actual tabletop), you can add a simple template sensor in Home Assistant. Here’s how to subtract the mounting height of the sensor from the measured distance:
sensor:
  - platform: vl53l0x
    id: desk_height
    name: "Raw Desk Height"
    update_interval: 2s

  - platform: template
    name: "Corrected Desk Height"
    unit_of_measurement: "cm"
    lambda: |-
      return id(desk_height).state * 100.0 + 8.0;
    update_interval: 5s
In this example, id(desk_height).state is the distance from the sensor to the floor in meters. To get the centimeters we multiply by 100 and then adjust the value to reflect the desk height. In our case, we add 8 cm, accounting for the desk thickness and the fact that I have mounted it on the frame, which is a bit lower to the ground.
Mounting Tips #
- Make sure the sensor has a clear line of sight to the floor-no cables or crossbars in the way.
- A vertical mount gives the most consistent readings. Even a slight tilt can affect accuracy.
- Use double-sided tape or mounting brackets to secure the sensor and avoid vibrations.
Bonus: Sitting/Standing Detection #
You can also define binary sensors in Home Assistant to detect states like "sitting" or "standing." For example:
binary_sensor:
  - platform: template
    id: desk_is_standing
    name: "Desk is in Standing Position"
    lambda: |-
      return id(desk_height).state > 90.0;
This makes it easy to create automations based on your posture or log your movement habits throughout the day.
Integrating with Home Assistant #
Once your ESPHome device is online and connected to your Wi-Fi, you’ll need to manually add it in Home Assistant. Just go to Settings → Devices & Services → Add Integration, then search for ESPHome. Enter the device’s IP address, and it will be added as a new device.
After that, all exposed sensors - like the distance reading from the TOF200C - will appear automatically. If you’ve added any template sensors or binary sensors in Home Assistant, those will also be linked to the device.
From there, it’s easy to build automations around it. Some practical use-cases:
- Posture reminders – Send a notification if you’ve been sitting too long and the desk hasn’t moved.
- Daily activity tracking – Log standing vs. sitting time over the day.
- Smart environment – Trigger light or climate changes based on desk position.
For example, a simple automation to remind you to stand:
alias: "Stand Up Reminder"
trigger:
  - platform: state
    entity_id: binary_sensor.desk_is_standing
    to: "off"
    for:
      hours: 1
condition: []
action:
  - service: notify.mobile_app_your_phone
    data:
      message: "Time to stand up for a bit!"
mode: single
With these kinds of automations, your desk can become a helpful part of your health and productivity routine-without modifying the desk hardware.
Conclusion #
This project turned a simple TOF200C sensor and ESP32-C3 SuperMini into a non-invasive, smart desk height monitor that talks directly to Home Assistant. By mounting the sensor under the desk and using ESPHome, I was able to measure desk height in real-time without modifying or opening up the desk hardware.
It’s compact, accurate, and integrates seamlessly into any Home Assistant setup-especially if you're running it on a Raspberry Pi with Docker which makes it a great starting point.
If you’ve got a motorized desk and want it to be a little smarter, I definitely recommend giving this a try-or even extending it with more sensors or features!