
ESP32 C3 Super Mini
Ultra-compact ESP32-C3 board with Wi-Fi & BLE 5.0 - perfect for low-cost, low-power IoT projects and space-constrained designs.

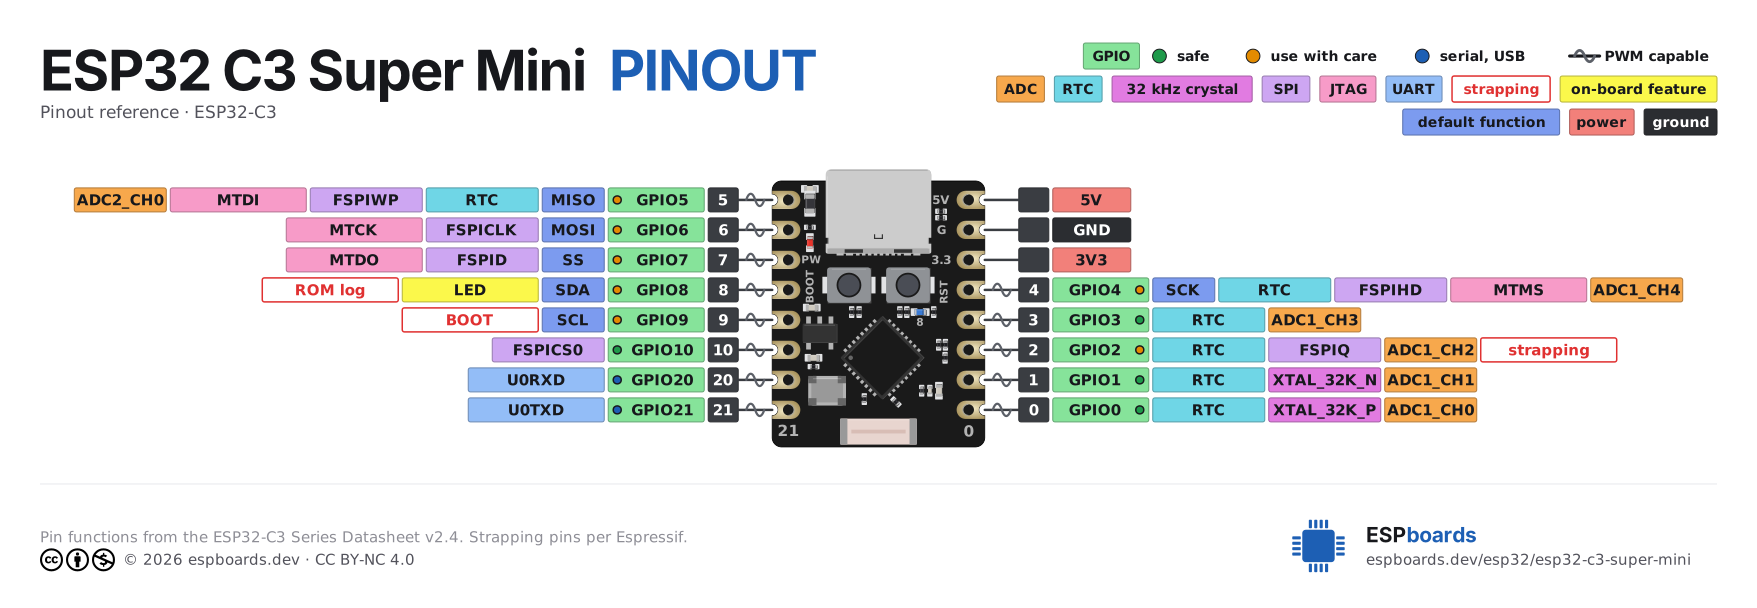
ESP32 C3 Super Mini Pinout
16 pins · 2.54 mm pitch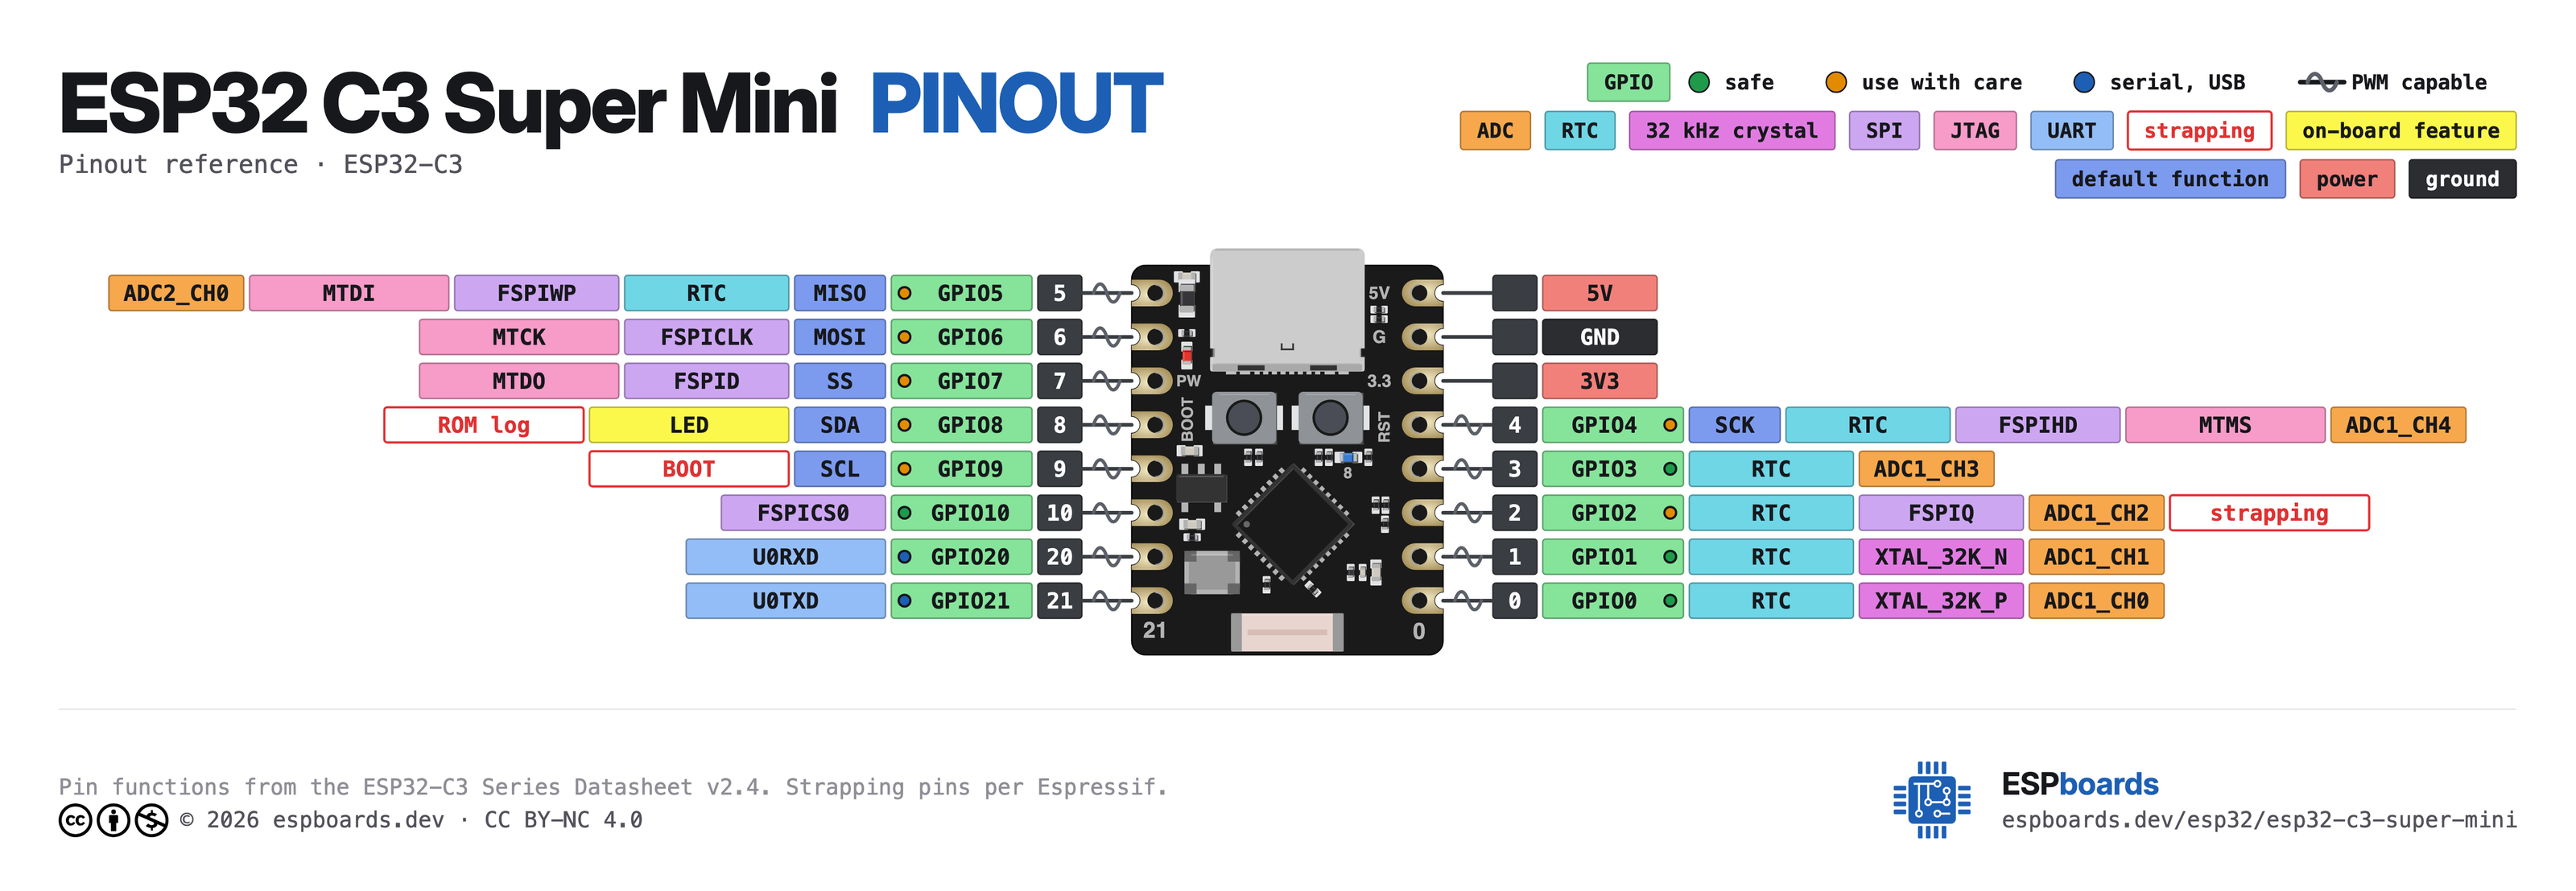
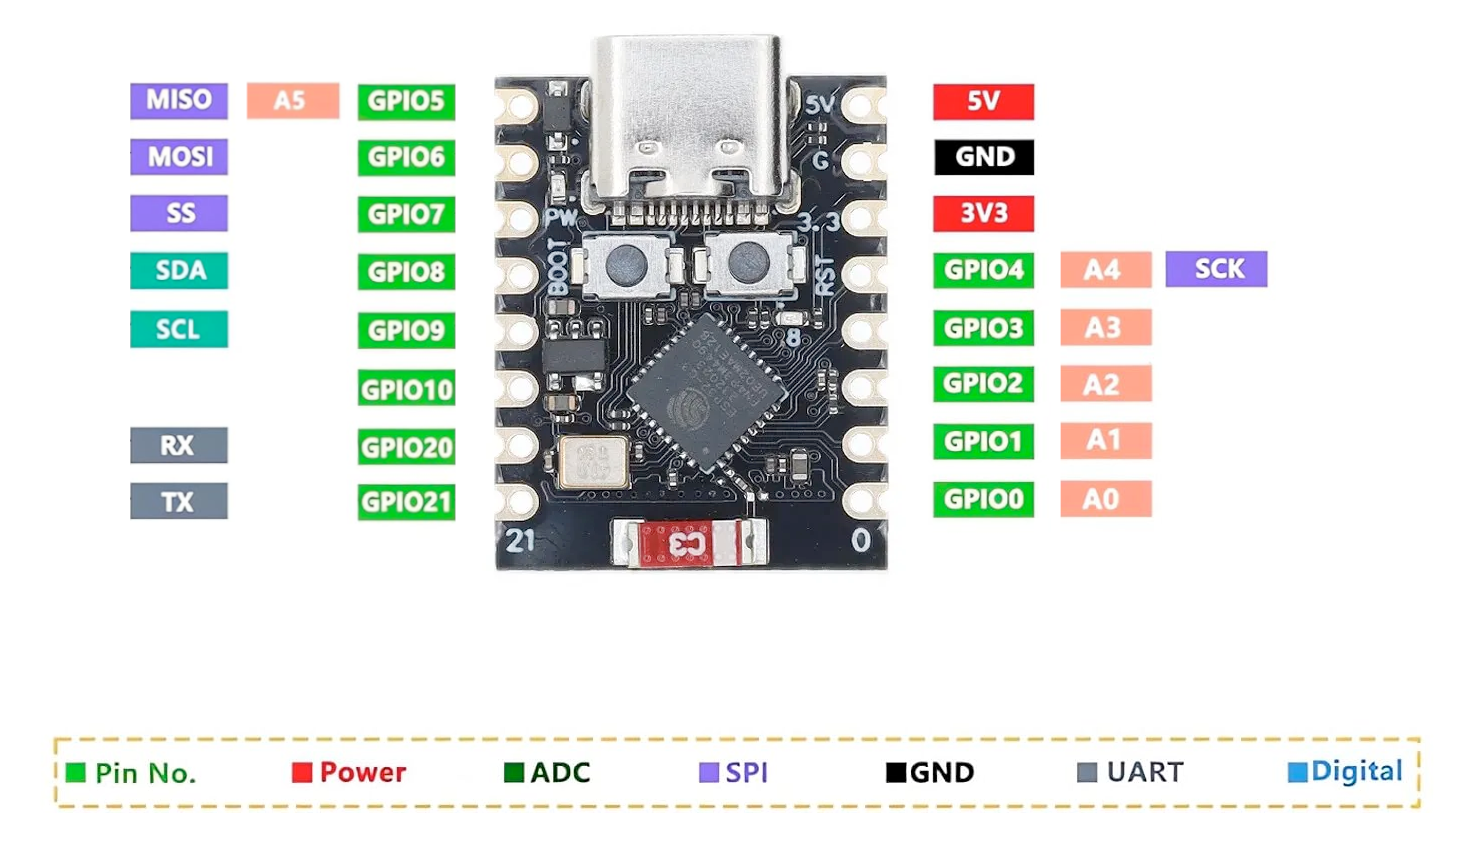
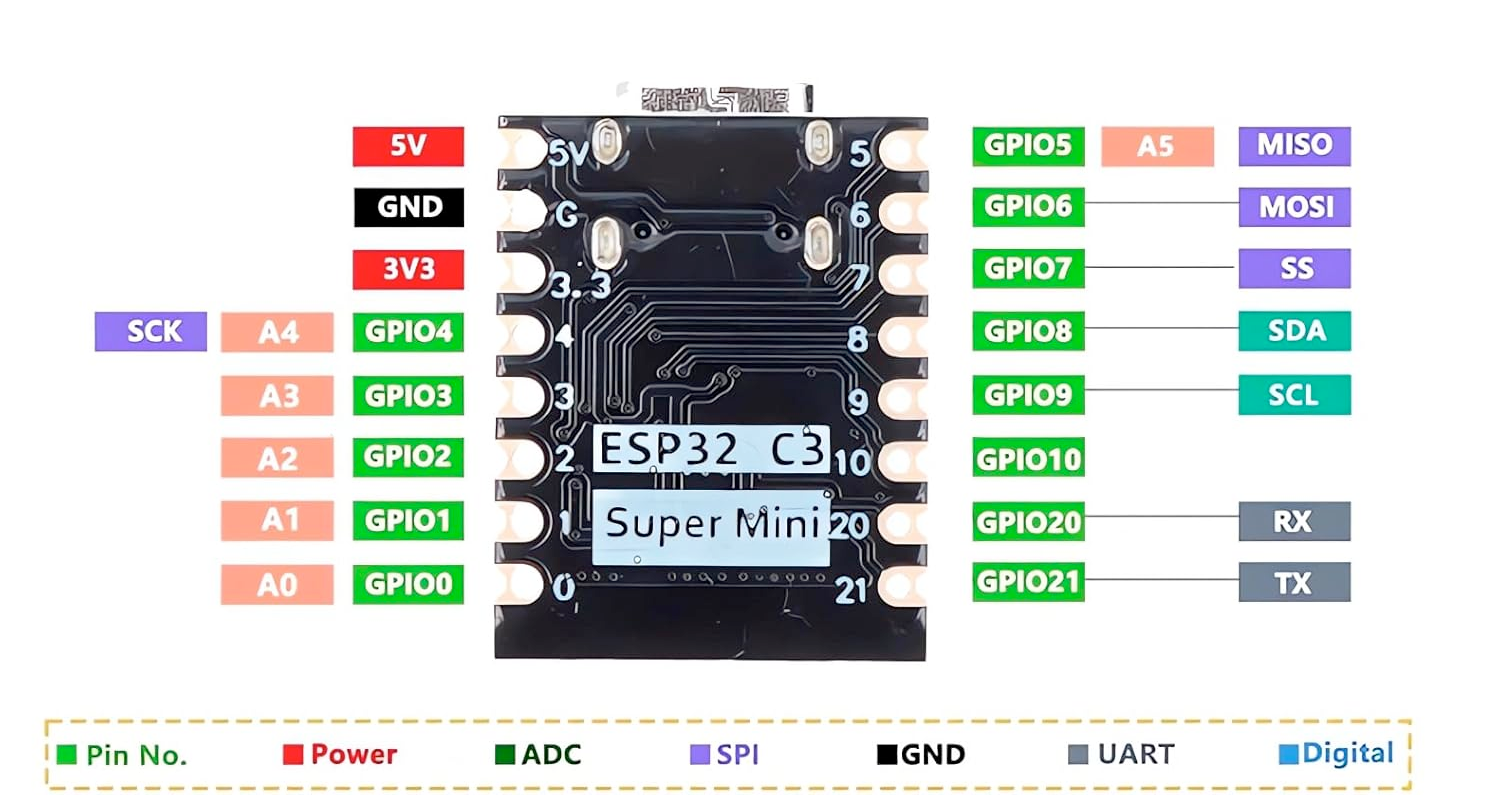
| Pin | GPIO | Labels | Status | Capabilities | Notes |
|---|---|---|---|---|---|
| 1 | - | 5V | power | - | 5V power input for the board |
| 2 | - | GND | ground | - | Ground connection |
| 3 | - | 3V33.3V | power | - | 3.3V power output |
| 4 | 0 | IO0A0 | safe | adc · pwm | GPIO, ADC pin, PWM |
| 5 | 1 | IO1A1 | safe | adc · pwm | GPIO, ADC pin, PWM |
| 6 | 2 | IO2A2 | strapping | adc · pwm | GPIO, ADC pin, PWM |
| 7 | 3 | IO3A3 | safe | adc · pwm | GPIO, ADC pin, PWM |
| 8 | 4 | IO4A4SCK | strapping | adc · spi · pwm | ADC1_CH4; SPI SCK; PWM |
| 9 | 5 | IO5A5MISO | strapping | adc · spi · pwm | GPIO, ADC pin, SPI Master In Slave Out, PWM |
| 10 | 6 | IO6MOSI | strapping | spi · pwm | GPIO, SPI Master Out Slave In, PWM |
| 11 | 7 | IO7SS | strapping | spi · pwm | GPIO, SPI Slave Select, PWM |
| 12 | 8 | IO8SDA | strapping | i2c · pwm | GPIO, I2C Data line, PWM |
| 13 | 9 | IO9SCL | strapping | i2c · pwm | GPIO, I2C Clock line, PWM |
| 14 | 10 | IO10 | safe | pwm | General-purpose GPIO |
| 15 | 21 | IO21TX | uart | uart | GPIO, UART Transmit |
| 16 | 20 | IO20RX | uart | uart | GPIO, UART Receive (secondary) |
Start with these
4 pins with no boot or system involvementFreely assignable - no strapping, flash, USB or JTAG duties. Ideal first picks for buttons, sensors and LEDs.
Fine - with a little care
9 pins · 9 things to knowIO2 Strapping pin, but it does not select the boot mode - GPIO9 does. Espressif only recommend pulling it up against reset-time glitches. Floating by default. Strapping
A strapping pin: Espressif recommend an external pull-up against glitches at reset, so avoid heavy capacitive loads or a strong low drive here. It does not put the chip into download mode (that is GPIO9).
IO4 Bootstrapping pin; JTAG TMS; Flash data (FSPIHD in internal-flash models) JTAG
Used during boot; JTAG TMS for debugging; acts as Quad-SPI flash IO (hold data line) in internal-flash variants
IO5 Bootstrapping pin; JTAG TDI; Flash data (FSPIWP in internal-flash models) JTAG
Used during boot; JTAG TDI for debugging; acts as Quad-SPI flash IO (write-protect data line) in internal-flash variants
IO6 Bootstrapping pin; JTAG TCK; Flash clock (FSPICLK in internal-flash models) JTAG
Used during boot; JTAG TCK for debugging; provides flash clock in internal-flash variants
IO7 Bootstrapping pin; JTAG TDO; Flash data (FSPID in internal-flash models) JTAG
Used during boot; JTAG TDO for debugging; acts as Quad-SPI flash IO (data line) in internal-flash variants
IO8 Bootstrapping pin (needs HIGH at reset); also gates ROM boot message printing (UART_PRINT_CONTROL efuse) Strapping
Must be held high during reset (if low, UART flashing/boot may not work)
IO9 Bootstrapping pin; selects boot mode (HIGH = SPI flash boot, LOW = UART download) Strapping
Controls boot mode on reset (HIGH for normal flash boot, LOW enters serial download mode)
IO21 UART0 TXD (default serial output) UART
Used as UART0 transmit (console/bootloader); repurposing may disable serial console output and printing
IO20 UART0 RXD (default serial input) UART
Used as UART0 receive (console/bootloader); repurposing may disable serial programming and debug logs
Across 16 pins (2.54 mm pitch), the ESP32 C3 Super Mini exposes 13 GPIO plus 5V, GND and 3V3 for power.
For peripherals, I²C is mapped to SDA on GPIO8 and SCL on GPIO9; the SPI bus (MOSI, MISO, SCK, SS) is broken out in full; TX/RX on GPIO21 and GPIO20 cover serial logging and flashing.
On the analog side there are 6 ADC-capable pins for sensors and battery monitoring and PWM on 11 pins.
If you want zero surprises, IO0, IO1, IO3 and IO10 are free of any such role - the safest first picks. 9 of the exposed pins carry boot-time or system duties on the ESP32-C3 (IO2, IO4, IO5 and 6 more).
Guides & tutorials

Getting started
flash your first firmware in ~2 minutesBoard: ESP32C3 Dev Module USB CDC On Boot: Enabled Flash Size: 4MB (32Mb) Flash Mode: QIO Partition Scheme: Default 4MB with spiffs (1.2MB APP/1.5MB SPIFFS) Upload Speed: 921600
// toggle GPIO0 - wire an LED and resistor to it
void setup() {
  pinMode(0, OUTPUT);
}
void loop() {
  digitalWrite(0, HIGH); delay(500);
  digitalWrite(0, LOW);  delay(500);
}[env:esp32-c3-super-mini]
platform = espressif32
board = esp32-c3-devkitm-1
framework = arduino
monitor_speed = 115200
upload_speed = 921600esp32-c3-devkitm-1 - or type it after board =.esp32:
board: esp32-c3-devkitm-1
variant: esp32c3
framework:
type: esp-idf
# blink - GPIO0
output:
- platform: gpio
pin: 0
id: led_out
light:
- platform: binary
name: "LED"
output: led_outesp32-c3-devkitm-1 (same ids as PlatformIO).esptool.py --chip esp32c3 --port /dev/ttyACM0 \
--baud 921600 write_flash 0x0 firmware.bin--port = your /dev/tty* (macOS/Linux) or COMx (Windows).Good to know
board-specific quirks worth 60 seconds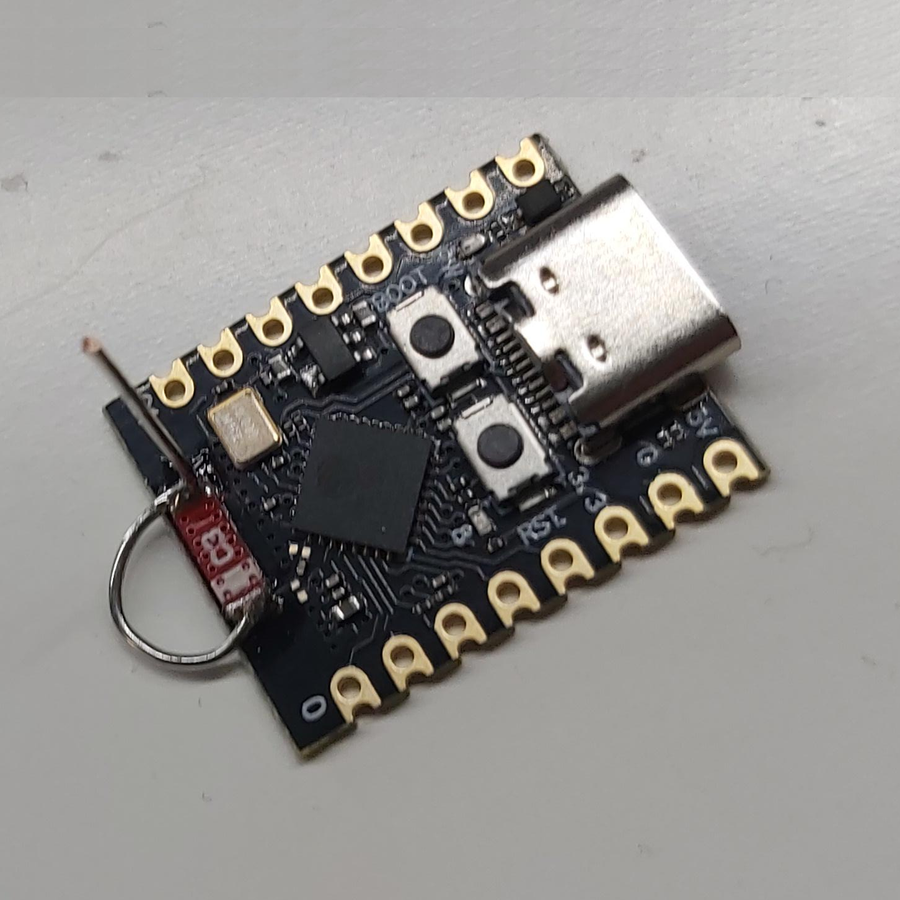
The CrossAir CA-C03 ceramic antenna keeps the board tiny but is its most common complaint: WiFi range is weak. The cause is the layout, not the ESP32-C3 - the antenna sits too close to the ground plane and the PCB skips the clearance and tuning stripline its datasheet asks for. Not every board is the same. Many near-identical variants exist, and newer revisions - plus the red SuperMini Plus - move the antenna away…
The CrossAir CA-C03 ceramic antenna keeps the board tiny but is its most common complaint: WiFi range is weak. The cause is the layout, not the ESP32-C3 - the antenna sits too close to the ground plane and the PCB skips the clearance and tuning stripline its datasheet asks for.
Not every board is the same. Many near-identical variants exist, and newer revisions - plus the red SuperMini Plus - move the antenna away from the ground plane for better range. Early/cheap boards have been flagged for sloppy antenna placement (and, on the S3 SuperMini, antennas mounted the wrong way round), so it's worth sanity-checking range on your own unit.
Soldering a 31 mm quarter-wave wire to the feed pad (or picking a u.FL/external-antenna variant) reliably adds 6-10 dB. See Peter Neufeld's teardown and mod for the exact dimensions.
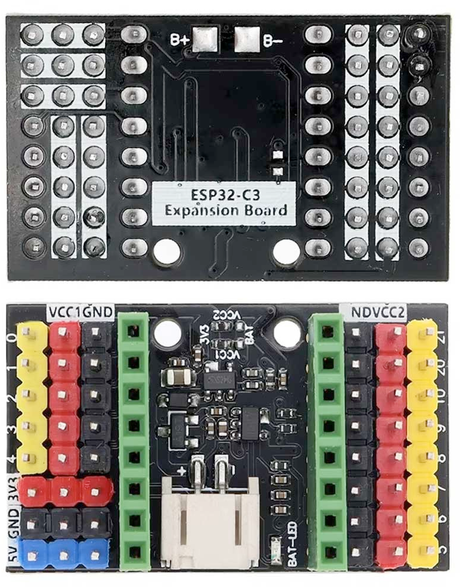
Key Features Lithium Battery Compatibility: Supports 3.7V lithium battery input for portable power solutions. USB Charging with LED Indicator: Green LED lights up during charging and turns off when the battery is full. Full IO Access: Breaks out all ESP32-C3 SuperMini GPIOs for easy connectivity to sensors and modules. Compact Size: Measures only 37.4mm x 22.5mm x 15.2mm, ideal for compact projects. Advanced Power…
Key Features
- Lithium Battery Compatibility: Supports 3.7V lithium battery input for portable power solutions.
- USB Charging with LED Indicator: Green LED lights up during charging and turns off when the battery is full.
- Full IO Access: Breaks out all ESP32-C3 SuperMini GPIOs for easy connectivity to sensors and modules.
- Compact Size: Measures only 37.4mm x 22.5mm x 15.2mm, ideal for compact projects.
Advanced Power Configuration - Dual Voltage Outputs
The expansion board includes two independent power outputs: VCC1 and VCC2, both defaulting to 3.3V. You can reconfigure them to output 3.7V if needed.
How to Switch to 3.7V Output:
- Remove the pre-installed 0Ω resistor for the desired rail (VCC1 or VCC2).
- Short the three solder pads using tin to reroute the output to 3.7V.
This allows you to adapt the voltage to match your specific module or sensor requirements.
Final Thoughts
If you're running the ESP32-C3 SuperMini off a battery or wiring up a handful of sensors, this expansion board covers the basics: onboard charging, two rails you can switch between 3.3V and 3.7V, and every GPIO broken out.
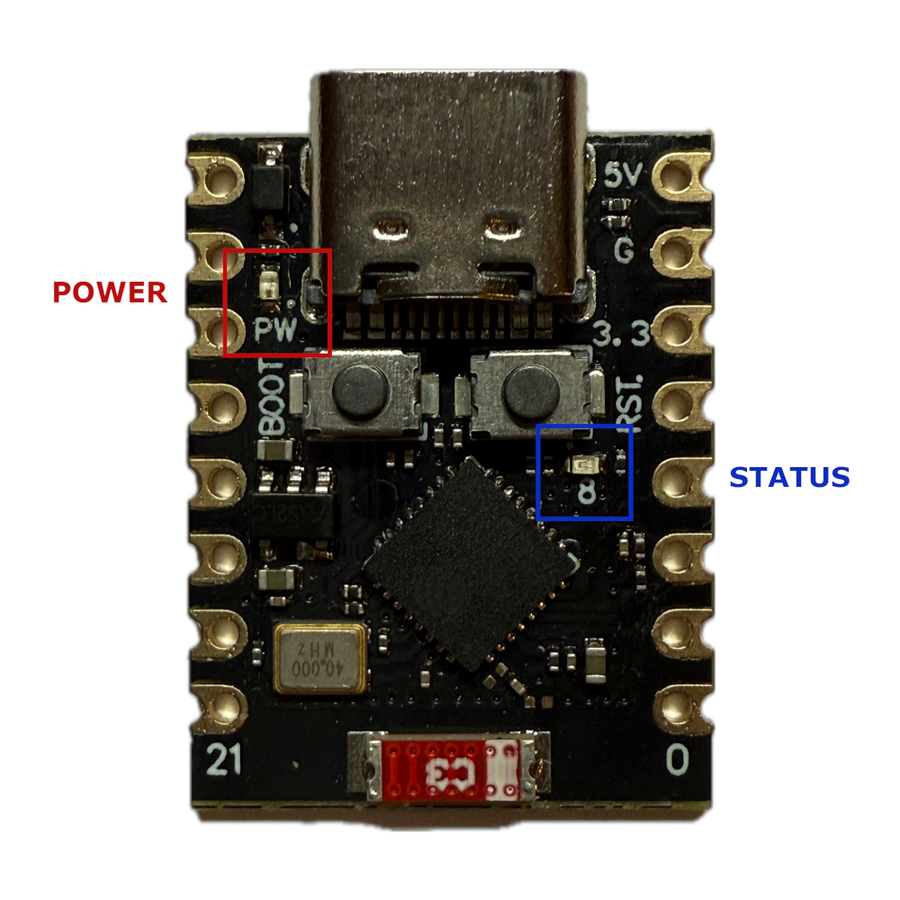
The ESP32-C3 Supermini features two onboard LEDs with specific functions and GPIO assignments. Below is a breakdown of their roles and how to use the controllable one in both Arduino and ESPHome. Red LED - Power Indicator GPIO: None Control: Not controllable via GPIO Behavior: Always on when the board is powered Blue LED - User Controllable GPIO: GPIO8 Control: digitalWrite(), ESPHome GPIO output Arduino Example:…
The ESP32-C3 Supermini features two onboard LEDs with specific functions and GPIO assignments. Below is a breakdown of their roles and how to use the controllable one in both Arduino and ESPHome.
Red LED - Power Indicator
- GPIO:
None - Control: Not controllable via GPIO
- Behavior: Always on when the board is powered
Blue LED - User Controllable
- GPIO:
GPIO8 - Control:
digitalWrite(), ESPHome GPIO output
void setup() {
 pinMode(8, OUTPUT);
}

void loop() {
 digitalWrite(8, HIGH);
 delay(1000);
 digitalWrite(8, LOW);
 delay(1000);
}
output:
 - platform: gpio
 pin: 8
 id: blue_led

light:
 - platform: binary
 name: "Blue LED"
 output: blue_led
Downloads
Free for non-commercial use, credit espboards.dev · License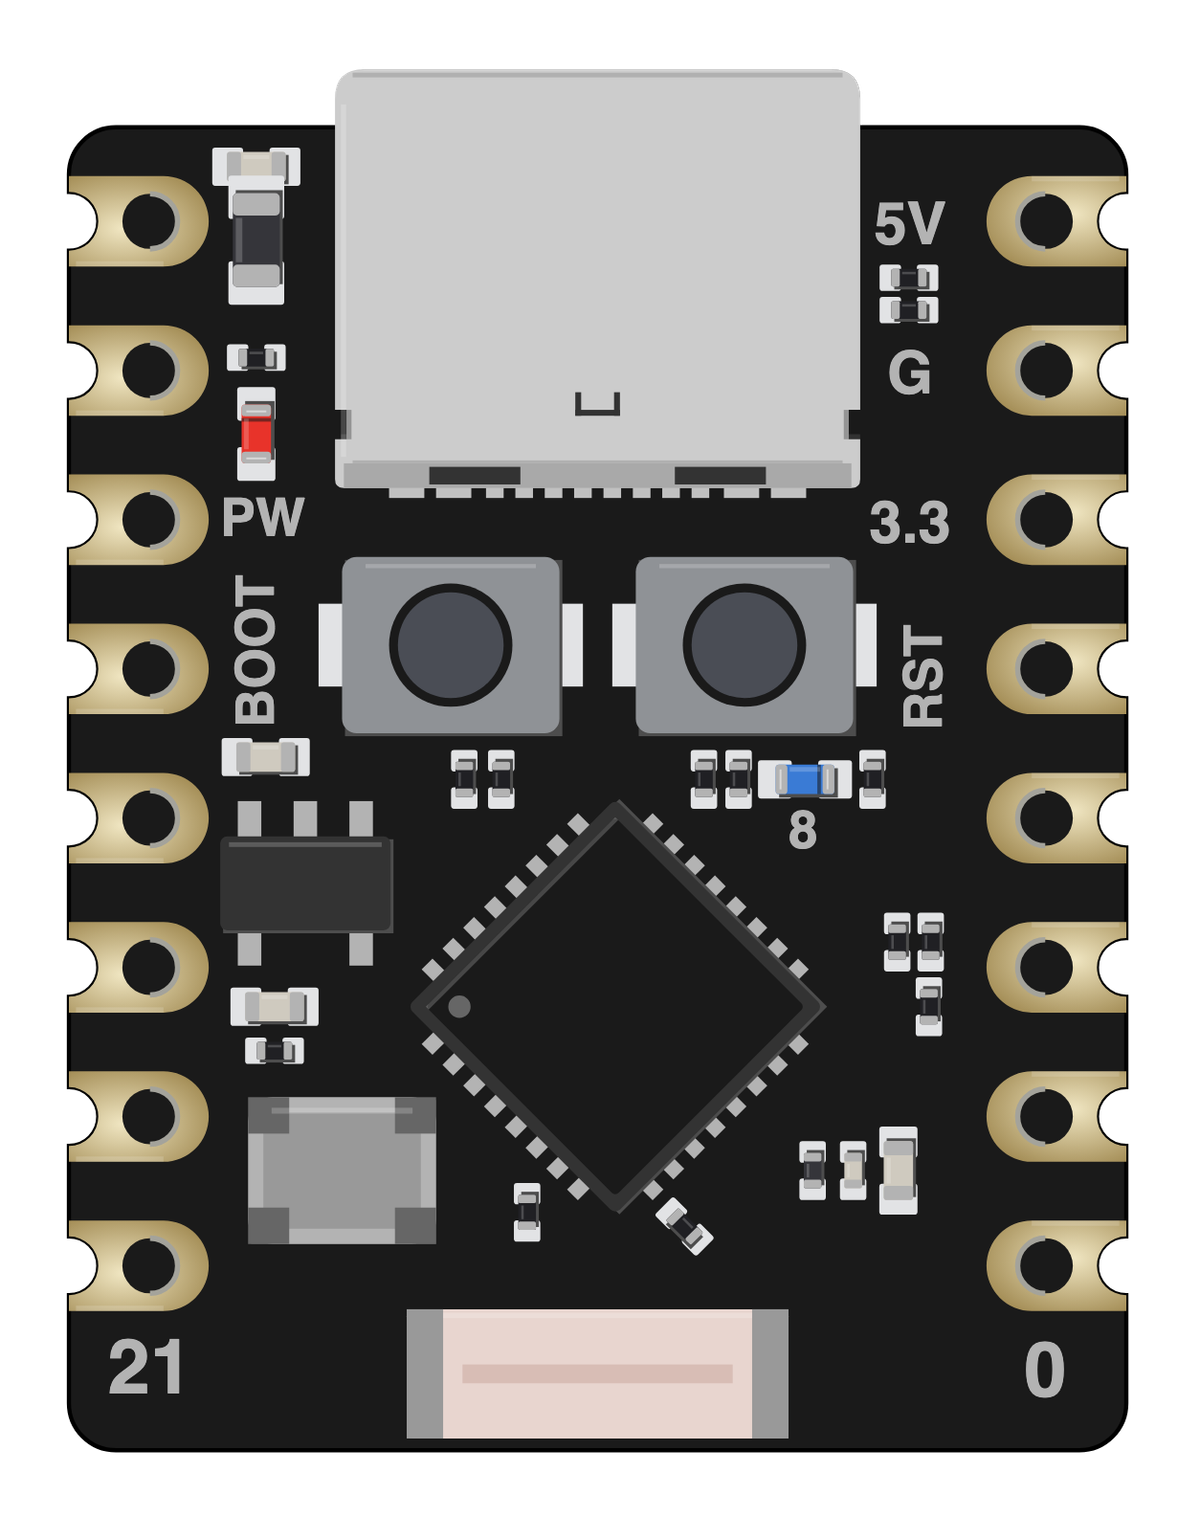
Board illustration
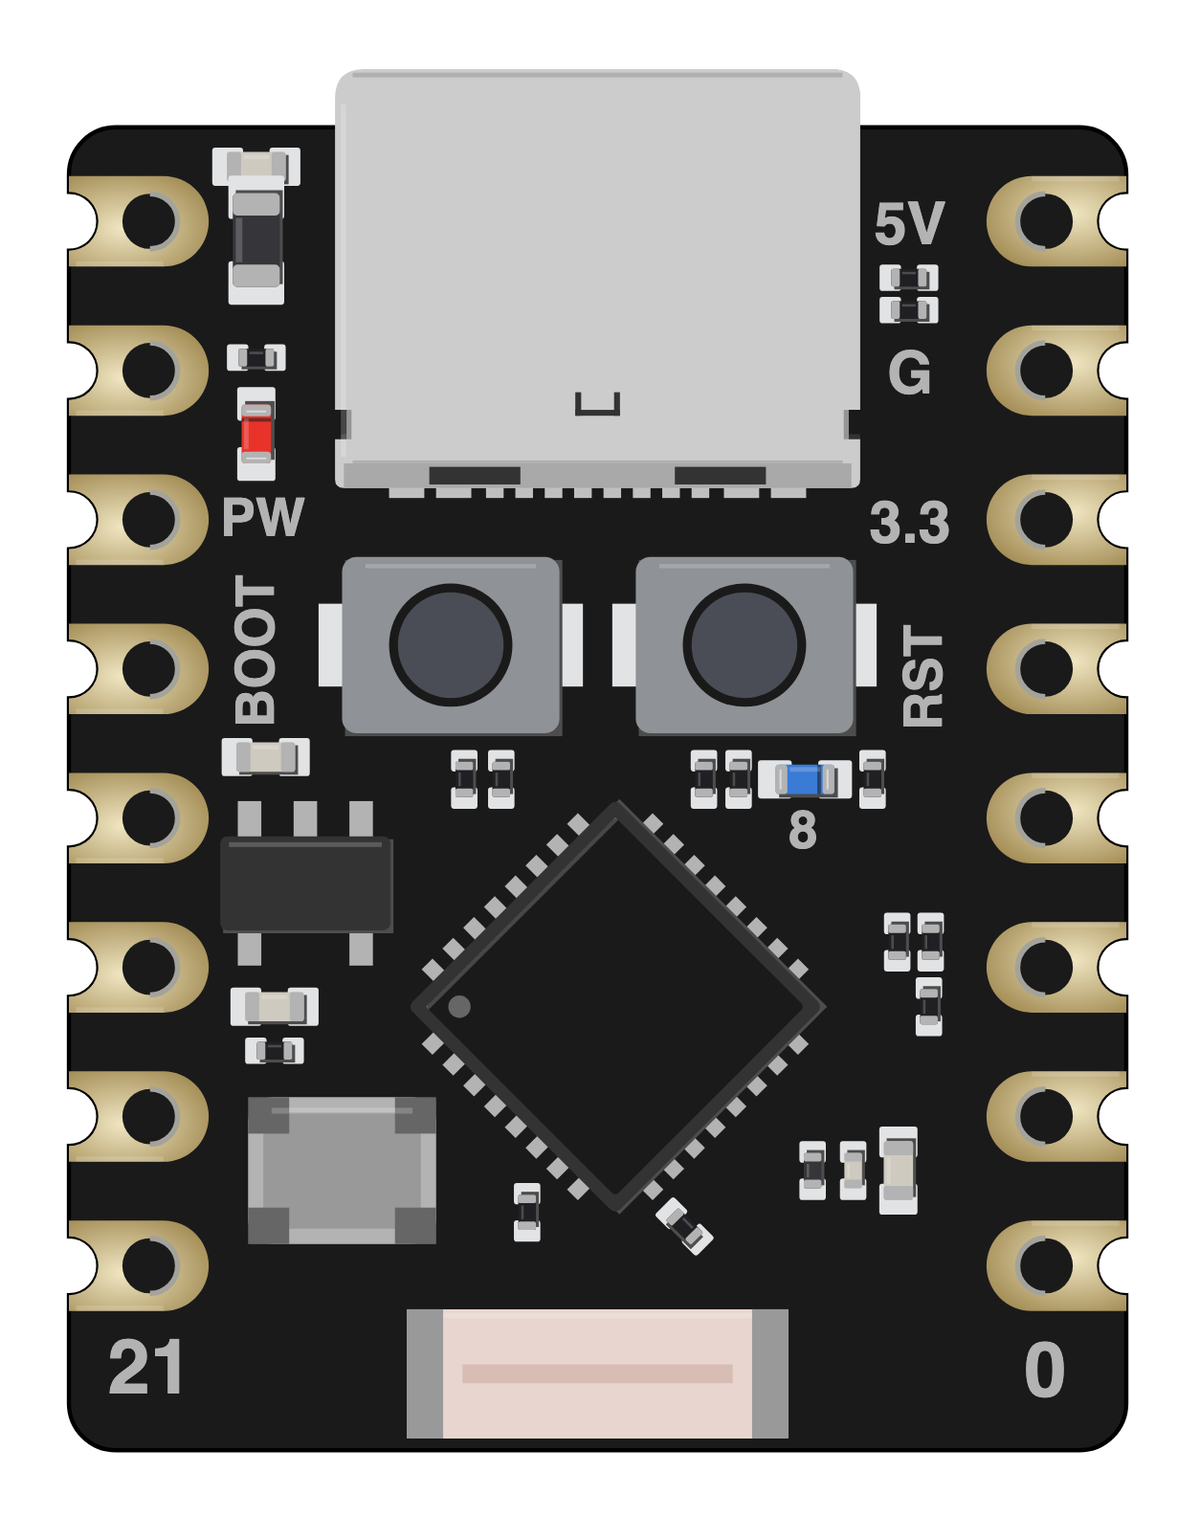
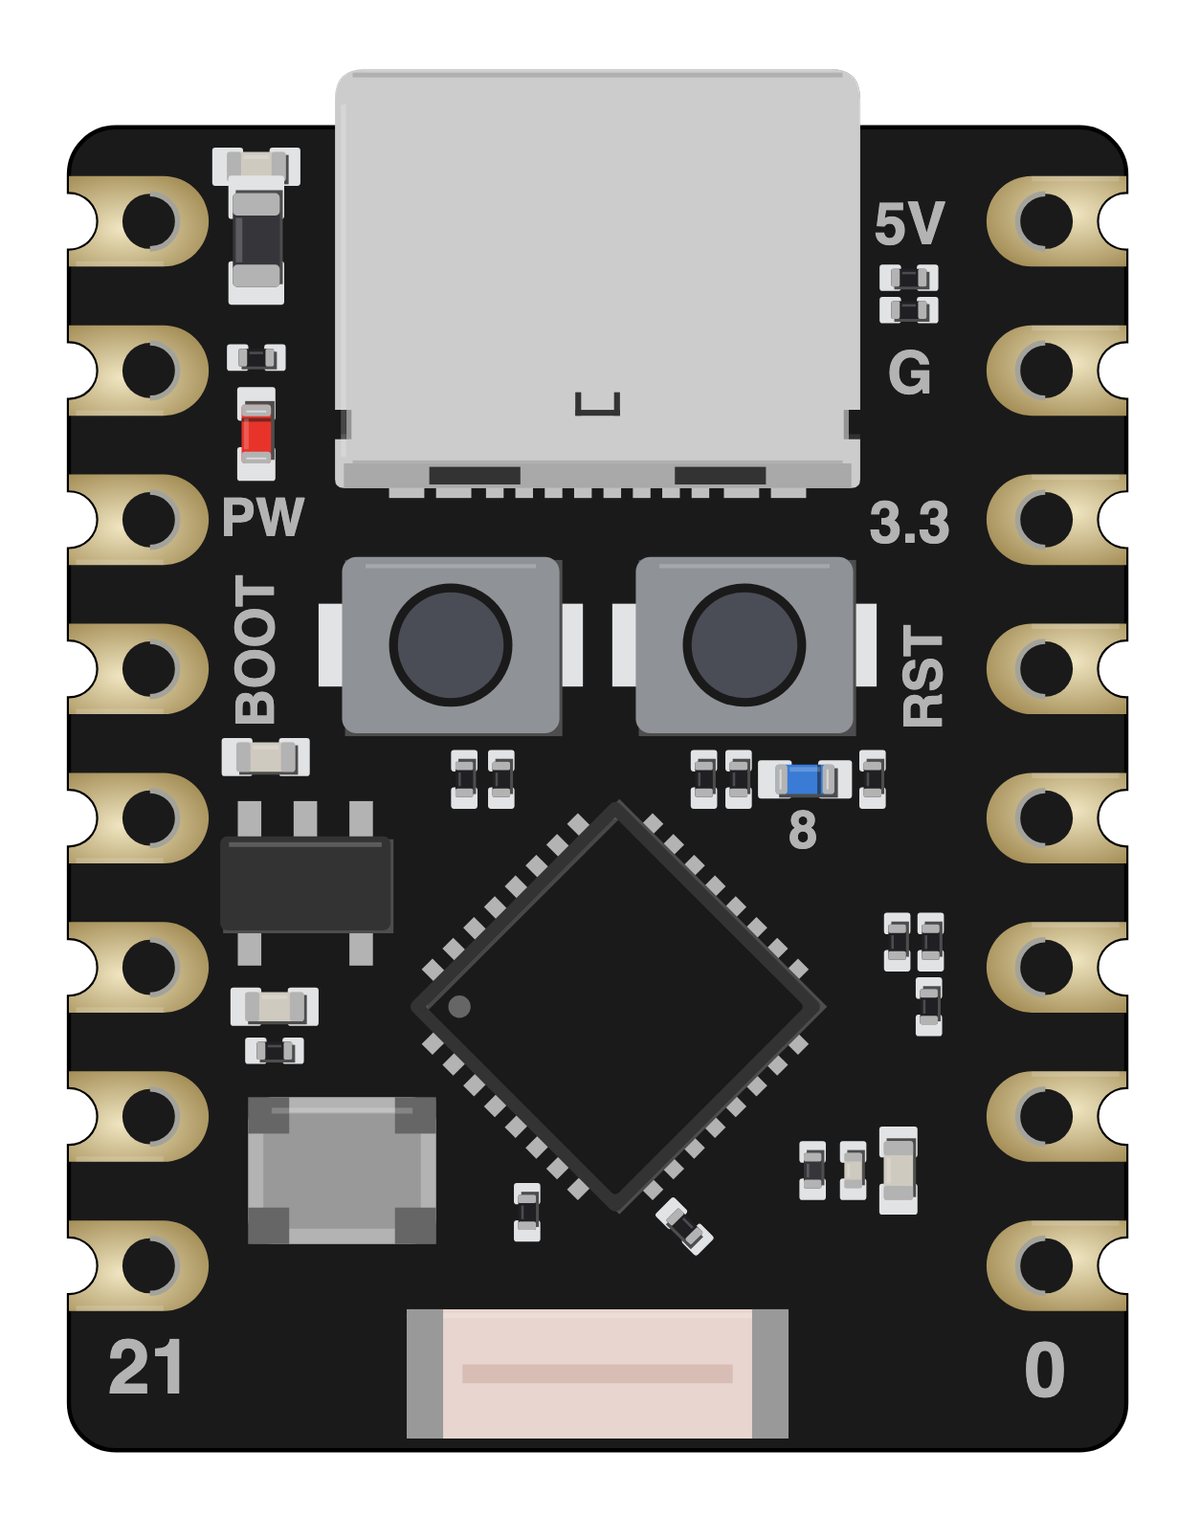
The bare ESP32 C3 Super Mini board drawn to scale at 22.52 × 18 mm, with no pin labels on it. Made for slide decks, wiring diagrams and project write-ups where a photo is too busy. Take the scalable SVG for print or editing, the high-resolution PNG to drop straight in, or the transparent PNG when you need it with no background behind it.
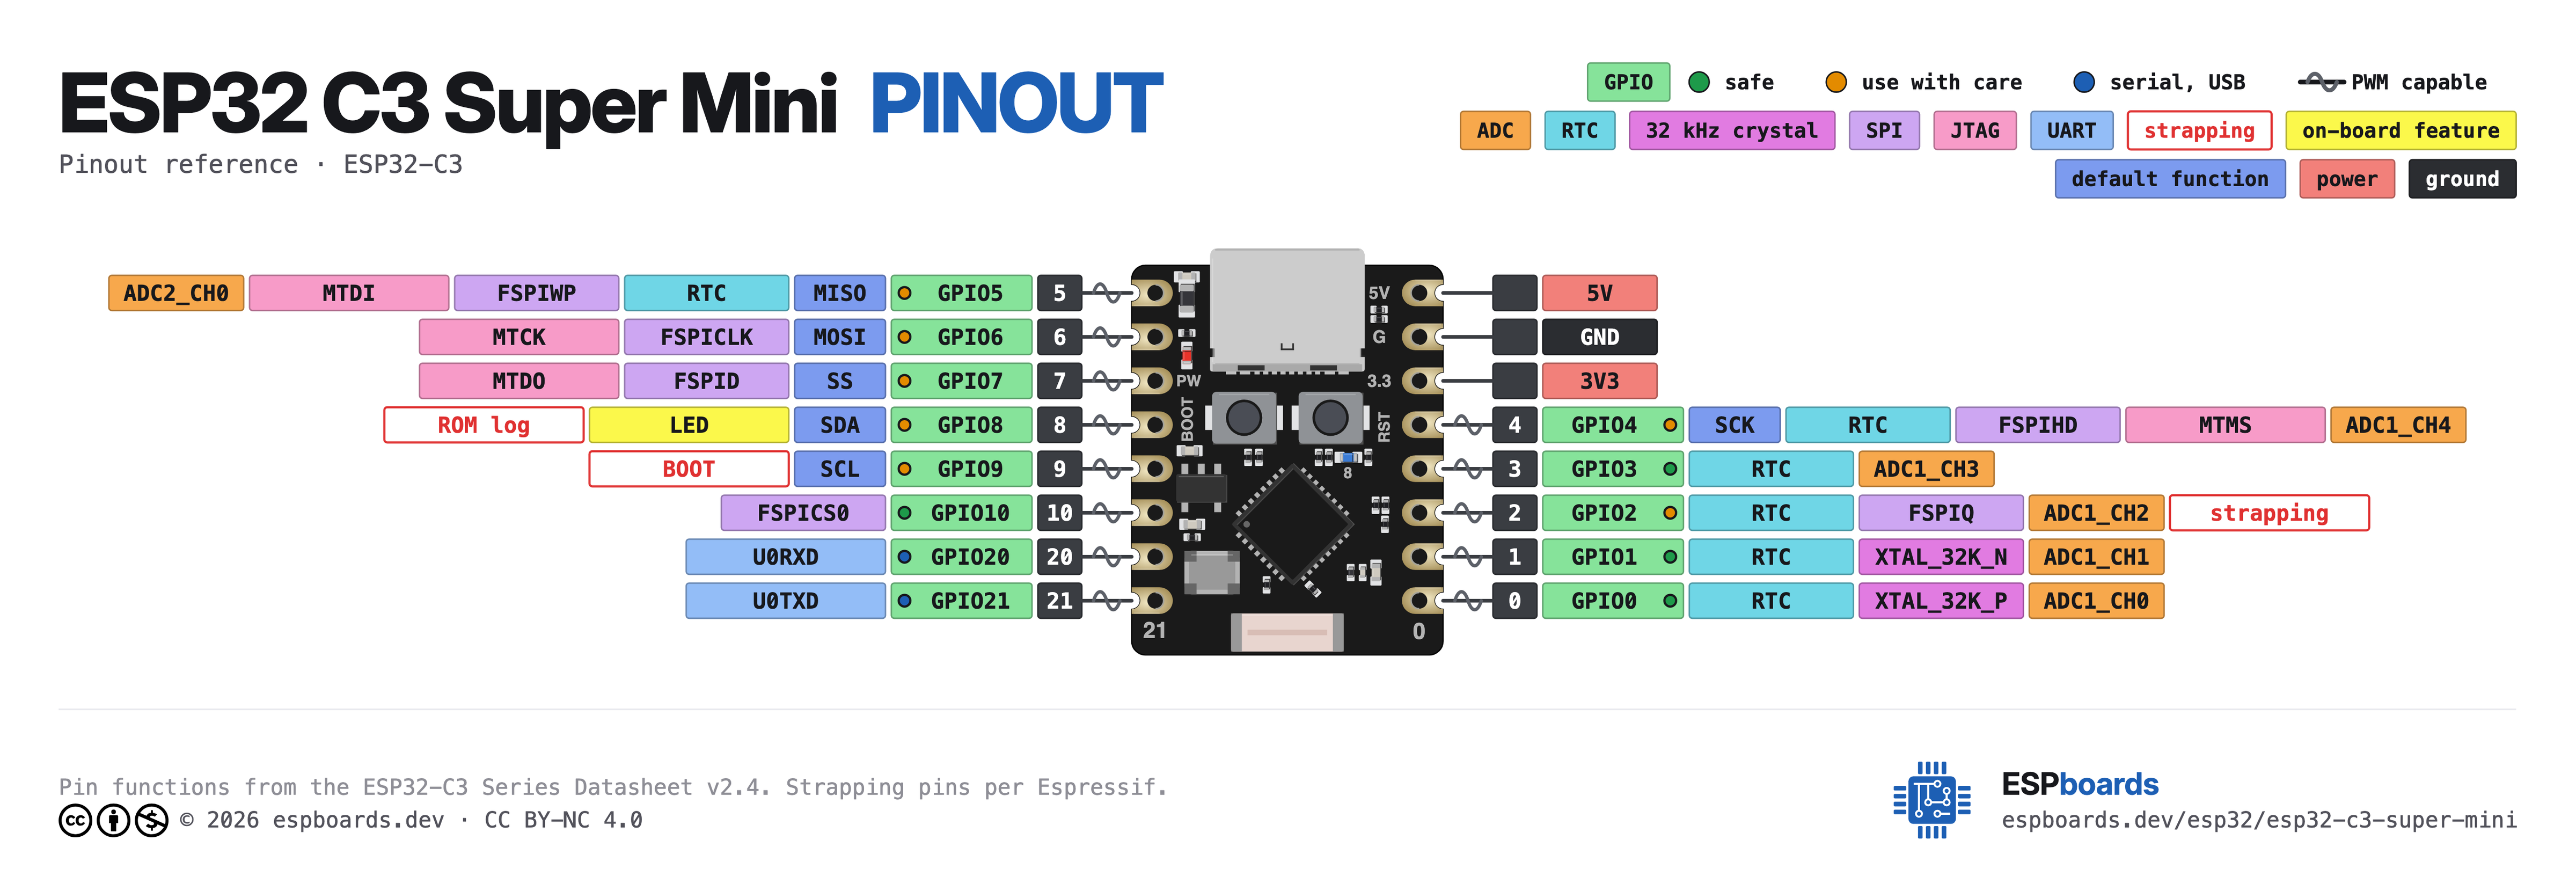
Pinout diagram
Every pin on both sides of the board with its functions, drawn by ESPboards from the ESP32-C3 Series Datasheet v2.4 - the same sheet shown at the top of this page. The PNG is a high-resolution image for screens, the SVG is vector so it stays sharp at any size, and the PDF is laid out to print on A4 or Letter.
Yours to use, share and adapt for non-commercial work, as long as you credit espboards.dev - the full terms and ready-made credit lines are here.
Specifications
ESP32-C3 · 22.52 × 18 mm · vs other ESP32 chips →Dimensions

About this board
At 22.52 × 18 mm it's the smallest Super Mini board we've measured.
Inside sits the ESP32-C3 - a single-core RISC-V and the budget low-power pick. Sibling Super Mini boards cover the ESP32-C6, ESP32-H2 and ESP32-S3, so you can change radios or horsepower without changing the footprint.
Expect to pay about $3.50 - less than the ~$5.00 most Super Mini boards go for.
Onboard you'll find status LEDs (Power (red), User (GPIO8)) and Reset/Boot buttons.
It flashes over native USB - no serial-converter driver needed.
Have a red board?
Check ESP32 C3 Supermini Plus instead.
Designed with a compact form factor, this board is easy to integrate into space-constrained projects. Its ceramic chip antenna keeps the board compact, at the cost of more limited WiFi range than a full PCB antenna.
For ease of use, it includes a reset button and a bootloader mode button, making development and debugging smooth.
With its versatile interfaces (UART, I2C, SPI) and plenty of GPIOs, the ESP32-C3 SuperMini is a great choice for your next embedded project.
Wondering how the ESP32-S3 SuperMini compares to other SuperMini boards? Check out our full comparison guide to see how it stacks up against the C3, C3 Plus, C6, and H2.
- Ultra-small size: As small as the thumb (22.52 x 18 mm)
- Ultra-low power consumption: deep sleep power consumption of about 43μA
- Onboard LED blue light: GPIO8 pin
- Ceramic chip antenna (CrossAir CA-C03) - saves space but limited WiFi range; tight ground clearance gives weaker RF than a wire/PCB antenna
Where to buy
prices are typical street prices
Resources
Similar boards
All Supermini boards →

