ESP32 KY-054 Phototransistor Module
Overview
The KY-054 is a phototransistor module that detects ambient light levels and provides an analog voltage output proportional to the light intensity. It is commonly used in projects that require light sensing capabilities, such as automatic lighting systems and brightness detection.


About KY-054 Phototransistor Module
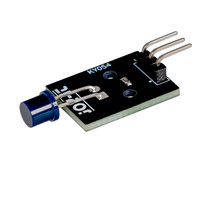
The KY-054 Phototransistor Module is designed to detect light intensity and convert it into an electrical signal. It operates similarly to a light-dependent resistor (LDR) but offers faster response times and greater sensitivity. This module is ideal for applications such as ambient light monitoring, automatic brightness adjustment, and light-based control systems.
Technical Specifications
Pinout Configuration
The VCC pin is used to supply power to the sensor, and it typically requires 3.3V or 5V (refer to the datasheet for specific voltage requirements). The GND pin is the ground connection and must be connected to the ground of your ESP32.
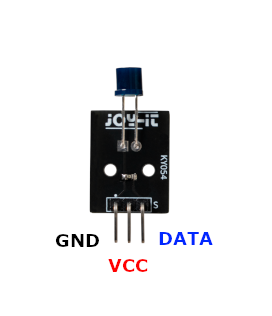
GND:Connects to the ground of the circuit.+V:Supplies power to the module, typically 3.3V or 5V.Signal:Outputs an analog voltage corresponding to the detected light intensity.
Wiring with ESP32
GND:Connect to the microcontroller's ground.+V:Connect to the microcontroller's 3.3V or 5V power supply.Signal:Connect to an analog input pin on the microcontroller (e.g.,A0on Arduino).
Troubleshooting Guide
Common Issues
❌ No Response from the Sensor
Issue: The sensor does not provide any output or the readings remain constant.
Solutions:
- Ensure that the module is properly powered with the correct voltage (3.3V or 5V).
- Verify that all connections are secure and correctly oriented.
- Check if the analog input pin on the microcontroller is functioning correctly by testing with another analog sensor.
⚠️ Inaccurate or Fluctuating Readings
Issue: The sensor provides erratic or incorrect light intensity values.
Solutions:
- Avoid exposing the sensor to direct light sources that may cause saturation.
- Implement software filtering techniques, such as averaging multiple readings, to smooth out fluctuations.
- Ensure that there are no loose connections or interference from nearby electronic components.
Debugging Tips
🔍 Serial Monitor
Use the Serial Monitor to check for error messages and verify the sensor's output. Add debug prints in your code to track the sensor's state.
⚡ Voltage Checks
Use a multimeter to verify voltage levels and check for continuity in your connections. Ensure the power supply is stable and within the sensor's requirements.
Additional Resources
Code Examples
Arduino Example
// Define pin for phototransistor
int light_sensor = A5;
// Definition of the parameters required for the calculation
const double U1 = 5.0;
const double R2 = 10000.0;
double U2;
double I;
double R1;
double lux;
int rawValue;

void setup() {
  // Define the pin mode
  pinMode(light_sensor, INPUT);
  // Set up serial communication for serial monitor
  Serial.begin(9600);
  Serial.println("KY-054 Brightness test");
}

void loop() {
  // Reading the voltage of the light sensor
  rawValue = analogRead(light_sensor);
  U2 = rawValue  (5.0/1023) ;

  // Check U2 for the division
  if (U2 != 0) {
    // Calculate the resistance of the sensor
    R1 = (U1  R2) / U2;
    // Calculate current
    I = (U1 / R1) * 1000000.0;
    // Calculate lux
    lux = log(I)/0.06;
  }
  else lux = 0;

  // Output the result on the serial monitor
  Serial.print("Lux:\t");
  Serial.println(lux);

  // wait for one second
  delay(1000);
}
This Arduino code sets up the KY-054 phototransistor module to measure ambient light intensity. It reads the analog voltage from the sensor, calculates the corresponding lux value using a logarithmic formula, and outputs the result to the serial monitor every second.
ESP-IDF Example
This ESP-IDF code configures GPIO36 as an analog input to read the output of the KY-054 phototransistor module. It calculates the voltage value and estimates the light intensity in lux using a logarithmic formula. The readings are displayed on the console every second.
ESPHome Example
sensor:
  - platform: adc
    pin: GPIO36
    name: "KY-054 Light Sensor"
    update_interval: 1s
    filters:
      - multiply: 3.3
      - lambda: |-
          float resistance = (3.3 * 10000.0) / (x == 0 ? 1 : x);
          float current = (3.3 / resistance) * 1000000.0;
          return log(current) / 0.06;
This ESPHome configuration sets up the KY-054 phototransistor module on GPIO36 as an analog input. It reads the voltage level, applies a mathematical conversion to estimate light intensity in lux, and updates the value every second.
PlatformIO Example
platformio.ini
[env:esp32]
platform = espressif32
board = esp32dev
framework = arduino
PlatformIO Example Code
#include <Arduino.h>

#define LIGHT_SENSOR_PIN 36

void setup() {
    Serial.begin(115200);
    Serial.println("KY-054 Light Sensor Test");
}

void loop() {
    int raw_value = analogRead(LIGHT_SENSOR_PIN);
    float voltage = raw_value * (3.3 / 4095.0);
    Serial.printf("Light Sensor Voltage: %.2fV\n", voltage);
    delay(1000);
}
This PlatformIO code configures GPIO36 as an analog input for the KY-054 sensor. It reads the analog voltage, converts it to a readable format, and prints it to the serial monitor every second.
MicroPython Example
import machine
import time
import math

LIGHT_SENSOR_PIN = machine.ADC(machine.Pin(36))
LIGHT_SENSOR_PIN.atten(machine.ADC.ATTN_11DB)

while True:
    raw_value = LIGHT_SENSOR_PIN.read()
    voltage = (raw_value / 4095)  3.3
    resistance = (3.3  10000.0) / (voltage if voltage > 0 else 1)
    current = (3.3 / resistance) * 1000000.0
    lux = math.log(current) / 0.06
    print("Light Intensity:", lux, "lux")
    time.sleep(1)
This MicroPython script sets up the KY-054 phototransistor module on GPIO36 as an analog input. It reads the sensor voltage, calculates the resistance, estimates the light intensity in lux, and prints the value every second.
Conclusion
The ESP32 KY-054 Phototransistor Module is a powerful KY-0xx module sensor that offers excellent performance and reliability. With support for multiple development platforms including Arduino, ESP-IDF, ESPHome, PlatformIO, and MicroPython, it's a versatile choice for your IoT projects.
For optimal performance, ensure proper wiring and follow the recommended configuration for your chosen development platform.
Always verify power supply requirements and pin connections before powering up your project to avoid potential damage.