
SHT85 Temperature and Humidity Sensor
The SHT85 sensor is a high-accuracy digital temperature and humidity sensor that utilizes Sensirion's CMOSens® technology. It provides calibrated, linearized sensor signals in digital I2C format, making it ideal for applications requiring precise and reliable environmental measurements.

SHT85 pinout
The SHT85 uses standard I²C communication with 4 pins, offering top-tier industrial-grade performance.
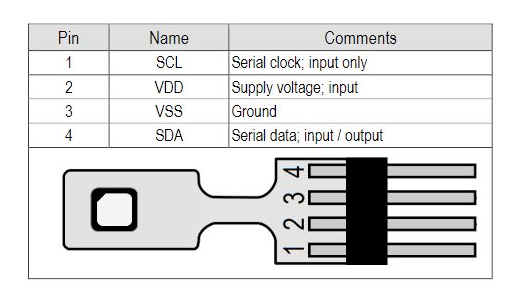
| Pin | Type | Description | Notes |
|---|---|---|---|
| SCL | Communication | I²C clock line | Serial Clock Line for I2C communication |
| VDD | Power | Power supply input (2.15V to 5.5V) | Wide voltage range for industrial applications |
| VSS | Power | Ground connection | Connect to ESP32 ground |
| SDA | Communication | I²C data line | Serial Data Line for I2C communication |
Standard I²C interface for easy integration
Default I²C address is 0x44 or 0x45 (configurable)
Highest accuracy: ±0.1°C temp, ±1.5% humidity
Wide voltage range (2.15V-5.5V) for industrial use
Premium industrial-grade sensor for demanding applications
Wiring the SHT85 to ESP32
Connect the SHT85 using standard I²C interface for industrial-grade environmental monitoring.
| SHT85 pin | ESP32 pin | Purpose |
|---|---|---|
| VDD | 3.3V | Power supply (2.15V to 5.5V supported) |
| VSS | GND | Ground connection |
| SDA | GPIO21 | I²C data line (default SDA) |
| SCL | GPIO22 | I²C clock line (default SCL) |
GPIO21/22 are default I²C pins on ESP32
I²C address is 0x44 or 0x45 (check your module)
Add 10kΩ pull-up resistors on SDA/SCL if needed
Industrial-grade reliability for critical applications
SHT85 code examples
#include <Wire.h>
#include "SHTSensor.h"

SHTSensor sht;

void setup() {
  Wire.begin();
  Serial.begin(9600);
  if (sht.init()) {
    Serial.println("SHT85 sensor initialized successfully.");
  } else {
    Serial.println("Failed to initialize SHT85 sensor.");
  }
}

void loop() {
  if (sht.readSample()) {
    Serial.print("Temperature: ");
    Serial.print(sht.getTemperature(), 2);
    Serial.println(" °C");
    Serial.print("Humidity: ");
    Serial.print(sht.getHumidity(), 2);
    Serial.println(" %");
  } else {
    Serial.println("Failed to read data from SHT85 sensor.");
  }
  delay(2000);
}
This Arduino sketch demonstrates how to interface with the SHT85 sensor using the SHTSensor library. It initializes the sensor and reads temperature and humidity data every 2 seconds, printing the results to the Serial Monitor. Ensure that the SHTSensor library is installed in your Arduino IDE.
#include <stdio.h>
#include "freertos/FreeRTOS.h"
#include "freertos/task.h"
#include "driver/i2c.h"

#define I2C_MASTER_SCL_IO    22    /*!< GPIO number used for I2C master clock */
#define I2C_MASTER_SDA_IO    21    /*!< GPIO number used for I2C master data */
#define I2C_MASTER_NUM       I2C_NUM_0 /*!< I2C master I2C port number */
#define I2C_MASTER_FREQ_HZ   100000     /*!< I2C master clock frequency */
#define SHT85_SENSOR_ADDR    0x44       /*!< SHT85 I2C address */

static esp_err_t i2c_master_init(void) {
    i2c_config_t conf = {
        .mode = I2C_MODE_MASTER,
        .sda_io_num = I2C_MASTER_SDA_IO,
        .scl_io_num = I2C_MASTER_SCL_IO,
        .sda_pullup_en = GPIO_PULLUP_ENABLE,
        .scl_pullup_en = GPIO_PULLUP_ENABLE,
        .master.clk_speed = I2C_MASTER_FREQ_HZ,
    };
    esp_err_t err = i2c_param_config(I2C_MASTER_NUM, &conf);
    if (err != ESP_OK) {
        return err;
    }
    return i2c_driver_install(I2C_MASTER_NUM, conf.mode, 0, 0, 0);
}

void read_sht85_sensor() {
    uint8_t data[6];
    uint8_t cmd[] = {0x24, 0x00}; // Command to trigger measurement
    i2c_master_write_to_device(I2C_MASTER_NUM, SHT85_SENSOR_ADDR, cmd, 2, pdMS_TO_TICKS(1000));
    vTaskDelay(pdMS_TO_TICKS(15));
    i2c_master_read_from_device(I2C_MASTER_NUM, SHT85_SENSOR_ADDR, data, 6, pdMS_TO_TICKS(1000));

    uint16_t raw_temp = (data[0] << 8) | data[1];
    uint16_t raw_humidity = (data[3] << 8) | data[4];

    float temperature = -45 + 175 * ((float)raw_temp / 65535.0);
    float humidity = 100 * ((float)raw_humidity / 65535.0);

    printf("Temperature: %.2f °C, Humidity: %.2f %%\n", temperature, humidity);
}

void app_main() {
    ESP_ERROR_CHECK(i2c_master_init());

    while (1) {
        read_sht85_sensor();
        vTaskDelay(pdMS_TO_TICKS(2000));
    }
}
This ESP-IDF code demonstrates how to interface with the SHT85 sensor using the I2C protocol. The function read_sht85_sensor() sends a command to the sensor to trigger a measurement, reads the raw temperature and humidity data, and converts it into human-readable values. These values are then printed to the console every 2 seconds.
i2c:
  sda: GPIO21
  scl: GPIO22

sensor:
  - platform: sht3xd
    address: 0x44
    temperature:
      name: "Living Room Temperature"
    humidity:
      name: "Living Room Humidity"
    update_interval: 60s
This ESPHome configuration defines the SHT85 sensor using the sht3xdd platform. The address field specifies the I2C address of the sensor (default: 0x44). Two sensor entities are defined: one for temperature and one for humidity, with user-friendly names like ‘Living Room Temperature’ and ‘Living Room Humidity.’ The update_interval is set to 60 seconds, ensuring regular updates.
[env:esp32dev]
platform = espressif32
board = esp32dev
framework = arduino
monitor_speed = 115200
lib_deps =
sensirion/arduino-sht @ ^1.2.6#include <Arduino.h>
#include <Wire.h>
#include "SHTSensor.h"
SHTSensor sht;
void setup() {
Wire.begin();
Serial.begin(9600);
if (sht.init()) {
Serial.println("SHT85 sensor initialized successfully.");
} else {
Serial.println("Failed to initialize SHT85 sensor.");
}
}
void loop() {
if (sht.readSample()) {
Serial.print("Temperature: ");
Serial.print(sht.getTemperature(), 2);
Serial.println(" °C");
Serial.print("Humidity: ");
Serial.print(sht.getHumidity(), 2);
Serial.println(" %");
} else {
Serial.println("Failed to read data from SHT85 sensor.");
}
delay(2000);
}This PlatformIO code uses the SHTSensor library to interact with the SHT85 sensor. The code initializes the sensor, reads temperature and humidity data every 2 seconds, and outputs the results to the Serial Monitor. The library simplifies the communication process and ensures accurate data handling.
from machine import I2C, Pin
from time import sleep

# Initialize I2C communication
i2c = I2C(0, scl=Pin(22), sda=Pin(21))

# SHT85 I2C address
SHT85_ADDR = 0x44

# Function to trigger measurement and read data
def read_sht85():
    i2c.writeto(SHT85_ADDR, b'\x24\x00')  # Trigger measurement
    sleep(0.015)  # Wait for measurement
    data = i2c.readfrom(SHT85_ADDR, 6)  # Read 6 bytes of data

    raw_temp = (data[0] << 8) | data[1]
    raw_hum = (data[3] << 8) | data[4]

    temperature = -45 + 175 * (raw_temp / 65535.0)
    humidity = 100 * (raw_hum / 65535.0)

    return temperature, humidity

while True:
    try:
        temp, hum = read_sht85()
        print("Temperature: {:.2f} °C".format(temp))
        print("Humidity: {:.2f} %".format(hum))
    except Exception as e:
        print("Error reading SHT85:", e)

    sleep(2)
This MicroPython script uses the I2C protocol to interface with the SHT85 sensor. It triggers a measurement, reads the raw data, converts it to temperature and humidity, and prints the results to the console every 2 seconds. The machine.I2C module is used to handle communication with the sensor.
SHT85 specifications
About the SHT85
The SHT85 takes the same high-accuracy SHT3x die used in the SHT35 - ±0.1 degC and ±1.5 %RH, I2C at 0x44 or 0x45 - and puts it in a pin-type, cable-ready package instead of a solder-down SMD footprint. A PTFE membrane over the sensing element gives it IP67 protection against dust and liquid without slowing the humidity response, and the connector makes it straightforward to mount the sensor away from the board and swap it out if it fails.
That combination targets measurement and test equipment, duct-mounted HVAC probes, and cold-chain or environmental monitoring setups where the sensing element needs to sit somewhere the PCB can’t - not a typical hobby build. It shows in the price: the SHT85 runs several times what the SHT35 costs for the same underlying accuracy, purely for the packaging and mounting convenience.
For a normal breadboard or enclosure-mounted ESP32 project that just needs the SHT35’s numbers without the probe form factor, the plain SHT35 delivers identical accuracy for a fraction of the price.
SHT85 troubleshooting
Initialization Failure with Arduino Uno
›
Issue: The SHT85 sensor fails to initialize when connected to an Arduino Uno, displaying the error message: Begin: failed.
Possible causes include incorrect wiring, improper power supply, or incompatible library versions.
Solution: Verify that the sensor's SCL and SDA lines are correctly connected to the Arduino's A5 and A4 pins, respectively. Ensure the sensor is powered with the appropriate voltage (3.3V or 5V, as per the sensor's specifications). Additionally, confirm that the latest version of the SHT sensor library is installed and compatible with your Arduino IDE.
Inconsistent Data Readings Due to I2C Communication Issues
›
Issue: The SHT85 sensor provides inconsistent temperature and humidity readings, or fails to communicate over the I2C bus.
Possible causes include improper pull-up resistor values on the I2C lines, leading to unreliable communication.
Solution: Ensure that 2.2kΩ pull-up resistors are connected between the SDA and SCL lines and the VCC to maintain proper I2C communication. Verify that the wiring matches the sensor's datasheet recommendations and that the Arduino's power supply is stable.
Challenges Implementing Multiple SHT85 Sensors on Arduino Mega
›
Issue: Difficulty arises when attempting to read data from two SHT85 sensors connected to the two I2C buses on an Arduino Mega 2560. The sensors return errors when the Arduino tries to read samples.
Possible causes include both sensors having the same I2C address, leading to address conflicts on the I2C bus.
Solution: Since the SHT85 sensors have fixed I2C addresses, consider using an I2C multiplexer to manage multiple sensors on the same bus. Alternatively, explore the possibility of using software I2C libraries to create additional I2C buses on different pins.
Communication Errors with SHT85 and USB-8451 Interface
›
Issue: When interfacing the SHT85 sensor with a USB-8451 module using LabVIEW, communication errors occur, preventing successful data retrieval.
Possible causes include incorrect I2C command sequences or improper configuration of the USB-8451 module.
Solution: Review the SHT85 sensor's datasheet to understand the correct I2C command sequences required for data acquisition. Utilize LabVIEW's built-in examples for I2C communication to ensure proper configuration of the USB-8451 module. Adjusting the timing parameters and ensuring correct pull-up resistors on the I2C lines may also resolve communication issues.
Where to buy the SHT85

Resources
Similar sensors


