
SIM800A GSM/GPRS Module
The SIM800A is a versatile GSM/GPRS module that provides dual-band connectivity for voice, SMS, and data applications. Its compact design and low power requirements make it suitable for a wide range of communication projects.

SIM800A pinout
The SIM800A pinout includes power, UART communication, control, status indication, antenna connection, and SIM card interface pins for quad-band GSM/GPRS connectivity.
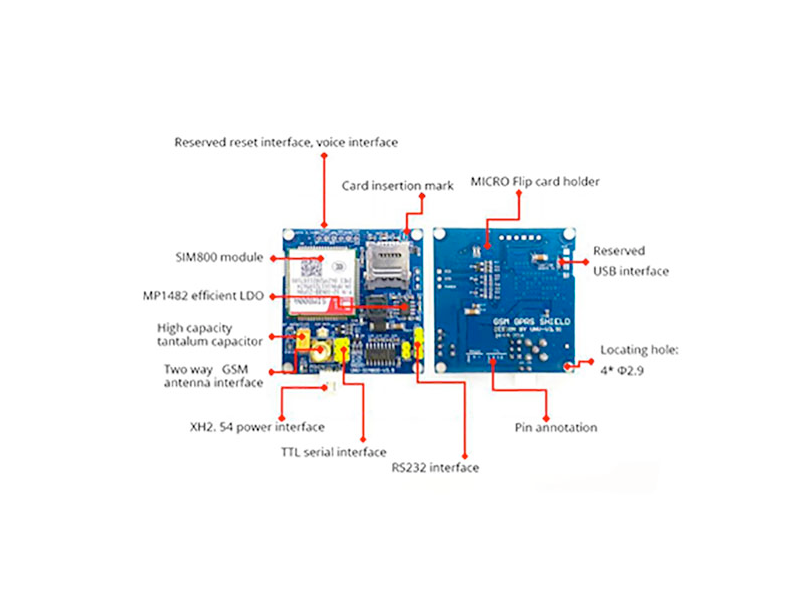
| Pin | Type | Description | Notes |
|---|---|---|---|
| VBAT | Power | Power supply input (3.4V to 4.4V) | Requires stable power supply with peak current up to 2A |
| GND | Ground | Ground connection | Connect to common ground |
| TXD | UART TX | UART Transmit Data (connects to microcontroller RX) | Default baud rate: 9600 bps |
| RXD | UART RX | UART Receive Data (connects to microcontroller TX) | Default baud rate: 9600 bps |
| PWRKEY | Control | Power on/off control (active low) | Pull low for at least 1 second to power on |
| RST | Control | Module reset (active low) | Pull low to reset the module |
| NETLIGHT | Status | Network status indication | LED indicator for network registration status |
| ANT | Antenna | Antenna connection | Requires external GSM antenna |
Quad-band GSM/GPRS module (850/900/1800/1900MHz)
Supports voice calls, SMS, and GPRS data transfer
GPRS multi-slot class 12/10
GPRS mobile station class B
Requires SIM card for cellular connectivity
Power consumption: 2A peak during transmission
Default baud rate: 9600 bps (configurable via AT commands)
Wiring the SIM800A to ESP32
Connect the SIM800A to your ESP32 via UART for AT command communication. The module requires a stable 3.4V-4.4V power supply with sufficient current capacity (peak 2A). An external GSM antenna is required for network connectivity.
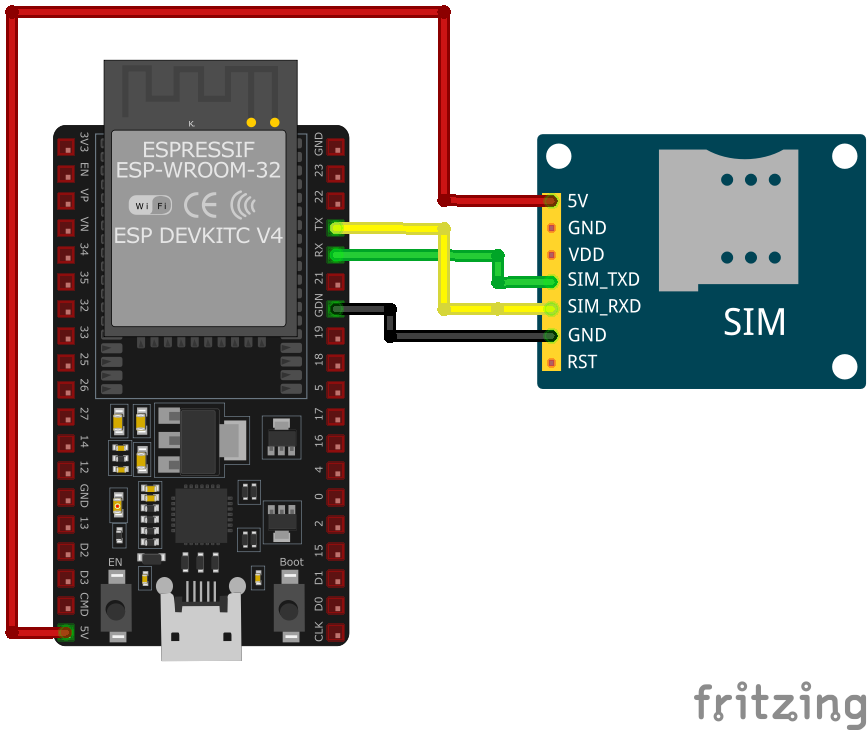
| SIM800A pin | ESP32 pin | Purpose |
|---|---|---|
| VBAT | 3.7V-4.4V Power Supply | Provide stable power (NOT from ESP32 pin) |
| GND | GND | Common ground connection |
| TXD | GPIO16 (RX2) | SIM800A TX to ESP32 RX |
| RXD | GPIO17 (TX2) | SIM800A RX to ESP32 TX |
| PWRKEY | GPIO4 | Power control (pull low to power on) · optional |
| RST | GPIO5 | Module reset control · optional |
| ANT | External GSM Antenna | Connect GSM antenna |
CRITICAL: Use a dedicated power supply (3.4V-4.4V, 2A peak) - DO NOT power from ESP32 pin!
Default UART baud rate is 9600 bps
Use logic level shifters if needed (though ESP32 is 3.3V compatible)
External GSM antenna is mandatory for network connectivity
Pull PWRKEY low for at least 1 second to power on the module
Monitor NETLIGHT pin for network registration status
Insert active SIM card before powering on
Ensure good antenna placement for optimal signal reception
SIM800A code examples
// SIM800A on ESP32 UART2: module TXD -> GPIO16 (RX2), RXD -> GPIO17 (TX2), PWRKEY -> GPIO4
#define PWRKEY_PIN 4
#define MODEM_BAUD 9600

HardwareSerial modem(2); // UART2

void powerOnModem() {
    pinMode(PWRKEY_PIN, OUTPUT);
    digitalWrite(PWRKEY_PIN, LOW);
    delay(1200); // Hold PWRKEY low to power the module on
    digitalWrite(PWRKEY_PIN, HIGH);
    delay(5000); // Give the module time to boot and register
}

void sendATCommand(const char *command) {
    modem.println(command);
    delay(500);
    while (modem.available()) {
        Serial.write(modem.read());
    }
}

void setup() {
    Serial.begin(115200);
    modem.begin(MODEM_BAUD, SERIAL_8N1, 16, 17); // RX=GPIO16, TX=GPIO17

    powerOnModem();

    Serial.println("Testing AT communication...");
    sendATCommand("AT");       // Should answer OK
    sendATCommand("ATI");      // Module identification
    sendATCommand("AT+CSQ");   // Signal quality
    sendATCommand("AT+CREG?"); // Network registration status
}

void loop() {
    // Bridge the Serial Monitor and the modem so you can type AT commands directly
    while (Serial.available()) modem.write(Serial.read());
    while (modem.available()) Serial.write(modem.read());
}
This sketch talks to the SIM800A over the ESP32's second hardware UART (UART2, RX on GPIO16, TX on GPIO17) - the ESP32 has three hardware UARTs, so the AVR-style SoftwareSerial library is neither available nor needed. GPIO4 pulses the module's PWRKEY to power it on, then a few basic AT commands verify communication, signal quality and network registration. The loop bridges the Serial Monitor to the module so you can type further AT commands interactively. Power the module from a supply that can deliver its transmit-burst current - not from the ESP32's 3.3V regulator.
#include <stdio.h>
#include <string.h>
#include "driver/uart.h"
#include "driver/gpio.h"
#include "freertos/task.h"

#define TX_PIN 17
#define RX_PIN 16
#define PWRKEY_PIN 4
#define UART_PORT UART_NUM_1

void init_uart() {
    uart_config_t uart_config = {
        .baud_rate = 9600,
        .data_bits = UART_DATA_8_BITS,
        .parity = UART_PARITY_DISABLE,
        .stop_bits = UART_STOP_BITS_1,
        .flow_ctrl = UART_HW_FLOWCTRL_DISABLE
    };

    uart_param_config(UART_PORT, &uart_config);
    uart_set_pin(UART_PORT, TX_PIN, RX_PIN, UART_PIN_NO_CHANGE, UART_PIN_NO_CHANGE);
    uart_driver_install(UART_PORT, 1024, 0, 0, NULL, 0);
}

void power_on_sim800a() {
    gpio_set_direction(PWRKEY_PIN, GPIO_MODE_OUTPUT);
    gpio_set_level(PWRKEY_PIN, 0);
    vTaskDelay(1000 / portTICK_PERIOD_MS); // Hold PWRKEY low for 1 second
    gpio_set_level(PWRKEY_PIN, 1);
    vTaskDelay(5000 / portTICK_PERIOD_MS); // Wait for the module to initialize
}

void app_main(void) {
    init_uart();
    power_on_sim800a();

    char *test_cmd = "AT\r\n";
    uart_write_bytes(UART_PORT, test_cmd, strlen(test_cmd));

    while (true) {
        char data[128];
        int len = uart_read_bytes(UART_PORT, data, sizeof(data), 100 / portTICK_PERIOD_MS);
        if (len > 0) {
            data[len] = '\0';
            printf("Response: %s\n", data);
        }
        vTaskDelay(1000 / portTICK_PERIOD_MS);
    }
}
This ESP-IDF example initializes UART communication with the SIM800A module and powers it on using the PWRKEY pin (GPIO4). The UART interface is configured with GPIO17 as TX and GPIO16 as RX. An AT command is sent to test communication, and responses from the module are printed to the console. The power_on_sim800a() function toggles the PWRKEY pin to activate the module.
uart:
  tx_pin: GPIO17  # module RXD
  rx_pin: GPIO16  # module TXD
  baud_rate: 9600

# ESPHome's sim800l component speaks the generic SIM AT command set
sim800l:
  on_sms_received:
    - logger.log:
        format: "Received '%s' from %s"
        args: [ 'message.c_str()', 'sender.c_str()' ]
ESPHome's sim800l component speaks the SIM800/SIM900 AT command set, which the SIM800A shares - the old custom-platform example no longer works (that component was removed from ESPHome in 2025). Wire UART2 as shown (9600 baud) and you get on_sms_received triggers plus sim800l.send_sms and USSD actions. Power the module from a supply that can deliver its transmit-burst current.
[env:sim800a]
platform = espressif32
board = esp32dev
framework = arduino
monitor_speed = 115200#include <HardwareSerial.h>
#include <Arduino.h>
HardwareSerial sim800a(1);
#define PWRKEY 4
void power_on_sim800a() {
pinMode(PWRKEY, OUTPUT);
digitalWrite(PWRKEY, LOW);
delay(1000); // Hold PWRKEY low for 1 second
digitalWrite(PWRKEY, HIGH);
delay(5000); // Wait for initialization
}
void setup() {
Serial.begin(115200);
sim800a.begin(9600, SERIAL_8N1, 16, 17); // RX, TX
power_on_sim800a();
// Test AT command
sim800a.println("AT");
delay(1000);
while (sim800a.available()) {
Serial.write(sim800a.read());
}
}
void loop() {
sim800a.println("AT+CMGF=1"); // Set SMS to text mode
delay(1000);
sim800a.println("AT+CMGS=\"+1234567890\""); // Replace with recipient's number
delay(1000);
sim800a.print("Hello from PlatformIO");
delay(1000);
sim800a.write(26); // CTRL+Z to send SMS
delay(5000);
}This PlatformIO code interfaces with the SIM800A module using HardwareSerial on an ESP32. The power_on_sim800a function toggles the PWRKEY pin (GPIO4) to activate the module. The AT command is sent to test communication, and SMS functionality is implemented in the loop. GPIO16 (RX) and GPIO17 (TX) are configured as serial pins.
from machine import UART, Pin
import time

# Initialize UART
uart = UART(2, baudrate=9600, tx=17, rx=16)
pwrkey = Pin(4, Pin.OUT)

def power_on_sim800a():
    pwrkey.value(0)
    time.sleep(1)  # Hold PWRKEY low for 1 second
    pwrkey.value(1)
    time.sleep(5)  # Wait for module to initialize

def send_at(command):
    uart.write(command + '\r\n')
    time.sleep(1)
    while uart.any():
        print(uart.read().decode('utf-8'), end='')

# Power on the module
power_on_sim800a()

# Test communication
send_at('AT')

# Send SMS
send_at('AT+CMGF=1')  # Set SMS to text mode
send_at('AT+CMGS="+1234567890"')  # Replace with recipient's number
uart.write("Hello from MicroPython" + chr(26))
This MicroPython code communicates with the SIM800A module over UART. The power_on_sim800a function activates the module using the PWRKEY pin (GPIO4). The send_at function sends AT commands and prints the responses. The script initializes the module, tests communication, and sends an SMS with a specified message.
SIM800A specifications
About the SIM800A
The SIM800A is a plain 2G GSM/GPRS module, dual-band 900/1800 MHz - the band pair used across most of Asia, Europe and Africa (and especially popular in India), rather than the 850/1900 MHz pair GSM historically used in North America. The quad-band SIM800L and its SIM800C sibling cover all four bands including that US pair, so they’re the ones to reach for if a project needs to work across regions rather than in one specific market.
Band matching aside, the bigger issue by 2026 is that 2G itself is disappearing on a country-by-country basis, and the picture is genuinely mixed rather than uniformly “dead” or “fine.” In the US, all three major carriers have now retired 2G: AT&T back in 2017, Verizon in 2020, and T-Mobile - the last holdout - shut its GSM network down on August 3, 2026, so no 2G network exists there anymore regardless of band. In the SIM800A’s actual target markets it’s less final: several EU carriers plan to keep some 2G running well into the late 2020s for fallback, IoT and emergency-call use (Vodafone Germany, for instance, has said it will keep limited 2G through 2030), and 2G in India, where this module sells heavily, remains commercially active with no announced shutdown date as of 2026. So whether a SIM800A design still works is a question about the specific country and carrier, not a blanket answer either way - it needs checking per deployment, and re-checking if that deployment is expected to still be running in a few years.
Where 2G is still alive, the SIM800A remains a legitimate, inexpensive choice for SMS alerts or low-rate GPRS logging, and TinyGSM’s supported-modem list includes it alongside the rest of the SIM800/SIM900 family. For anything meant to keep working for years, or shipping to an unknown region, an LTE part like SIM7600G or an LPWA module like SIM7000 carries far less risk of quietly going dark mid-deployment.
SIM800A troubleshooting
Module Fails to Power On
›
Issue: The SIM800A module does not power up or respond to commands.
Possible causes include insufficient power supply, incorrect wiring, or faulty hardware.
Solution: Ensure the module is connected to a stable power source within the recommended voltage range of 3.4V to 4.4V. Verify that all connections are secure and correctly configured. If the problem persists, consider testing the module with a different power source or replacing it.
SIM Card Not Recognized
›
Issue: The module fails to detect or register the SIM card.
Possible causes include improper SIM card insertion, unsupported SIM card type, or SIM card lock.
Solution: Ensure the SIM card is properly inserted into the module's SIM card slot and is compatible with the GSM network. Verify that the SIM card is active and unlocked. If necessary, test the SIM card in another device to confirm its functionality.
Poor Network Signal or Connectivity Issues
›
Issue: The module experiences weak signal strength or fails to maintain a stable network connection.
Possible causes include improper antenna connection, environmental interference, or network coverage limitations.
Solution: Ensure the GSM antenna is securely connected to the module and positioned for optimal signal reception. Avoid placing the module near sources of electromagnetic interference. Check the network coverage in your area to ensure adequate signal strength.
AT Commands Not Responding
›
Issue: The module does not respond to AT commands sent from the microcontroller or computer.
Possible causes include incorrect baud rate settings, faulty serial connections, or improper command syntax.
Solution: Verify that the baud rate of the module matches that of the microcontroller or computer; the default baud rate is 9600 bps. Check that the TX and RX lines are correctly connected and that there are no loose connections. Ensure that AT commands are correctly formatted and terminated with a carriage return.
Module Overheating
›
Issue: The SIM800A module becomes excessively hot during operation.
Possible causes include overvoltage, excessive current draw, or continuous high-power transmission.
Solution: Confirm that the power supply voltage is within the recommended range (3.4V to 4.4V). Monitor the current consumption to ensure it does not exceed the module's specifications. If the module is transmitting continuously, consider implementing power-saving modes or reducing the transmission frequency to prevent overheating.
Where to buy the SIM800A

Resources
Similar sensors


