
ESPHome Home Assistant in Docker Containers on Raspberry Pi
Setting up and running Home Assistant within Docker containers in Raspberry Pi and Integrating ESPhome for seamlessly controlling your ESP32 development boards
If you want to turn your humble Raspberry Pi 4 into a powerful smart home command center, you're in the right place. In this tutorial, we'll walk through the entire process, from getting Home Assistant up and running within Docker containers to harnessing the potential of ESPhome for seamlessly connecting and controlling your ESP32 and other smart devices.
In this tutorial we will go through several steps to run the ESPHome with Home Assistant on a Docker container on Raspberry Pi:
- What is Home Assistant and ESPHome?
- Why Docker?
- Installing Raspberry Pi Operating System and SSH Access
- Installing Docker on Raspberry Pi
- Installing Home Assistant in Docker running on Raspberry Pi
- Setting up ESPHome
- What's next?
- Conclusion
What is Home Assistant and ESPHome? #
Home Assistant is a versatile and user-friendly open-source home automation platform, that supports a wide range of devices from various manufacturers. Home Assistant helps you connect different brands of smart devices into one eco-system, eliminating the need for multiple mobile apps to control your home.
Apart from market-ready smart devices, Home Assistant has plenty of integrations with other systems, including the ESP32/ESP8266 board, through the ESPHome Raspberry Pi. "ESPHome is a system to control your ESP8266/ESP32 and RP2040 by simple yet powerful configuration files and control them remotely through Home Automation systems." - esphome.io
One of the best parts of Home Assistant, it is available for most modern Operating Systems, including Raspberry Pi OS and Docker.
The Home Assistant website suggests using a dedicated system to run the Home Assistant, therefore we will be using Raspberry Pi 4 8Gb, but since we will be running multiple services on the Raspberry, we will be running it inside a Docker container.
Why Docker? #
First off, Docker is an open-source project, you can imagine it as a free tool that helps put apps into these neat little containers – think of them as mini-app packages. Home Assistant totally backs it, and there's a bunch of guides to help out. Containers are awesome because they're easy to move around, copy, and try out different stuff without much worry. You don't need one of the services anymore? Just stop the Docker container and that's it! No frustration deleting the mess that some services make when installing.
Add this to the fact that Docker is really good at making sure things stay the same every time you use it. When you put an app inside a Docker container, you package up everything that the app needs to run. This includes the code, libraries, and settings. So, no matter where you run that container – on your laptop, a server, or in the cloud – it'll always work the same way. This consistency is what gives Docker its magic touch of reproducibility.
Installing Raspberry Pi Operating System and SSH Access #
As already mentioned, we plan to run multiple services on Raspberry Pi, therefore we will be running homeassistant docker container. We could simply choose the default Raspberry Pi OS option, but since we are not planning to run any services, that require Desktop access, we do not need a Desktop environment and other stuff that comes with the default Raspberry Pi OS option. Instead, we will be using "Raspberry Pi OS Lite", which as the name suggests is a lighter version of Raspberry Pi OS.
Prerequisites #
Before we begin, make sure you have everything ready, needed for this project, to avoid disappointment in the middle of instructions.
| Part | Notes |
|---|---|
 Raspberry Pi 4 | Raspberry Pi 4 8Gb recommended. You could use an older version, but for example Rpi3b+ has only 1Gb RAM, which might not be enough for running ESPHome integration |
 microSD Card | Any microSD card compatible with Raspberry Pi. We are using SanDisk 64GB Extreme microSD |
 microHDMI Cable (optional) | In case you do not want to enable ssh access and prefer to configure the Raspberry physically. Amazon Basics microHDMI to HDMI cable |
 Computer | With Operating System compatible with "Raspberry Pi Imager" or other similar image writer |
 microSD Card Reader | If your computer does not have the microSD/SD card reader, make sure you have an external one |
There is a common question Can you run Home Assistant on Raspberry Pi 3b+ 1Gb? And the answer is yes you can, however in our experience, it is usually consuming most of the available RAM and therefore is too slow, especially for integrations with ESPHome. While it does work, it can be unstable sometimes and compiling ESPHome programs through Home Assistant takes eternity. And that is without Docker. Therefore we recommend choosing a Raspberry Pi 4 with at least 4 Gb RAM.
If you have everything ready, we can begin.
Download Raspberry Pi Imager In case you are on MacOS and using HomeBrew, you can install the Raspberry Pi Imager by running
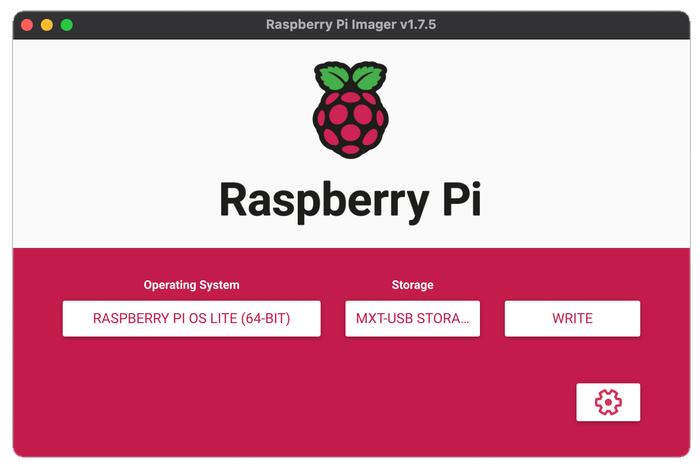
brew install --cask raspberry-pi-imager. Otherwise, download the Raspberry Pi Imager and follow the instructions on Raspberry Pi Website.Select Raspberry Pi Imager Options As discussed earlier, because we are going to use Raspberry Pi mainly to run Docker, which will run Home Assistant and other services, we select "Raspberry Pi OS Lite (64-bit)". For Storage, select the inserted microSD card.
Note that steps 3 and 4 are optional if you will be using a microHDMI cable to connect your Raspberry Pi to a screen and program it physically.
Generate SSH Keys To access our Raspberry Pi remotely, after the OS has been installed, we need to enable the SSH connection. You could use password authentication, but that is highly not recommended, as it could be a potential security threat for the whole Raspberry Pi because anyone who knows the password could SSH into your Raspberry Pi and gain administrator access. Therefore, we will generate an SSH key pair so only our computer can SSH into Raspberry Pi.
- Open Terminal and type '
ssh-keygen -t rsa'. Click "enter" to confirm the default location at '~/.ssh/id_rsa.pub'; - Type '
cat ~/.ssh/id_rsa.pub' and copy the output printed to the terminal.
- Open Terminal and type '
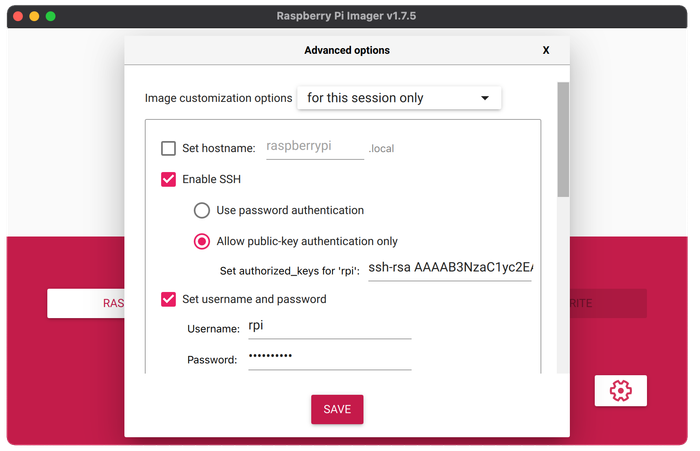
Advanced Options In Raspberry Pi Imager, click the settings icon on the bottom-right corner.
- Check the "Enable SSH" checkbox
- Select "Allow public-key authentication" only
- In the field "Set authorized_keys for 'x':", paste the contents of your public key that you have copied in the previous step
- We also check the "Set username and password" checkbox and fill in the default user credentials for our Raspberry Pi Lite OS.
- Click "Save"
Write the Image Click "Write" and wait for the image to be written onto your microSD card.
Install Raspberry Pi OS Lite After successfully writing the image to a micro SD card, insert it into your Raspberry Pi and wait a few minutes. If you have microHDMI cable connected to the screen, wait until the Raspberry Pi prompts you to log in. If you don't have the screen connected, we recommend waiting around 5 minutes.
SSH Into Raspberry Pi First, we need to know the local IP address of our Raspberry Pi. There are several ways to do that...
- If you have the screen and keyboard connected to your Raspberry Pi, simply type '
ifconfig eth0' into the console of Raspberry Pi and look for the IP address. It should look similar to "192.168.129.13". - If you don't have the screen connected to Raspberry Pi, you can check the Raspberry Pi IP address on your router's web interface. The instructions will differ from router to router, therefore consult the manual of your router.
- If you don't have router access though, you can scan your network by typing '
arp -a' into the terminal of your computer. It will list all the devices connected to the same network as your computer. Probably you will have several IPs that look similar to "192.168.129.13". If you are unsure which one is Raspberry Pi, you can try disconnecting the Raspberry from the internet or powering it off, and running the arp-scan again. You might need to repeat it several times to notice which IP address appears or disappears, meaning it belongs to Raspberry Pi.
- If you have the screen and keyboard connected to your Raspberry Pi, simply type '
Now, that we have the local IP address of the Raspberry Pi, which in our case we found is 192.168.129.13, we can SSH to our Raspberry Pi, by typing 'ssh rpi@192.168.129.13'. Make sure to replace the IP address with yours and also, if you used a different username than 'rpi' in Advanced Options, before writing the image to the microSD card, make sure to change that too.
You might need to confirm to add the host to the list of known hosts by clicking enter and you should see a similar screen as below, showing 'rpi@raspberrypi:~ $'.
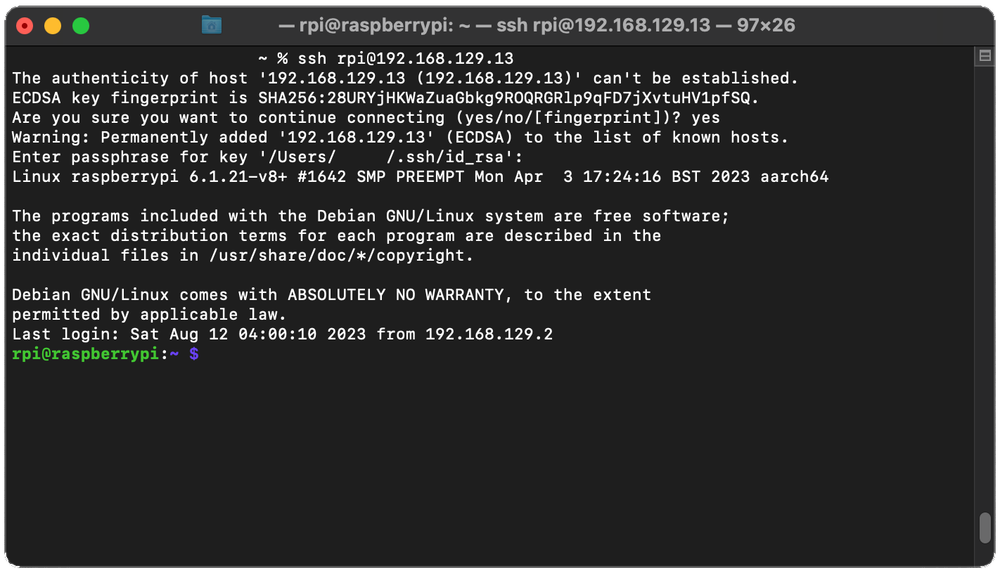
Type 'sudo su' to gain superuser privileges.
Congratulations! You are now inside a Raspberry Pi terminal.
Installing Docker on Raspberry Pi #
As mentioned previously, we will be running our services inside Docker containers. To begin with this, we need to install the Docker Host on our Raspberry Pi.
- Download and Install Docker
Inside the Terminal, where you have the SSH connection to Raspberry Pi, type:
curl -fsSL https://get.docker.com -o get-docker.sh
sh get-docker.sh
This will download the "get-docker.sh" script and run it, which in turn will download and install the Docker Host. Running the shell scripts like that is controversial, therefore, if you prefer, you can follow manual instructions in Docker Docs.
- Test Docker Installation
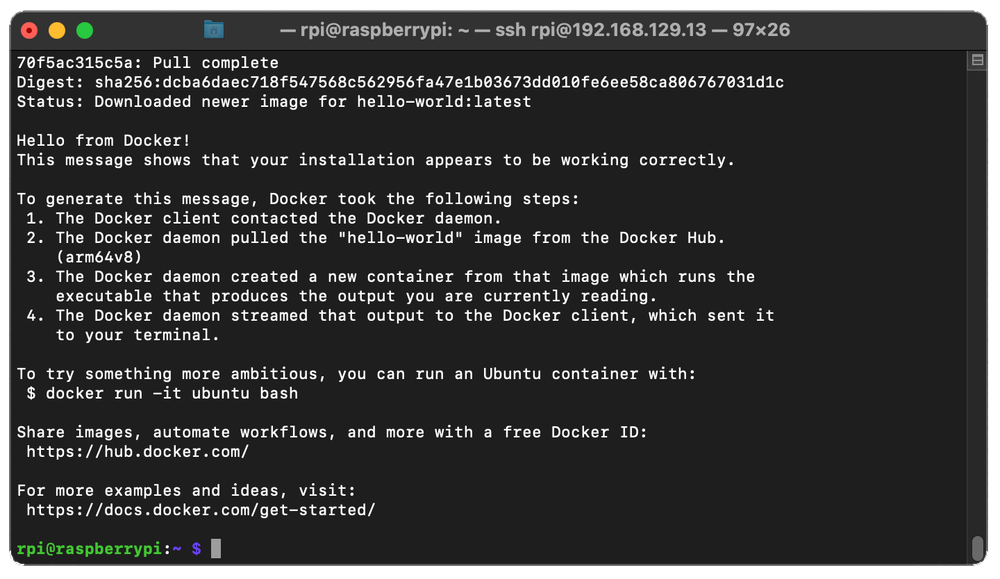
To test, if the Docker installation was successful and the Docker is running properly, there is a prepared "hello-world" container on Docker Hub. Run the following:
docker run --name helloworld hello-worldThis will download the "hello-world" container image, and run it inside a Docker container, which will run the program and print the "Hello From Docker" message to the screen.
- Remove the Test Container
We have now made sure our Docker installation was indeed successful and don't need the "hello-world" container anymore. Let's keep it clean and delete it right away by typing:
docker rm helloworldWe have installed and tested the Docker running inside our Raspberry Pi and have it fully functioning. Congratulations!
Installing Home Assistant in Docker running on Raspberry Pi #
Finally, we have everything ready to install the Home Assistant. So without further ado, let's get right to it.
- Create a Directory for Home Assistant
In your user's root directory on Raspberry Pi, create a new directory and switch to it by typing:
mkdir homeassistant && cd homeassistant- Run Docker Image
We are going to use an official Home Assistant Docker Image by running the following command. Don't forget to change the TZ variable to your Timezone!
docker run -d \
  --name homeassistant \
  --privileged \
  --restart=unless-stopped \
  -e TZ=Europe/Brussels \
  -v ~/homeassistant:/config \
  --network=host \
ghcr.io/home-assistant/home-assistant:stable- Make Sure the Container is Running
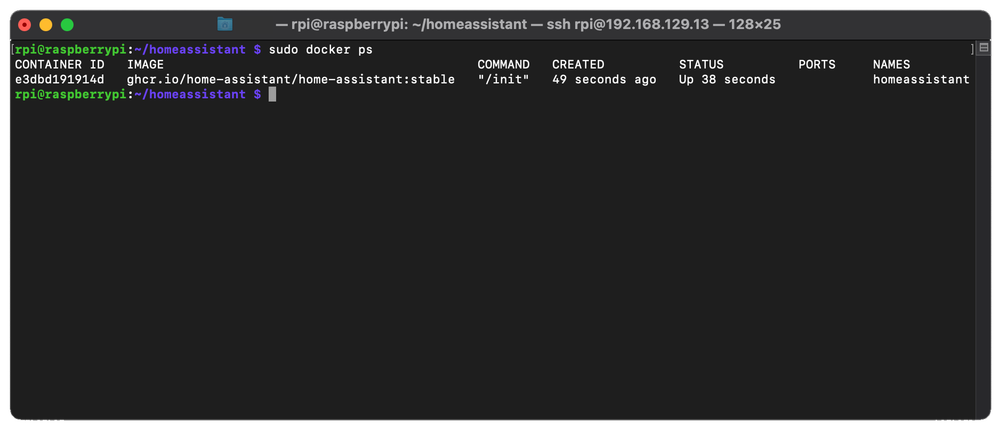
After waiting a few minutes, we should have the Home Assistant running inside a Docker container on our Raspberry Pi. To check the status type
docker psLook for the "homeassistant" container. Under STATUS you should see "Up x seconds/minutes". Seems that our container is up and running!
- Open Home Assistant Web UI
Open Web Browser on your host computer and enter the same IP address you used to ssh into Raspberry, adding the “:8123” at the end. In our case, it would be “http://192.168.129.13:8123”.

- Home Assistant Onboarding
Follow the onboarding steps, until you are landed in the Home Assistant dashboard. If you need any help, you can follow the official Home Assistant Onboarding Documentation.

Congratulations! You now have the Home Assistant fully functioning inside a Docker container running on Raspberry Pi!
Setting up ESPHome #
Finally, we are going to integrate the ESP32 device with Home Assistant, using the ESPHome. For this step, we will need an ESP32 board and a USB cable to connect it to the Raspberry Pi.
Prerequisites #
- ESP32 development board
- USB cable
If you have the ESP32 next to you, let's begin. Oh, where's that USB cable...
- Pull ESPHome Docker Image
To pull the Docker image of ESPHome, run the following command in Raspberry Pi
docker pull ghcr.io/esphome/esphome- Run the ESPHome Setup Wizard
To help you with setting up your first ESP32/ESP8266 project, ESPHome has a setup wizard. To run it, type the following command in your Raspberry Pi
docker run --rm -v "${PWD}":/config -it ghcr.io/esphome/esphome wizard livingroom.yaml- Follow the ESPHome Setup Wizard
- Enter the name of your ESP32. We will name our device '
office'. Keep in mind it has to be an all-lowercase name. - Enter either '
ESP32' or 'ESP8266', depending on the platform you are using. We are using 'ESP32' in this case. - Enter the board type you are using from the provided list. Since we are using Wemos D1 mini ESP32, '
esp32dev' will work. - Enter the WiFi SSID (the name) of your network, where Raspberry Pi is connected
- Enter the WiFi Password
- Enter the name of your ESP32. We will name our device '
That's it. You have gone through the ESPHome setup wizard. You should see a new file called 'office.yaml' created in Raspberry Pi.
- Add Built-in LED Entity Open the newly created '
office.yaml' file and add the following to the end of it
switch:
  - platform: gpio
    name: "Builtin LED"
    pin: 2
The final version of your 'office.yaml' file should look like this:
esphome:
  name: office

esp32:
  board: esp32dev
  framework:
    type: arduino

# Enable logging
logger:

# Enable Home Assistant API
api:
  password: ""

ota:
  password: ""

wifi:
  ssid: "<YOUR_WIFI_SSID>"
  password: "<YOUR_WIFI_PASSWORD>"

  # Enable fallback hotspot (captive portal) in case wifi connection fails
  ap:
    ssid: "Office Fallback Hotspot"
    password: "AvQ6HE0YfWw8"

captive_portal:

switch:
  - platform: gpio
    name: "Builtin LED"
pin: 2- Upload the Configuration to ESP32 Board
Run the following command to verify your configuration and if everything is fine, upload it to your ESP32 board.
docker run --rm --privileged -v "${PWD}":/config --device=/dev/ttyUSB0 -it ghcr.io/esphome/esphome run office.yaml- Add ESPHome Integration to Home Assistant
Open the Home Assistant Web UI and go to Settings -> Devices & Services.
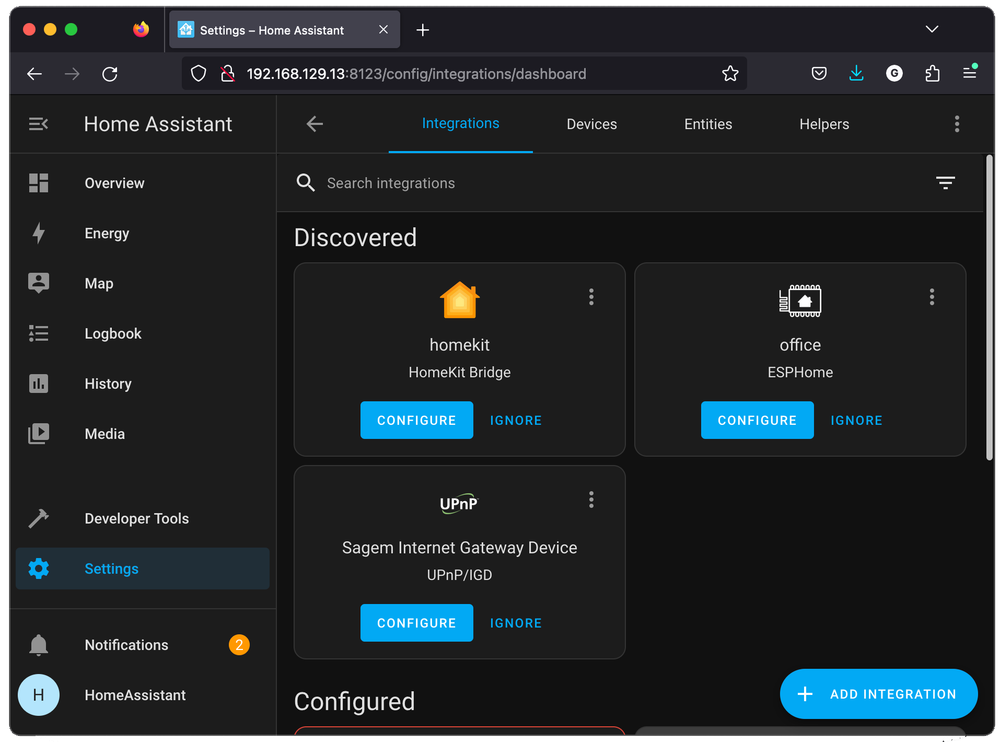
You should see a new ESPHome device, named 'office' under Discovered section. For the new ESP32 device to appear it might take a few minutes. If it is not appearing, click "Add Integration", select "ESPHome", enter 'office.local' under host, keep port '`6053', and click "Submit".
ESP32 device, running ESPHome is now integrated with Home Assistant.
- Test ESP32 Board Integration with Home Assistant
On the Home Assistant Web UI, Settings -> Devices & Services, you should now see ESPHome under the "Configured" section. Click on the text "1 Device". Under Controls you should see "Builtin LED", try turning it on and off. You should see the built-in LED on your ESP32 board blinking.
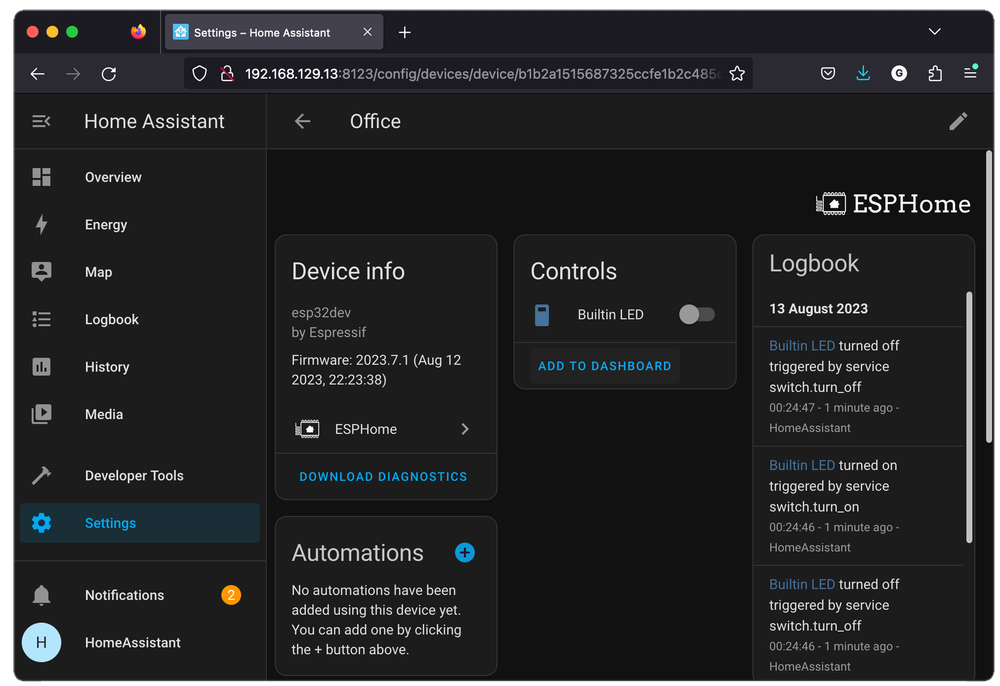
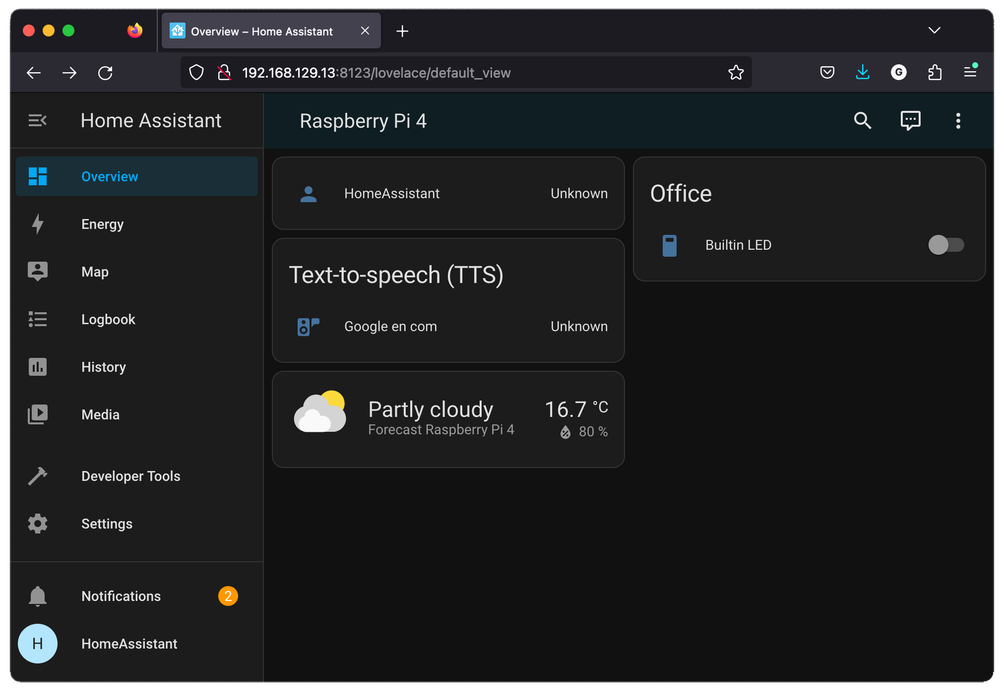
You can also click "Add to Dashboard" to make the control of built-in LED available from the Overview in the menu.
Congratulations! We have finished our journey of integrating the ESP32 board, running ESPHome, with Home Assistant, running in a Docker container, which runs in a Raspberry Pi! Isn't that exciting?!
What's next? #
Now, that we have our fancy setup working, the next logical step would be to add some sensors and actuators to your ESP32 board and configure them with ESPHome. That is exactly what we recommend you to do. We will have some posts about that in the future.
Also, you might want to access your smart home features from outside of your network, when you are not at home. Check "Home Assistant access from Internet with Cloudflare Tunnel" post.
Or integrate a secure local MQTT broker to Home Assistant with Mosquitto. Check the "Secure MQTT Broker in Raspberry Docker Containers with HASS post.
Conclusion #
After all this work, we have learned what Home Assistant and ESPHome are and why we should run them in the Docker containers.
We have also had some hands-on experience and integrated the ESP32 board, running ESPHome, with Home Assistant, running in a Docker container, which runs in a Raspberry Pi.
The infrastructure we have built on our Raspberry Pi will help us in the long term. Homeassistant Docker container will help us manage our Raspberry Pi. If we have some free resources, we can easily run additional services now, without being afraid to break the Home Assistant setup.