

Turn the M5Stack Dial into a Kitchen Timer with ESPHome
Build a standalone kitchen timer with ESPHome on the M5Stack Dial v1.1: half-minute detents, a state-colored LVGL arc, an idle clock kept by the onboard RTC, and a buzzer that rings until you tap it quiet.
A kitchen timer is a solved interface. Twist a knob, it starts ticking, it rings when it is done. Every attempt to improve on that with touchscreens and apps has mostly made it worse.
The M5Stack Dial is that exact interface with an ESP32-S3 inside: a rotary knob with real detents that also clicks like a button, a 1.28" round touchscreen in the middle, and a buzzer. So this post builds the obvious thing: a standalone kitchen timer in ESPHome. A twist sets the duration in half-minute steps, with a blip from the buzzer for every detent. Press the dial (or tap the glass) to start. An LVGL arc drains around the rim, changing color with the timer's mood, and at zero the buzzer rings until you tap it quiet.
And because a wall-mounted knob that shows nothing most of the day would be a waste, idle is not blank: it is a clock, kept honest by the Dial's battery-backed RTC, so it survives WiFi outages and reboots. No Home Assistant required for any of it; the API stays enabled as an optional extra.
This is the timer face, drawn to scale on the left, and the real thing running it on the right:

Green means running; the same layout turns indigo while you set a duration, amber when paused and red for the last ten seconds. The 270-degree arc leaves a gap at the bottom, and the hint text lives in it.
What you end up with
- Twist to set: half-minute detents, whole minutes past ten, a blip per click, up to 99 minutes
- Press the dial or tap the glass: start, pause, resume, dismiss. Hold about a second: back to the clock
- A state-colored arc, an audible tick for the last ten seconds, and an "ends at 14:52" line
- Idle is a clock kept by the battery-backed RTC, so it works offline after the first sync
- Impatient? The whole thing is in one copy-pasteable config
Meet the Dial #
The hardware
M5Stack Dial v1.1
This build uses most of what the Dial carries: the encoder, the round touchscreen, the buzzer, both buttons (the dial itself clicks, and there is a side button), and the BM8563 RTC that keeps the idle clock honest. Only the RFID reader and the two Grove ports sit this one out, and the board page covers them if you want the whole picture.
One hardware fact worth stating up front: the Stamp-S3A module inside is an ESP32-S3 with 8MB flash and no PSRAM. ESPHome will warn you about it when LVGL is in play; more on that below. And there is nothing to wire, every peripheral is already routed inside the case, so the YAML below is the entire project. This is where everything lives:
| GPIO | What sits on it | Notes |
|---|---|---|
| 40 / 41 | Encoder A / B | One count per detent at the default resolution |
| 42 | Dial button | The knob itself clicks; active-low |
| 46 | Side button | Doubles as the battery power-hold pin, covered at the end |
| 3 | Buzzer | LEDC PWM, driven through rtttl |
| 9 | Display backlight | PWM, and off until firmware says otherwise |
| 7 / 4 / 8 | LCD CS / DC / RST | SPI control lines |
| 6 / 5 | SPI CLK / MOSI | Display bus |
| 11 / 12 | I2C SDA / SCL | FT5x06 touch at 0x38, PCF8563 RTC at 0x51, RFID at 0x28 |
| 14 | Touch interrupt | Optional; the touch works polled without it |
First light #
Bringing up the display is where this board spends its beginner luck. Three separate defaults all fail the same way: a config that compiles, flashes and logs happily while the screen shows you nothing useful. Here is what each one looks like from the outside:
The three ways this screen stays broken, and the one line that fixes each.
The stories behind them are short. The backlight is a PWM output on GPIO9 that boots off, and the panel renders perfectly well behind it, so the logs never complain about your black circle; declaring it as a light with restore_mode: ALWAYS_ON also gets you a brightness slider in Home Assistant for free. The GC9A01 panel wants invert_colors: true, and that is not a stylistic choice: without it every color renders negative and this UI's deep navy comes out cream. And the panel is mounted upside down relative to how you hold the Dial, so without a rotation the whole interface does a headstand: one rotation: 180 line in the lvgl: block puts it right (a recent addition to ESPHome's LVGL component, so update if it errors on you).
Condensed to the lines that matter (the full blocks, with pins and ids, are in the complete config):
light:
  - platform: monochromatic
    output: backlight_output            # ledc output on GPIO9
    restore_mode: ALWAYS_ON             # 1: the backlight boots off

display:
  - platform: ili9xxx
    model: GC9A01A
    invert_colors: true                 # 2: colors render negative without it

lvgl:
  rotation: 180                         # 3: the panel is mounted upside down
One more bring-up note while we are here: because the Stamp-S3A has no PSRAM, ESPHome prints a warning that the LVGL buffer "may need to be reduced". In practice LVGL falls back to a smaller strip buffer on its own and this config runs fine without touching it; if you ever push the UI harder and see render trouble, pinning buffer_size: 25% in the lvgl: block is the knob to reach for.
Five states, four integers #
Strip away the hardware and the whole device is four globals: which mode it is in, the duration you picked (set_seconds, which is what the arc calls "full"), the seconds left (remaining), and a blink phase for the paused display. There is no timer library; the states are just named integers, given readable names through substitutions so the YAML says ${mode_running} instead of a bare 2.
Five states, colored the way the screen colors them. Every arrow is a few lines in one of the scripts.
The device sells that diagram better than the diagram does. The idle clock, a countdown in green, the amber pause, and the alarm, straight off the real thing:


Time only ever passes in one place, a 1-second interval:. While RUNNING it counts down, refreshes the page, and for the last ten seconds adds an audible tick, the little courtesy that lets you sprint back to the kitchen before the alarm proper:
interval:
  - interval: 1s
    then:
      - if:
          condition:
            lambda: "return id(mode) == ${mode_running};"
          then:
            - lambda: "id(remaining) -= 1;"
            - if:
                condition:
                  lambda: "return id(remaining) <= 0;"
                then:
                  - script.execute: timer_finished
                else:
                  - script.execute: refresh_timer_page
                  - if:
                      condition:
                        lambda: "return id(remaining) <= 10;"
                      then:
                        - rtttl.play: ${tune_tick}
The same heartbeat does two more small jobs, both in the full config: while PAUSED it flips the digits between full and dimmed opacity, a 1 Hz blink that reads as "I am waiting" from across the room, and while idle it keeps the clock page's time, date and seconds ring fresh.
Everything else mutates those four integers and calls one of two refresh scripts, which push the numbers into the arc and labels. refresh_timer_page also does the color grading: digits and arc turn indigo, green, amber or red purely from the current state, including the flip to red inside the last ten seconds. A TFT repaints in milliseconds, so there is no refresh budget to manage; if you have built anything on e-paper, enjoy how much ceremony is missing here.
Teaching a screen to feel mechanical #
The whole reason to build this on the Dial instead of any random touchscreen is the physical layer, so this is where the config earns its keep. The complete control scheme fits on one hand:
Three gestures, no menus. Everything else is the timer doing its job.
The twist. The encoder has 16 real detents per revolution and, at ESPHome's default rotary_encoder resolution, each detent arrives as exactly one count (a heads-up if you go comparing configs: some, including M5Stack's own guide, set resolution: 4, which fires four counts per click). Every detent lands in one script with a direction parameter, and that script carries the one design decision in this build I would defend in an argument: it snaps to the grid instead of blindly adding 30. If a running timer got nudged to 5:28 and you re-open the setting, the next detent lands on 5:30, not 5:58, because that is what a good knob does. Below ten minutes a detent is 30 seconds; from ten minutes up it is a whole minute, so dialing in 45 minutes does not wear a groove in your thumb.
  - id: dial_turned
    parameters:
      direction: int
    then:
      - if:
          condition:
            # While the alarm rings the dial is ignored - tap to dismiss.
            lambda: "return id(mode) != ${mode_ringing};"
          then:
            - lambda: |-
                if (id(mode) == ${mode_clock}) {
                  // First detent just opens the timer page.
                  id(mode) = ${mode_setting};
                  id(remaining) = id(set_seconds);
                } else if (id(mode) == ${mode_setting}) {
                  // 30 s per detent, 1 min from 10 minutes up. Snap to the
                  // next multiple, so off-grid values left over from a
                  // running timer (e.g. 5:28) land back on :00/:30.
                  int step = id(remaining) >= 600 ? 60 : 30;
                  int snapped = direction > 0
                      ? (id(remaining) / step + 1) * step
                      : (id(remaining) - 1) / step * step;
                  id(remaining) = std::clamp(snapped, 30, 99 * 60);
                  id(set_seconds) = id(remaining);
                } else {
                  // Running or paused: adjust the countdown on the fly.
                  id(remaining) = std::clamp(id(remaining) + direction * 30, 0, 99 * 60);
                  if (id(remaining) > id(set_seconds)) id(set_seconds) = id(remaining);
                }
Notice the last branch: turning does not stop at the setting screen. A running timer takes +30/-30 adjustments live, the "actually, two more minutes" move every real kitchen knows, and dialing it all the way to zero just finishes it.
The press. Here is the detail spec sheets undersell: the Dial's knob is itself a button, on GPIO42, so "press the dial" is a real gesture, not a metaphor. on_multi_click splits a short click (under 400 ms, runs dial_pressed) from a hold (800 ms and up, resets to the clock), with 20 ms debounce filters on the pin. dial_pressed is the state diagram's press arrow in one lambda: clock opens the setting page, setting and paused start the countdown, running pauses it, ringing dismisses.
The tap. The touchscreen (an FT3267 chip, driven by ESPHome's ft5x06 platform at address 0x38) does not use a touchscreen: trigger at all. Instead, the timer page carries an invisible, full-screen LVGL button, and that gets both gestures for free, with the same timing logic LVGL uses everywhere:
        # Invisible full-screen button: a tap acts like pressing the dial,
        # a long press resets.
        - button:
            id: touch_overlay
            align: CENTER
            width: 240
            height: 240
            bg_opa: 0%
            border_width: 0
            shadow_width: 0
            pressed:
              bg_opa: 0%
            on_short_click:
              - script.execute: dial_pressed
            on_long_press:
              - script.execute: reset_to_clock
              - rtttl.play: ${tune_reset}
Wet-finger insurance is physical: the side button (GPIO46) is a third way to reset, and pressing the dial does everything a tap does, so the timer never depends on capacitive touch cooperating with floury hands.
The sounds. Every interaction answers in audio, and all the melodies live in substitutions: as one-line RTTTL strings: a rising blip for adding time, a falling one for removing it, little jingles for start, pause and reset, the last-ten-seconds tick, and the alarm. The alarm loops with a trick worth stealing: instead of a watchdog timer, rtttl: gets an on_finished_playback trigger that simply starts the tune again while the state is still RINGING.
rtttl:
  id: buzzer
  output: buzzer_output
  # Replaying from on_finished_playback loops the alarm until dismissed.
  on_finished_playback:
    - if:
        condition:
          lambda: "return id(mode) == ${mode_ringing};"
        then:
          - rtttl.play: ${tune_alarm}
Swap tune_alarm for anything RTTTL, which is to say: if your kitchen deserves to be alerted by the Nokia tune, nothing is stopping you.
A face with no corners #
Round displays punish rectangular habits. The canvas is still an ordinary 240x240 square as far as LVGL is concerned, and it will happily position widgets into corners that physically do not exist, without a single warning. How the layout divides the square it actually gets:
The square LVGL sees versus the circle you get. Hatched area: pixels that render into the void.
Both pages, the idle clock and the timer, are the same skeleton: a rim arc, big type dead center, quieter lines below it, a hint in the arc's gap. Two more habits kept the face honest:
Near-black makes the circle vanish
The background is a deep navy, dark enough that the display edge melts into the bezel and the UI floats in the knob, but with enough blue in it to feel designed rather than off.
Color means state, sound means events
Indigo, green, amber and red are readable from across the kitchen; the buzzer confirms every action. No LVGL animations anywhere, and the only "motion" is the paused digits blinking at 1 Hz.
The typography is not the built-in Montserrat either: the config pulls Rubik from Google Fonts at build time, antialiased at 4 bits per pixel, and the big 60-point timer font only embeds the fourteen glyphs it can ever show, which keeps the flash cost of a font that size honest:
font:
  - file: "gfonts://Rubik@600"
    id: font_time
    size: 60
    bpp: 4
    glyphs: "0123456789:- "
This face was not laid out by guessing coordinates in YAML: it was built in our free ESPHome LVGL designer, which has a round 240x240 canvas that shows exactly what falls outside the glass. The lvgl: block in the config below still carries the designer's markers, so you can paste it straight back in, drag things around, restyle the arcs and export it out again.
The whole config #
Everything above, assembled and ready to flash. Set your WiFi secrets, change the timezone substitution, and go:
Show the full config, about 570 lines
# M5Stack Dial v1.1 - standalone kitchen timer (ESPHome)
# UI designed with the ESPboards LVGL Designer: https://lvgl.espboards.dev/
#
# Controls:
#   rotate       set the duration; while running, add/remove 30 s
#   press / tap  start · pause · resume · dismiss the alarm
#   hold ~1 s    reset back to the clock (dial, screen or side button)
#
# Idle shows a clock (SNTP → battery-backed RTC, so it works offline after
# the first sync). The arc and digits are color-coded by state: indigo =
# setting, green = running, red = last 10 s / alarm, amber blink = paused.
#
# No Home Assistant required - the API stays enabled as an optional extra.

substitutions:
  name: m5dial-timer
  friendly_name: M5Dial Timer
  timezone: Europe/Brussels # TODO: set your timezone

  # UI palette
  color_background: "0x0B1120"
  color_arc_track: "0x1E293B"
  color_text: "0xF8FAFC"
  color_text_muted: "0x94A3B8"
  color_text_faint: "0x475569"
  color_setting: "0x6366F1" # indigo - picking a duration
  color_running: "0x34D399" # green  - counting down
  color_paused: "0xF59E0B" # amber  - paused
  color_alert: "0xEF4444" # red    - last 10 s and alarm

  # Buzzer melodies (RTTTL ringtone format)
  tune_blip_up: "blip:d=32,o=7,b=300:g"
  tune_blip_down: "blip:d=32,o=7,b=300:e"
  tune_start: "go:d=16,o=6,b=220:c,e,g,c7"
  tune_pause: "hold:d=16,o=6,b=220:g,e,c"
  tune_reset: "reset:d=16,o=6,b=220:e,c"
  tune_tick: "tick:d=32,o=7,b=300:c"
  tune_alarm: "ring:d=16,o=7,b=280:c,p,c,p,c,4p,c,p,c,p,c,4p"

  # Timer states. Globals hold plain integers, so the states are named
  # here and used as ${mode_...} below.
  mode_clock: "0"
  mode_setting: "1"
  mode_running: "2"
  mode_paused: "3"
  mode_ringing: "4"

# ── Board & network ──────────────────────────────────────────────────────

esphome:
  name: ${name}
  friendly_name: ${friendly_name}
  platformio_options:
    board_build.flash_mode: dio
  on_boot:
    then:
      # Clock is correct right away, before Wi-Fi/SNTP comes up.
      - pcf8563.read_time:

esp32:
  board: m5stack-stamps3
  variant: esp32s3
  framework:
    type: esp-idf

logger:

api:
  # Don't reboot when no Home Assistant client is connected.
  reboot_timeout: 0s

ota:
  - platform: esphome

wifi:
  ssid: !secret wifi_ssid
  password: !secret wifi_password
  ap:
    ssid: "${friendly_name} Fallback"
    password: !secret wifi_password

captive_portal:

# ── Hardware ─────────────────────────────────────────────────────────────
# Pin reference: https://devices.esphome.io/devices/m5stack-dial/

i2c:
  - id: internal_i2c
    sda: GPIO11
    scl: GPIO12

spi:
  id: spi_bus
  mosi_pin: GPIO5
  clk_pin: GPIO6

# 1.28" round GC9A01 display
display:
  - platform: ili9xxx
    id: round_display
    model: GC9A01A
    invert_colors: true
    cs_pin: GPIO7
    reset_pin: GPIO8
    dc_pin: GPIO4

touchscreen:
  - platform: ft5x06
    id: touch
    i2c_id: internal_i2c
    address: 0x38

output:
  - platform: ledc
    pin: GPIO3
    id: buzzer_output
  - platform: ledc
    pin: GPIO9
    id: backlight_output

light:
  - platform: monochromatic
    name: Backlight
    id: backlight
    output: backlight_output
    default_transition_length: 0s
    restore_mode: ALWAYS_ON

rtttl:
  id: buzzer
  output: buzzer_output
  # Replaying from on_finished_playback loops the alarm until dismissed.
  on_finished_playback:
    - if:
        condition:
          lambda: "return id(mode) == ${mode_ringing};"
        then:
          - rtttl.play: ${tune_alarm}

# The dial - a quadrature rotary encoder.
sensor:
  - platform: rotary_encoder
    id: encoder
    internal: true
    pin_a: GPIO40
    pin_b: GPIO41
    on_clockwise:
      - script.execute:
          id: dial_turned
          direction: 1
    on_anticlockwise:
      - script.execute:
          id: dial_turned
          direction: -1

binary_sensor:
  # Front button (pressing the dial): short press = start/pause/dismiss,
  # hold = reset to the clock.
  - platform: gpio
    name: Dial Button
    id: front_button
    pin:
      number: GPIO42
      inverted: true
    filters:
      - delayed_on: 20ms
      - delayed_off: 20ms
    on_multi_click:
      - timing:
          - ON for at most 400ms
          - OFF for at least 10ms
        then:
          - script.execute: dial_pressed
      - timing:
          - ON for at least 800ms
        then:
          - script.execute: reset_to_clock
          - rtttl.play: ${tune_reset}
  - platform: gpio
    name: Side Button
    id: side_button
    pin:
      number: GPIO46
      inverted: true
    filters:
      - delayed_on: 20ms
      - delayed_off: 20ms
    on_press:
      - script.execute: reset_to_clock

# SNTP fetches the time over Wi-Fi and stores it in the battery-backed
# PCF8563, so the clock still works offline after the first sync.
time:
  - platform: pcf8563
    id: rtc_time
    i2c_id: internal_i2c
    address: 0x51
    update_interval: never
    timezone: ${timezone}
  - platform: sntp
    id: sntp_time
    timezone: ${timezone}
    on_time_sync:
      then:
        - pcf8563.write_time:

# ── Timer logic ──────────────────────────────────────────────────────────

globals:
  - id: mode # one of the ${mode_...} states
    type: int
    initial_value: ${mode_clock}
  - id: set_seconds # full duration (arc = remaining / set_seconds)
    type: int
    restore_value: true # remembered across reboots
    initial_value: "300"
  - id: remaining # seconds left; also the value being edited while setting
    type: int
    initial_value: "0"
  - id: blink_on # blink phase for the paused display
    type: bool
    initial_value: "true"

# 1-second heartbeat: counts down, blinks the paused digits, keeps the
# idle clock fresh.
interval:
  - interval: 1s
    then:
      - if:
          condition:
            lambda: "return id(mode) == ${mode_running};"
          then:
            - lambda: "id(remaining) -= 1;"
            - if:
                condition:
                  lambda: "return id(remaining) <= 0;"
                then:
                  - script.execute: timer_finished
                else:
                  - script.execute: refresh_timer_page
                  - if:
                      condition:
                        lambda: "return id(remaining) <= 10;"
                      then:
                        - rtttl.play: ${tune_tick}
      - if:
          condition:
            lambda: "return id(mode) == ${mode_paused};"
          then:
            - lambda: "id(blink_on) = !id(blink_on);"
            - lvgl.widget.update:
                id: time_label
                text_opa: !lambda "return id(blink_on) ? 255 : 100;"
      - if:
          condition:
            lambda: "return id(mode) == ${mode_clock};"
          then:
            - script.execute: refresh_clock_page

script:
  # One detent of rotation. direction: +1 = clockwise, -1 = anticlockwise.
  - id: dial_turned
    parameters:
      direction: int
    then:
      - if:
          condition:
            # While the alarm rings the dial is ignored - tap to dismiss.
            lambda: "return id(mode) != ${mode_ringing};"
          then:
            - lambda: |-
                if (id(mode) == ${mode_clock}) {
                  // First detent just opens the timer page.
                  id(mode) = ${mode_setting};
                  id(remaining) = id(set_seconds);
                } else if (id(mode) == ${mode_setting}) {
                  // 30 s per detent, 1 min from 10 minutes up. Snap to the
                  // next multiple, so off-grid values left over from a
                  // running timer (e.g. 5:28) land back on :00/:30.
                  int step = id(remaining) >= 600 ? 60 : 30;
                  int snapped = direction > 0
                      ? (id(remaining) / step + 1) * step
                      : (id(remaining) - 1) / step * step;
                  id(remaining) = std::clamp(snapped, 30, 99 * 60);
                  id(set_seconds) = id(remaining);
                } else {
                  // Running or paused: adjust the countdown on the fly.
                  id(remaining) = std::clamp(id(remaining) + direction * 30, 0, 99 * 60);
                  if (id(remaining) > id(set_seconds)) id(set_seconds) = id(remaining);
                }
            - if:
                condition:
                  lambda: "return id(mode) == ${mode_running} && id(remaining) <= 0;"
                then:
                  # Dialed a running timer down to zero.
                  - script.execute: timer_finished
                else:
                  - lvgl.page.show: timer_page
                  - script.execute: refresh_timer_page
                  - script.execute: setting_timeout
                  - rtttl.play: !lambda |-
                      return direction > 0 ? "${tune_blip_up}" : "${tune_blip_down}";

  # Dial press or screen tap:
  #   clock → setting → running ⇄ paused, ringing → back to the clock.
  - id: dial_pressed
    then:
      - if:
          condition:
            lambda: "return id(mode) == ${mode_ringing};"
          then:
            - script.execute: reset_to_clock
          else:
            - lambda: |-
                if (id(mode) == ${mode_clock}) {
                  id(mode) = ${mode_setting};
                  id(remaining) = id(set_seconds);
                } else if (id(mode) == ${mode_setting} || id(mode) == ${mode_paused}) {
                  id(mode) = ${mode_running};
                } else if (id(mode) == ${mode_running}) {
                  id(mode) = ${mode_paused};
                }
            - lvgl.page.show: timer_page
            - script.execute: refresh_timer_page
            - script.execute: setting_timeout
            - rtttl.play: !lambda |-
                if (id(mode) == ${mode_running}) return "${tune_start}";
                if (id(mode) == ${mode_paused}) return "${tune_pause}";
                return "${tune_blip_up}";

  - id: timer_finished
    then:
      - lambda: |-
          id(mode) = ${mode_ringing};
          id(remaining) = 0;
      - script.execute: refresh_timer_page
      - rtttl.play: ${tune_alarm}

  - id: reset_to_clock
    then:
      - rtttl.stop:
      - lambda: "id(mode) = ${mode_clock};"
      - script.execute: refresh_clock_page
      - lvgl.page.show: clock_page

  # A duration that is picked but never started falls back to the clock.
  - id: setting_timeout
    mode: restart
    then:
      - delay: 60s
      - if:
          condition:
            lambda: "return id(mode) == ${mode_setting};"
          then:
            - script.execute: reset_to_clock

  - id: refresh_timer_page
    then:
      - lvgl.label.update:
          id: time_label
          text: !lambda |-
            return str_sprintf("%02d:%02d", id(remaining) / 60, id(remaining) % 60);
      - lvgl.arc.update:
          id: timer_arc
          value: !lambda |-
            return id(remaining) * 1000 / std::max(id(set_seconds), 1);
      - lvgl.label.update:
          id: status_label
          text: !lambda |-
            switch (id(mode)) {
              case ${mode_setting}: return "press to start";
              case ${mode_running}: return "press to pause";
              case ${mode_paused}:  return "paused";
              case ${mode_ringing}: return "TIME'S UP\ntap to stop";
              default:              return "";
            }
      # Projected finish time, e.g. "ends at 14:32".
      - lvgl.label.update:
          id: ends_label
          text: !lambda |-
            if (id(mode) != ${mode_setting} && id(mode) != ${mode_running}) return "";
            auto now = id(rtc_time).now();
            if (!now.is_valid()) return "";
            return "ends at " + ESPTime::from_epoch_local(now.timestamp + id(remaining)).strftime("%H:%M");
      # Digits and arc follow the state color.
      - lvgl.widget.update:
          id: time_label
          text_opa: 100%
          text_color: !lambda |-
            switch (id(mode)) {
              case ${mode_running}: return lv_color_hex(id(remaining) <= 10 ? ${color_alert} : ${color_running});
              case ${mode_paused}:  return lv_color_hex(${color_paused});
              case ${mode_ringing}: return lv_color_hex(${color_alert});
              default:              return lv_color_hex(${color_setting});
            }
      - lvgl.widget.update:
          id: timer_arc
          indicator:
            arc_color: !lambda |-
              switch (id(mode)) {
                case ${mode_running}: return lv_color_hex(id(remaining) <= 10 ? ${color_alert} : ${color_running});
                case ${mode_paused}:  return lv_color_hex(${color_paused});
                case ${mode_ringing}: return lv_color_hex(${color_alert});
                default:              return lv_color_hex(${color_setting});
              }

  - id: refresh_clock_page
    then:
      - lvgl.label.update:
          id: clock_label
          text: !lambda |-
            auto now = id(rtc_time).now();
            return now.is_valid() ? now.strftime("%H:%M") : "--:--";
      - lvgl.label.update:
          id: date_label
          text: !lambda |-
            auto now = id(rtc_time).now();
            return now.is_valid() ? now.strftime("%A, %b %d") : "waiting for time sync";
      - lvgl.arc.update:
          id: seconds_arc
          value: !lambda |-
            auto now = id(rtc_time).now();
            return now.is_valid() ? now.second : 0;

# ── UI ───────────────────────────────────────────────────────────────────

# Rubik from Google Fonts, antialiased (bpp 4). The timer font only embeds
# the glyphs it can ever show.
font:
  - file: "gfonts://Rubik@600"
    id: font_time
    size: 60
    bpp: 4
    glyphs: "0123456789:- "
  - file: "gfonts://Rubik"
    id: font_label
    size: 18
    bpp: 4
    glyphs: "ABCDEFGHIJKLMNOPQRSTUVWXYZabcdefghijklmnopqrstuvwxyz0123456789 :.,'-!"
  - file: "gfonts://Rubik"
    id: font_small
    size: 14
    bpp: 4
    glyphs: "ABCDEFGHIJKLMNOPQRSTUVWXYZabcdefghijklmnopqrstuvwxyz0123456789 :.,'-!"

# >>> LVGL Designer - https://lvgl.espboards.dev/ >>>
# Two pages, one design language: a 270° arc with a gap at the bottom,
# where the hint text lives.
lvgl:
  rotation: 180
  pages:
    # Idle clock with a live seconds ring.
    - id: clock_page
      bg_color: ${color_background}
      pad_all: 0
      widgets:
        - arc:
            id: seconds_arc
            align: CENTER
            width: 232
            height: 232
            min_value: 0
            max_value: 60
            value: 0
            start_angle: 135
            end_angle: 45
            arc_width: 6
            arc_color: ${color_arc_track}
            arc_rounded: true
            adjustable: false
            indicator:
              arc_color: ${color_setting}
              arc_width: 6
              arc_rounded: true
            knob:
              bg_opa: 0%
        - label:
            id: clock_label
            align: CENTER
            y: -8
            text: "--:--"
            text_font: font_time
            text_color: ${color_text}
        - label:
            id: date_label
            align: CENTER
            y: 36
            text: ""
            text_font: font_label
            text_color: ${color_text_muted}
        - label:
            align: BOTTOM_MID
            y: -14
            text: "rotate for timer"
            text_font: font_small
            text_color: ${color_text_faint}

    # Countdown with a draining, state-colored arc.
    - id: timer_page
      bg_color: ${color_background}
      pad_all: 0
      widgets:
        - arc:
            id: timer_arc
            align: CENTER
            width: 232
            height: 232
            min_value: 0
            max_value: 1000
            value: 1000
            start_angle: 135
            end_angle: 45
            arc_width: 14
            arc_color: ${color_arc_track}
            arc_rounded: true
            adjustable: false
            indicator:
              arc_color: ${color_setting}
              arc_width: 14
              arc_rounded: true
            knob:
              bg_opa: 0%
        - label:
            id: time_label
            align: CENTER
            y: -6
            text: "05:00"
            text_font: font_time
            text_color: ${color_setting}
        - label:
            id: status_label
            align: CENTER
            y: 44
            text: "press to start"
            text_font: font_label
            text_align: CENTER
            text_color: ${color_text_muted}
        - label:
            id: ends_label
            align: CENTER
            y: 72
            text: ""
            text_font: font_small
            text_color: ${color_text_faint}
        - label:
            align: BOTTOM_MID
            y: -14
            text: "hold to reset"
            text_font: font_small
            text_color: ${color_text_faint}
        # Invisible full-screen button: a tap acts like pressing the dial,
        # a long press resets.
        - button:
            id: touch_overlay
            align: CENTER
            width: 240
            height: 240
            bg_opa: 0%
            border_width: 0
            shadow_width: 0
            pressed:
              bg_opa: 0%
            on_short_click:
              - script.execute: dial_pressed
            on_long_press:
              - script.execute: reset_to_clock
              - rtttl.play: ${tune_reset}
# <<< end LVGL Designer block <<<
Two version notes: rotation: under lvgl: is a recent ESPHome addition, so update if it errors, and the config pulls Rubik from Google Fonts at build time, so the first compile needs internet access.
Cutting the cord #
This build assumes wall power, USB or the Dial's 6-36V screw terminal, and that assumption is baked into one pin. GPIO46 is doing double duty on this board: as an input it senses the side button, which is how the config uses it, and as an output driven HIGH it is the power-hold latch that keeps the board alive on battery. You get one or the other.
USB and DC do not care. On battery, the same GPIO46 that senses the side button has to be driven HIGH instead, or the Dial powers off the moment the wake button is released.
So if you want this timer on a battery, the side button stops being a button. Drop the side_button binary sensor and latch the pin instead:
switch:
  - platform: gpio
    pin: GPIO46
    id: power_hold
    restore_mode: ALWAYS_ON            # latches battery power at boot
    internal: true
One honest caveat before you do: this config never sleeps, because a clock that updates every second and a knob that must react instantly cannot. With the backlight on, expect on the order of a day per charge from a small cell, not weeks. The screw terminal is the better cordless story: wire it to whatever supply your kitchen already has and treat the Dial as an appliance. For a genuinely low-power ESPHome build you need a different design entirely, and our battery e-paper display shows what that looks like.
On the counter #
A pot of pasta, in four frames:
Twenty-four clicks, one press, al dente, and the buzzer nags until the last tap. Then it goes back to being a clock.
The interaction is the whole point of this build, and it lands. The detents are firm enough that dialing in a duration becomes muscle memory within a day, the blip on every click does a surprising amount of work in making the thing feel mechanical rather than like a screen pretending to be a knob, and the color does the long-range reading: green glance means cooking, amber blink means someone paused it, red means move. The "ends at" line turns out to be the sleeper feature, because "ends at 14:29" answers the question you actually have. And when it is not timing anything, it earns its wall space by being a clock.
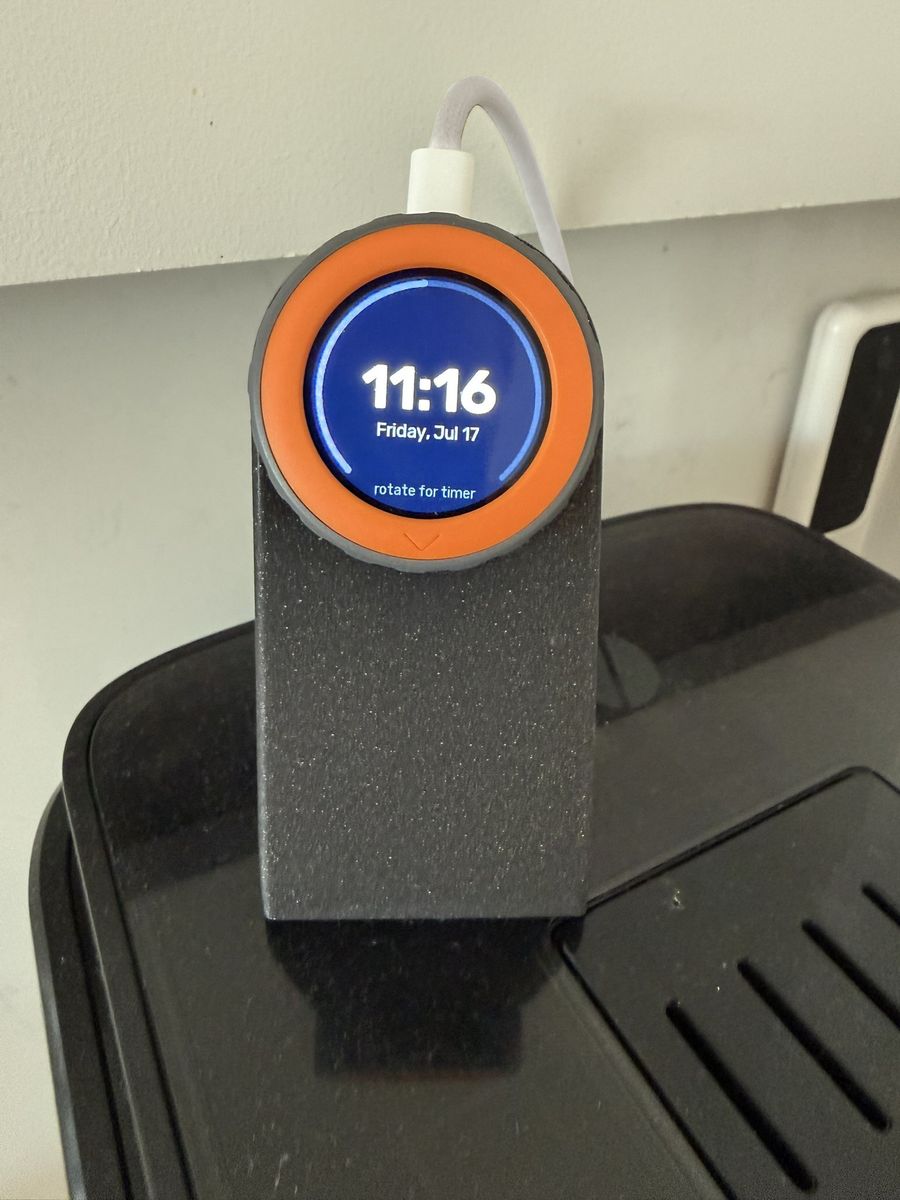
Mine ended up on a printed stand on top of the coffee machine, which is exactly the kind of spot this thing is for: somewhere you glance at ten times a day, where a clock earns the space between timers.
A few honest notes from the desk. The buzzer is a buzzer: plenty loud for a kitchen, but the RTTTL "melodies" are square-wave chic, not a gentle chime. The countdown ticks inside a 1-second interval: rather than against the RTC, so a multi-hour timer could drift a little; over the sub-hour spans a kitchen timer lives in, it is nowhere near mattering. And the clock page is only as good as its first sync: SNTP writes the time into the battery-backed PCF8563, after which WiFi can disappear for days and the Dial keeps telling the truth.
Home Assistant stays optional by design: the API is on (with reboot_timeout: 0s, so the Dial does not restart itself when no HA is around), and the backlight and both buttons are already exposed. If you want automations on "the timer hit zero", add a template sensor publishing remaining and trigger on it; the timer itself will never notice HA is gone, which is exactly the failure mode a kitchen timer should have.
And the Dial is not done: its RFID reader sits right behind the screen doing nothing in this build. Tap a tagged jar of rice against the knob and have its cooking time load automatically? That is the follow-up project this config was designed to grow into. Full specs, the pinout and buying options are on the board page.