
LilyGo T-Dongle S3
A USB dongle-style ESP32-S3 development board, providing a compact solution for USB-based applications.

LilyGo T-Dongle S3 Pinout
4 pins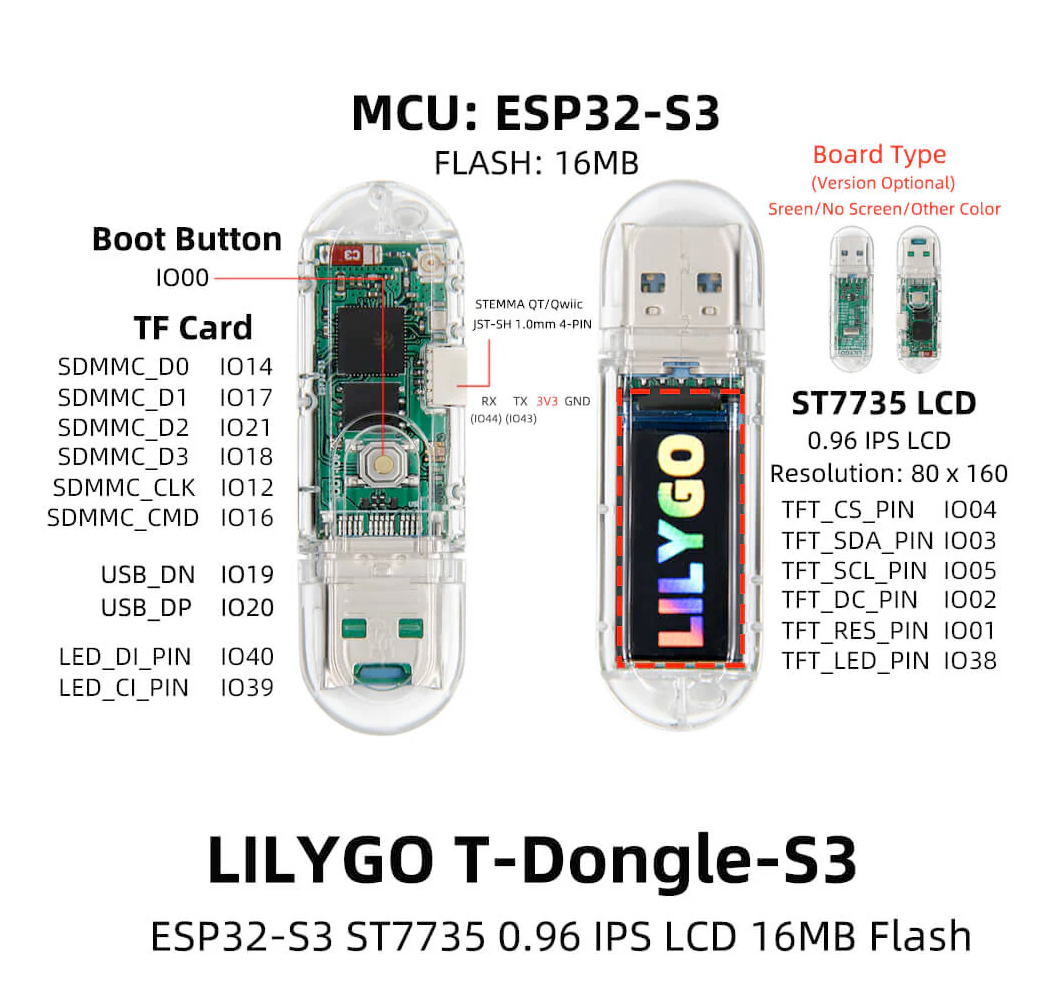
| Pin | GPIO | Labels | Status | Capabilities | Notes |
|---|---|---|---|---|---|
| 1 | - | 3V33.3V | power | - | 3.3V output on the 4-pin JST SH connector (UART / QWIIC) |
| 2 | 43 | TXIO43U0TXD | uart | uart · i2c · pwm | 4-pin JST SH connector (UART / QWIIC) - default UART0 TX; usable as I2C SDA |
| 3 | 44 | RXIO44U0RXD | uart | uart · i2c · pwm | 4-pin JST SH connector (UART / QWIIC) - default UART0 RX; usable as I2C SCL |
| 4 | - | GND | ground | - | Ground on the 4-pin JST SH connector (UART / QWIIC) |
Fine - with a little care
2 pins · 2 things to knowTXGPIO43 UART0 transmit pin (U0TXD), default serial console TX UART
Used for bootloader output and UART console logs. If repurposed, you will lose the default serial output (and programming via UART0).
RXGPIO44 UART0 receive pin (U0RXD), default serial console RX UART
Used for bootloader input (download mode via serial). If repurposed, you cannot use the default UART0 download mode for programming the chip.
The LilyGo T-Dongle S3 breaks out 4 pins in total: 2 GPIO for your project, with 3V3 and GND handling power.
For peripherals, TX/RX on GPIO43 and GPIO44 cover serial logging and flashing.
On the analog side there are PWM on every GPIO.
2 of the exposed pins carry boot-time or system duties on the ESP32-S3 (TX and RX).
Getting started
flash your first firmware in ~2 minutesBoard: ESP32S3 Dev Module USB CDC On Boot: Enabled Flash Size: 16MB (128Mb) Flash Mode: DIO PSRAM: OPI PSRAM Partition Scheme: 16M Flash (3MB APP/9.9MB FATFS) Upload Speed: 921600
// toggle GPIO8 - wire an LED and resistor to it
void setup() {
  pinMode(8, OUTPUT);
}
void loop() {
  digitalWrite(8, HIGH); delay(500);
  digitalWrite(8, LOW);  delay(500);
}[env:lilygo_t_dongle_s3]
platform = espressif32
board = esp32-s3-devkitc-1
framework = arduino
monitor_speed = 115200
upload_speed = 921600
board_build.arduino.memory_type = qio_opi
build_flags = -DBOARD_HAS_PSRAMesp32-s3-devkitc-1 - or type it after board =.esp32:
board: esp32-s3-devkitc-1
variant: esp32s3
framework:
type: esp-idf
psram:
mode: octal
speed: 80MHz
# blink - GPIO8
output:
- platform: gpio
pin: 8
id: led_out
light:
- platform: binary
name: "LED"
output: led_outesp32-s3-devkitc-1 (same ids as PlatformIO).esptool.py --chip esp32s3 --port /dev/ttyACM0 \
--baud 921600 write_flash 0x0 firmware.bin--port = your /dev/tty* (macOS/Linux) or COMx (Windows).Specifications
ESP32-S3 · 58 × 18 mm · vs other ESP32 chips →Dimensions
About this board
At its core is the ESP32-S3 - a dual-core Xtensa with vector extensions suited to AI workloads.
Expect to pay about $19.99 - less than the ~$29 most ESP32-S3 boards go for.
Only 2 GPIO are broken out, where most ESP32-S3 boards manage about 23 - worth checking the pinout covers what you need.
Onboard you'll find 8MB (OPI) PSRAM, an LCD 0.96" 80x160 display, a microSD slot, a Qwiic connector, a microphone (PDM MEMS), an addressable RGB LED (GPIO40), battery charging via MX1.25 2-pin and Boot buttons.
It flashes over native USB - no serial-converter driver needed, which isn't a given among ESP32-S3 boards.
- USB-A male plug (S3 native USB)
- APA102 addressable RGB LED (data GPIO40, clock GPIO39)
- PDM MEMS microphone (blow detection in factory firmware)
- microSD (TF) slot hidden inside the USB-A housing
- IPEX external-antenna connector on some variants
Where to buy
prices are typical street pricesResources
Similar boards

