
KY-008 Laser Transmitter Module
The KY-008 is a laser transmitter module that emits a red laser beam at 650 nm with an output power of 5 mW. It is suitable for applications requiring a visible laser source and is compatible with various microcontrollers.

KY-008 pinout
The KY-008 is a 3-pin red laser transmitter module (650nm, 5mW):
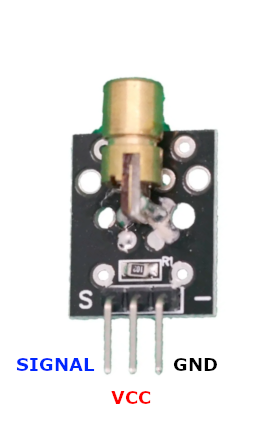
| Pin | Type | Description | Notes |
|---|---|---|---|
| Pin (S) | Communication | Signal/control pin | Digital control for laser on/off |
| Pin (middle) | Control | Not connected | Leave unconnected (NC) |
| Pin (-) | Power | Ground connection |
Interface: Digital output for laser control
Laser: 650nm red laser diode, 5mW output power
Power: 5V operation, <40mA current draw
Safety: Class 2 laser - avoid direct eye exposure
Control: Simple digital HIGH/LOW for on/off
Applications: Laser pointers, alignment tools, distance measurement, optical communication
Wiring the KY-008 to ESP32
To interface the KY-008 with an ESP32 for laser control:
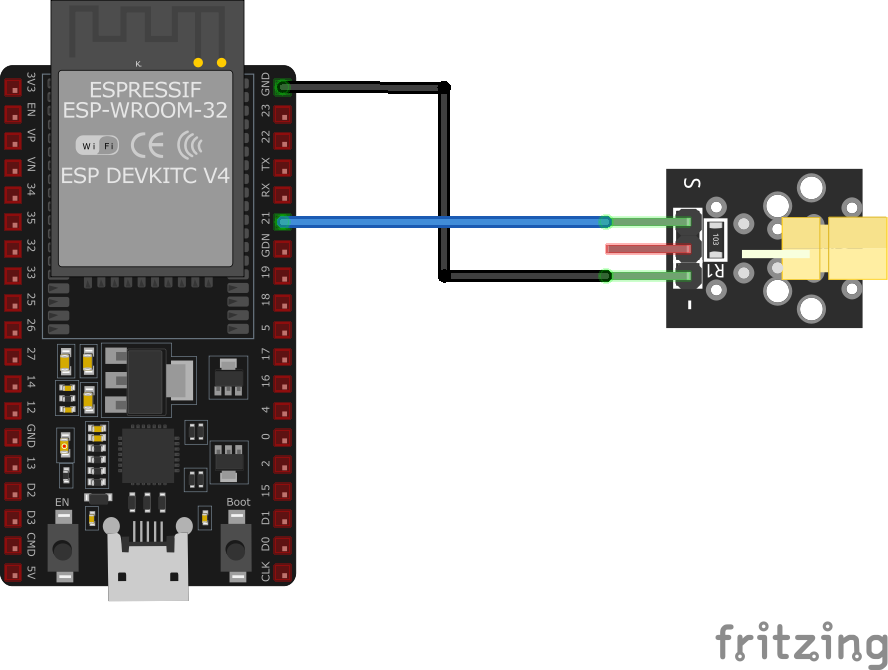
| KY-008 pin | ESP32 pin | Purpose |
|---|---|---|
| Pin (S) | GPIO5 | Laser control signal (any GPIO) |
| Pin (-) | GND | Ground |
| Pin (middle) | N/C | Not connected · optional |
Control: Set GPIO HIGH to turn laser on, LOW to turn off
GPIO Selection: Any digital GPIO pin works, GPIO5 is just an example
Power: Module typically powered from 5V source (separate from signal)
Eye Safety: Never point laser at eyes - permanent damage possible
Duty Cycle: Avoid continuous operation to prevent overheating
KY-008 code examples
int laserPin = 13;

void setup() {
    pinMode(laserPin, OUTPUT);
}

void loop() {
    digitalWrite(laserPin, HIGH); // Turn on the laser
    delay(1000); // Wait for one second
    digitalWrite(laserPin, LOW); // Turn off the laser
    delay(1000); // Wait for one second
}
This Arduino code controls the KY-008 laser module connected to digital pin 13. It turns the laser on for one second and then off for one second, creating a blinking effect.
#include <stdio.h>
#include "freertos/FreeRTOS.h"
#include "freertos/task.h"
#include "driver/gpio.h"

#define LASER_PIN GPIO_NUM_5

void app_main(void) {
    gpio_reset_pin(LASER_PIN);
    gpio_set_direction(LASER_PIN, GPIO_MODE_OUTPUT);

    while (1) {
        gpio_set_level(LASER_PIN, 1); // Turn on the laser
        vTaskDelay(1000 / portTICK_PERIOD_MS); // Wait for one second
        gpio_set_level(LASER_PIN, 0); // Turn off the laser
        vTaskDelay(1000 / portTICK_PERIOD_MS); // Wait for one second
    }
}
This ESP-IDF code configures GPIO5 as an output to control the KY-008 laser module. It turns the laser on for one second and off for one second in a loop, creating a blinking effect.
switch:
  - platform: gpio
    pin: GPIO5
    name: "KY-008 Laser"
    id: laser_switch
This ESPHome configuration sets up a switch to control the KY-008 laser module connected to GPIO5. The laser can be turned on and off via the defined switch entity.
[env:esp32]
platform = espressif32
board = esp32dev
framework = arduino#include <Arduino.h>
#define LASER_PIN 5
void setup() {
pinMode(LASER_PIN, OUTPUT);
}
void loop() {
digitalWrite(LASER_PIN, HIGH); // Turn on the laser
delay(1000); // Wait for one second
digitalWrite(LASER_PIN, LOW); // Turn off the laser
delay(1000); // Wait for one second
}This PlatformIO code initializes GPIO5 as an output to control the KY-008 laser module. It toggles the laser on and off every second, creating a blinking effect.
import machine
import time

LASER_PIN = machine.Pin(5, machine.Pin.OUT)

while True:
    LASER_PIN.value(1)  # Turn on the laser
    time.sleep(1)        # Wait for one second
    LASER_PIN.value(0)  # Turn off the laser
    time.sleep(1)        # Wait for one second
This MicroPython script sets up the KY-008 laser module on GPIO5 and toggles it on and off every second, producing a blinking effect.
KY-008 specifications
About the KY-008
The KY-008 is a 5V laser diode module - 650nm red, rated 5mW output, under 40mA draw - wired to a signal pin so a GPIO can switch it fully on or off. There’s no PWM dimming or beam-shaping electronics onboard, just the diode and a series resistor. At 5mW it falls in the Class 2 laser range: low enough that the eye’s blink reflex is generally expected to prevent damage from a brief accidental glance, but still bright enough that staring into the beam, or pointing it at anyone’s eyes on purpose, is a real hazard - treat it with the same caution as a laser pointer, because that’s essentially what it is.
On its own it’s just a light source; the classic beginner project pairs it with a photoresistor module like the KY-018 to build a simple laser tripwire, where the ESP32 watches the LDR’s analog reading drop when something crosses the beam. Power it from 5V rather than the ESP32’s 3.3V rail per its rated voltage, and switch it through a GPIO exactly like any other digital output.
KY-008 troubleshooting
Laser Not Emitting
›
Issue: The laser module does not emit a beam when expected.
Solutions:
- Ensure that the signal pin is connected to the correct GPIO pin on the microcontroller and is configured as an output.
- Verify that the microcontroller is supplying a HIGH signal to the laser module to activate it.
- Check all wiring connections for continuity and correctness.
- Confirm that the supply voltage is 5V as required by the module.
Weak or Flickering Laser Beam
›
Issue: The laser beam is dim or flickers during operation.
Solutions:
- Ensure a stable 5V power supply to the module.
- Check for loose connections or intermittent contacts in the wiring.
- Verify that the current supplied to the module does not exceed 40 mA to prevent overheating.
Where to buy the KY-008

Resources
Similar sensors


