
KY-037 High Sensitivity Sound Detection Module
The KY-037 is a high sensitivity sound detection module featuring an electret condenser microphone and an LM393 comparator. It offers both analog and digital outputs, making it suitable for various sound detection applications, including voice-activated projects and sound level monitoring.

KY-037 pinout
The KY-037 is a 4-pin high sensitivity sound detection module:
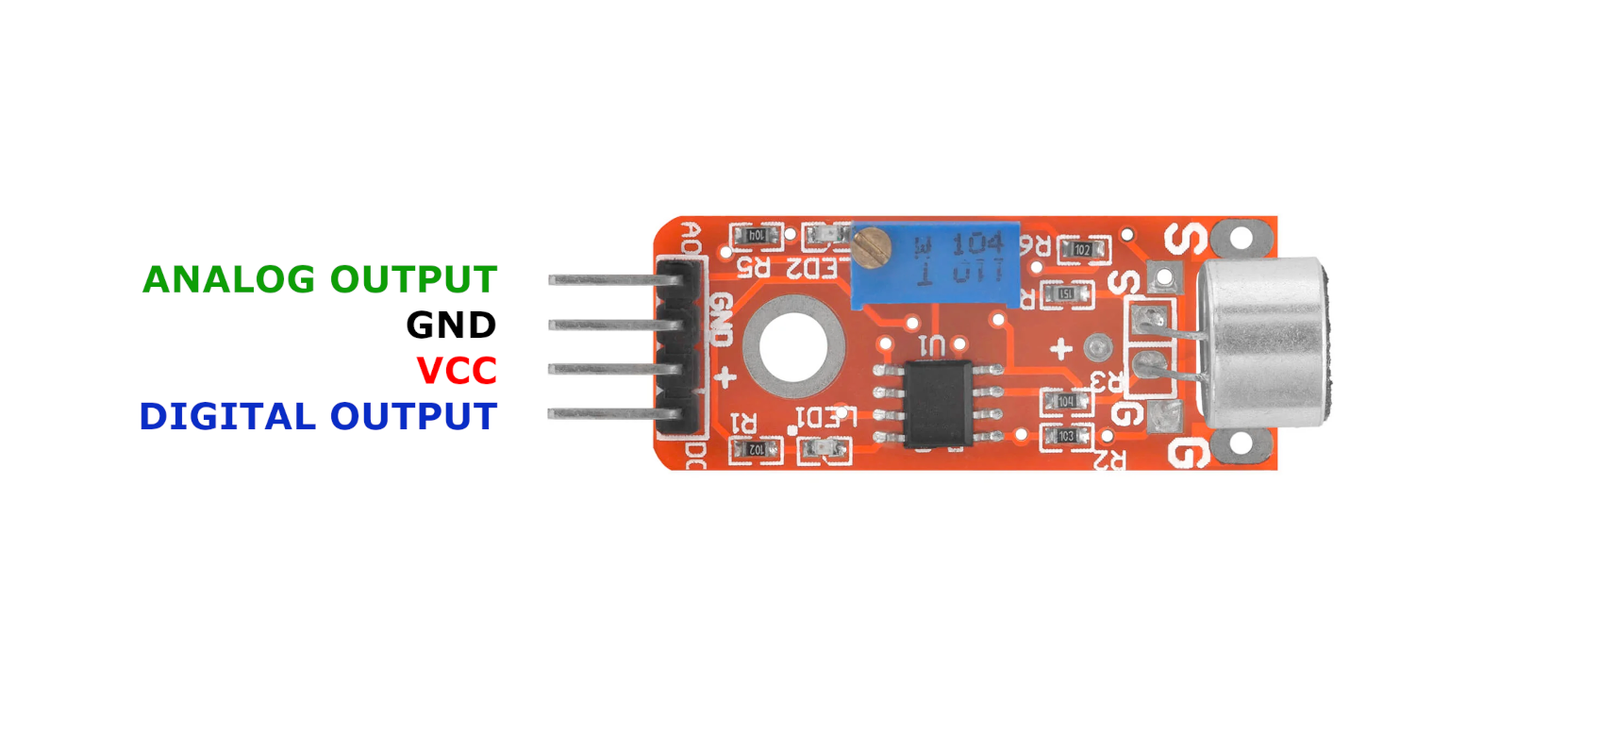
| Pin | Type | Description | Notes |
|---|---|---|---|
| GND | Power | Ground connection | |
| +V | Power | Power supply | 3.3V or 5V |
| D0 | Communication | Digital output | HIGH when sound exceeds threshold |
| A0 | Communication | Analog output | Voltage proportional to sound intensity |
Interface: Dual output (analog + digital with comparator)
Sensor: Electret condenser microphone (high sensitivity)
Analog Output: Continuous sound intensity measurement
Digital Output: Threshold-based trigger (adjustable via potentiometer)
Power: 3.3V or 5V operation
Sensitivity: Adjustable via onboard potentiometer
Frequency Range: 50Hz - 10kHz typical
LED Indicators: Power LED and sound detection LED
Applications: Voice-activated systems, sound level monitoring, clap switches, noise detection
Wiring the KY-037 to ESP32
To interface the KY-037 with an ESP32 for sound detection:
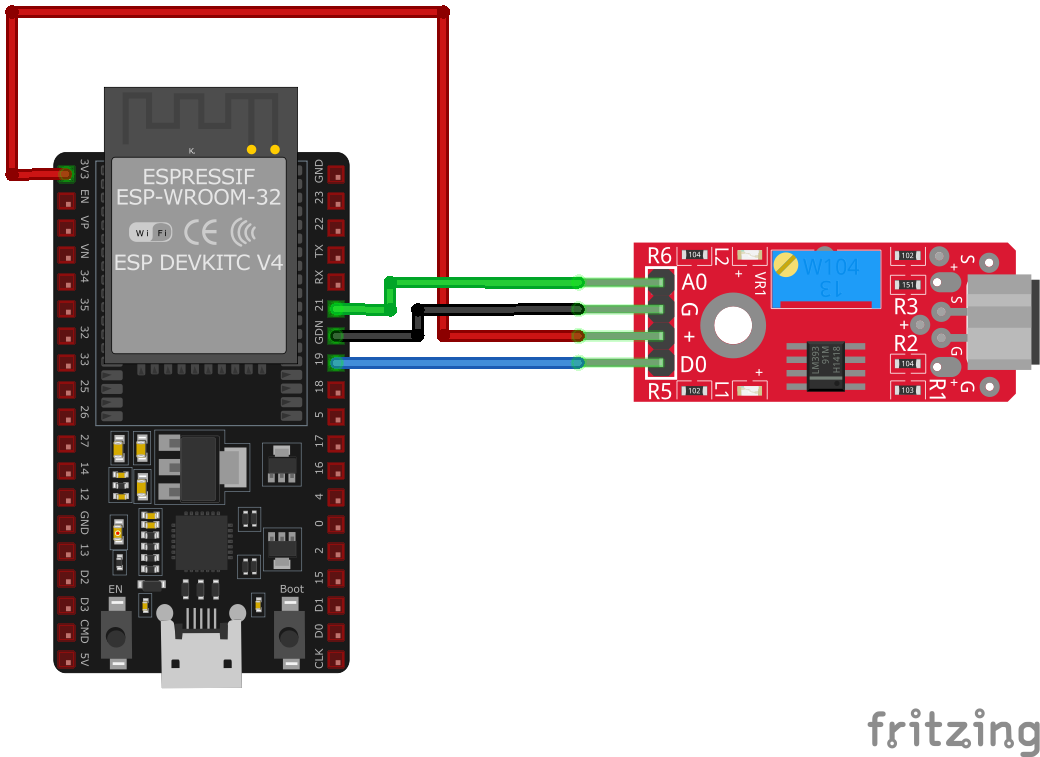
| KY-037 pin | ESP32 pin | Purpose |
|---|---|---|
| GND | GND | Ground |
| +V | 3.3V or 5V | Power supply |
| D0 | GPIO15 | Digital input (any GPIO) · optional |
| A0 | GPIO34 | Analog input (ADC pin) · optional |
Digital Mode: Use D0 for simple sound-activated trigger (clap switch, alarm)
Analog Mode: Use A0 for sound level measurement and audio analysis
ADC Pins: Use GPIO32-39 for analog input on ESP32
Voltage: 3.3V recommended for ESP32 ADC compatibility
Threshold Adjustment: Turn potentiometer to set sound detection sensitivity
High Sensitivity: More sensitive than KY-038, better for quiet environments
Comparison: Similar to KY-038 but with higher sensitivity microphone
LED Feedback: Status LED lights when sound threshold exceeded
KY-037 code examples
int analogPin = 34;  // Analog output of the sensor (GPIO34 / ADC1_CH6, matches the wiring above)
int digitalPin = 15; // Digital output of the sensor (GPIO15)
int ledPin = 2;      // Onboard LED on most ESP32 dev boards

void setup() {
    pinMode(digitalPin, INPUT);
    pinMode(ledPin, OUTPUT);
    Serial.begin(115200);
    Serial.println("KY-037 Sound Detection Module Test");
}

void loop() {
    int analogValue = analogRead(analogPin); // 0-4095 on the ESP32's 12-bit ADC
    int digitalValue = digitalRead(digitalPin);

    if (digitalValue == HIGH) {
        digitalWrite(ledPin, HIGH); // Turn ON the LED when sound is detected
    } else {
        digitalWrite(ledPin, LOW);  // Turn OFF the LED when no sound is detected
    }

    Serial.print("Analog Value: ");
    Serial.println(analogValue);
    delay(1000);
}
This Arduino code initializes the analog and digital pins connected to the KY-037 sensor. It reads the analog value to monitor sound intensity and uses the digital output to control the onboard LED, indicating when the sound level exceeds the set threshold. The analog values are printed to the serial monitor every second.
#include <stdio.h>
#include "freertos/FreeRTOS.h"
#include "freertos/task.h"
#include "driver/adc.h"
#include "driver/gpio.h"

#define ANALOG_PIN ADC1_CHANNEL_6 // GPIO34
#define DIGITAL_PIN GPIO_NUM_15

void app_main(void) {
    adc1_config_width(ADC_WIDTH_BIT_12);
    adc1_config_channel_atten(ANALOG_PIN, ADC_ATTEN_DB_11);
    gpio_set_direction(DIGITAL_PIN, GPIO_MODE_INPUT);

    printf("KY-037 Sound Detection Module Test\n");
    while (1) {
        int raw = adc1_get_raw(ANALOG_PIN);
        float voltage = raw * (3.3 / 4095.0);
        int digital_state = gpio_get_level(DIGITAL_PIN);

        printf("Analog Voltage: %.2f V, Sound Detected: %s\n", voltage, digital_state ? "Yes" : "No");
        vTaskDelay(pdMS_TO_TICKS(1000));
    }
}
This ESP-IDF code configures GPIO34 as an analog input and GPIO15 as a digital input for the KY-037 sound sensor. It reads the analog voltage and digital state, printing the voltage and whether a sound is detected to the console every second.
sensor:
  - platform: adc
    pin: GPIO34
    name: "KY-037 Sound Sensor Analog"
    update_interval: 1s
    filters:
      - multiply: 3.3
      - lambda: |-
          return x * 1000;  // Convert to millivolts

binary_sensor:
  - platform: gpio
    pin:
      number: GPIO15
      mode: INPUT_PULLUP
    name: "KY-037 Sound Sensor Digital"
This ESPHome configuration sets up the KY-037 sensor with both an analog and digital sensor. The analog value from GPIO34 is converted to millivolts, while the digital sensor on GPIO15 acts as a binary sensor to indicate sound detection.
[env:esp32]
platform = espressif32
board = esp32dev
framework = arduino#include <Arduino.h>
#define ANALOG_PIN 34
#define DIGITAL_PIN 15
void setup() {
pinMode(DIGITAL_PIN, INPUT_PULLUP);
Serial.begin(115200);
Serial.println("KY-037 Sound Sensor Test");
}
void loop() {
int raw_value = analogRead(ANALOG_PIN);
float voltage = raw_value * (3.3 / 4095.0) * 1000; // Convert to millivolts
int digital_value = digitalRead(DIGITAL_PIN);
Serial.printf("Analog Voltage: %.2f mV, Digital State: %s\n", voltage, digital_value ? "Sound Detected" : "No Sound");
delay(1000);
}This PlatformIO code sets up GPIO34 as an analog input and GPIO15 as a digital input for the KY-037 sensor. It reads the analog voltage and digital state, logging the voltage and sound detection status to the serial monitor every second.
import machine
import time

ANALOG_PIN = machine.ADC(machine.Pin(34))
ANALOG_PIN.atten(machine.ADC.ATTN_11DB)
DIGITAL_PIN = machine.Pin(15, machine.Pin.IN, machine.Pin.PULL_UP)

while True:
    analog_value = ANALOG_PIN.read()
    voltage = (analog_value / 4095) * 3300  # Convert to millivolts
    digital_value = DIGITAL_PIN.value()
    print("Analog Voltage:", voltage, "mV", "| Digital State:", "Sound Detected" if digital_value == 1 else "No Sound")
    time.sleep(1)
This MicroPython script configures GPIO34 as an ADC input and GPIO15 as a digital input for the KY-037 sensor. It continuously reads the sensor values and prints the voltage and sound detection state every second.
KY-037 specifications
About the KY-037
The KY-037 is built around an electret condenser microphone feeding an LM393 comparator, the same core design as the KY-038 - the two are functionally identical, differing mainly in board size and the physical microphone capsule mounted on them, with sellers marketing the KY-037’s larger capsule as the more sensitive of the pair. Both outputs come off that same comparator stage: the digital pin trips once sound intensity crosses whatever level the onboard pot is set to (handy for a clap switch or noise alarm), and the analog pin exposes the microphone’s raw amplified level before that threshold is applied.
What neither pin gives is actual audio. This is a sound-level detector, not a microphone input for recording or voice processing - the analog signal reflects how loud the ambient sound is at any moment, not a waveform sampled fast enough to reconstruct speech or music, and reading it with a simple analogRead() polling loop on the ESP32 doesn’t capture audio in any usable sense. For projects that need to actually record or analyze sound, an I2S MEMS microphone sampled through the ESP32’s I2S peripheral is the right tool; the KY-037 is for detecting that a sound happened and roughly how loud it was.
KY-037 troubleshooting
No Response from Sensor
›
Issue: The sensor does not respond to sound.
Solutions:
- Ensure the module is properly powered with the correct voltage (3.3V or 5V).
- Verify all connections are secure and correctly wired.
- Adjust the sensitivity using the onboard potentiometer.
- Check if the microphone is functioning correctly and not obstructed.
False Triggering
›
Issue: The sensor triggers without any sound input.
Solutions:
- Reduce the sensitivity using the potentiometer to prevent false triggers.
- Ensure the environment is free from electrical noise or interference.
- Check for any loose connections or faulty components on the module.
Where to buy the KY-037
Resources
Similar sensors


