ESP32 KY-053 Analog Digital Converter Module
Overview
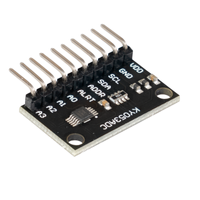
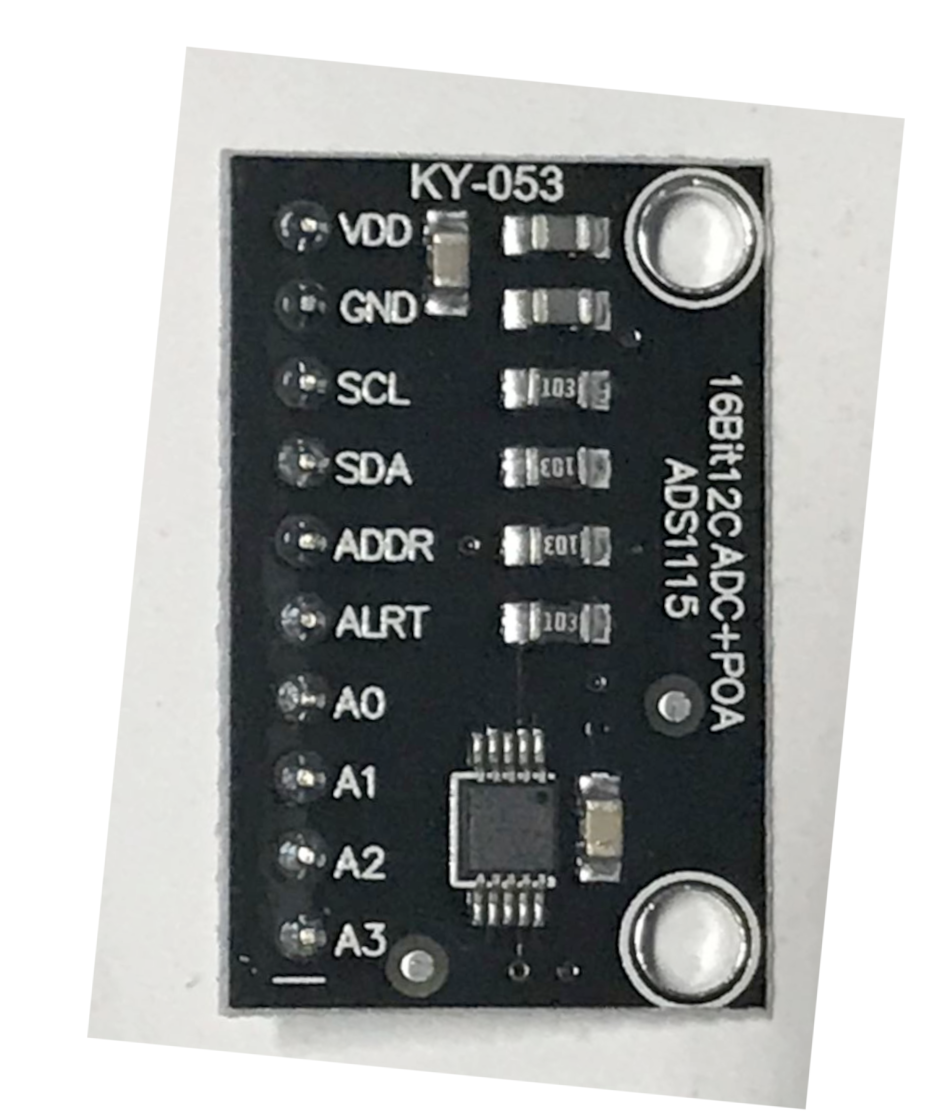
The KY-053 is an analog-to-digital converter module featuring the ADS1115 ADC. It provides four 16-bit resolution channels and communicates via the I²C interface. This module is ideal for expanding the analog input capabilities of microcontrollers and single-board computers, enabling precise voltage measurements in various applications.
About KY-053 Analog Digital Converter Module
The KY-053 module is an analog-to-digital converter (ADC) that allows for precise measurement of analog voltage values on up to 4 inputs. It communicates via the I²C bus, making it compatible with various microcontrollers and single-board computers, including Arduino and Raspberry Pi. With a resolution of up to 16 bits and programmable sampling rates ranging from 8 to 860 samples per second (SPS), it is suitable for applications requiring accurate analog measurements.
Technical Specifications
Pinout Configuration
The VCC pin is used to supply power to the sensor, and it typically requires 3.3V or 5V (refer to the datasheet for specific voltage requirements). The GND pin is the ground connection and must be connected to the ground of your ESP32.
VDD:Power supply pin, can be connected to 2V to 5.5V.GND:Ground pin.SCL:I²C clock line.SDA:I²C data line.ADDR:Used to select the I²C slave address.ALRT:Sends a signal when the conversion is ready or when the comparator output is ready.A0 - A3:Analog inputs for voltage measurement.
Wiring with ESP32
VDD:Connect to 3.3V or 5V on the microcontroller.GND:Connect to the ground of the microcontroller.SCL:Connect to the SCL pin of the microcontroller (e.g., GPIO22 on ESP32).SDA:Connect to the SDA pin of the microcontroller (e.g., GPIO21 on ESP32).ADDR:Connect to GND, VDD, SDA, or SCL to set the I²C address (0x48 to 0x4B).ALRT:Optional, can be used to monitor conversion readiness.A0 - A3:Connect to analog signal sources to be measured.
Troubleshooting Guide
Common Issues
❌ Module Not Detected
Issue: The KY-053 module is not recognized by the microcontroller.
Solutions:
- Verify that the I²C interface is enabled and properly configured on the microcontroller.
- Ensure correct wiring connections, especially the SCL and SDA lines.
- Check that the ADDR pin is connected appropriately to set the desired I²C address.
⚡ Incorrect Voltage Readings
Issue: The module provides inaccurate or fluctuating voltage measurements.
Solutions:
- Confirm that the input voltage on analog pins does not exceed the operating voltage (2V to 5.5V).
- Ensure stable power supply to the module to prevent noise interference.
- Adjust the programmable gain amplifier (PGA) settings to match the expected input voltage range for better resolution.
Debugging Tips
🔍 Serial Monitor
Use the Serial Monitor to check for error messages and verify the sensor's output. Add debug prints in your code to track the sensor's state.
⚡ Voltage Checks
Use a multimeter to verify voltage levels and check for continuity in your connections. Ensure the power supply is stable and within the sensor's requirements.
Additional Resources
Code Examples
Arduino Example
#include <Wire.h>
#include <Adafruit_ADS1X15.h>

Adafruit_ADS1115 ads;

void setup() {
    Serial.begin(9600);
    ads.setGain(GAIN_TWOTHIRDS); // 2/3x gain ±6.144V 1 bit = 0.1875mV
    if (!ads.begin()) {
        Serial.println("Failed to initialize KY-053 ADS1115!");
        while (1);
    }
}

void loop() {
    int16_t adc0, adc1, adc2, adc3;
    adc0 = ads.readADC_SingleEnded(0);
    adc1 = ads.readADC_SingleEnded(1);
    adc2 = ads.readADC_SingleEnded(2);
    adc3 = ads.readADC_SingleEnded(3);

    Serial.print("AIN0: "); Serial.println(adc0);
    Serial.print("AIN1: "); Serial.println(adc1);
    Serial.print("AIN2: "); Serial.println(adc2);
    Serial.print("AIN3: "); Serial.println(adc3);
    Serial.println("----------------");
    delay(1000);
}
This Arduino code initializes the KY-053 ADC module using the ADS1115 library. It sets the gain to GAIN_TWOTHIRDS, allowing a maximum input voltage range of ±6.144V. The code continuously reads the values from all four analog input channels and prints them to the serial monitor.
ESP-IDF Example
#include <stdio.h>
#include "freertos/FreeRTOS.h"
#include "freertos/task.h"
#include "driver/i2c.h"
#include "ads1115.h"

#define I2C_MASTER_SCL_IO 22
#define I2C_MASTER_SDA_IO 21
#define I2C_MASTER_NUM I2C_NUM_0
#define I2C_MASTER_FREQ_HZ 100000

void app_main() {
    printf("Initializing KY-053 ADC module...\n");
    ads1115_t adc;
    ads1115_init(&adc, I2C_MASTER_NUM, 0x48, I2C_MASTER_SDA_IO, I2C_MASTER_SCL_IO);

    while (1) {
        int16_t adc_values[4];
        for (int i = 0; i < 4; i++) {
            adc_values[i] = ads1115_read(&adc, i);
            printf("AIN%d: %d\n", i, adc_values[i]);
        }
        vTaskDelay(pdMS_TO_TICKS(1000));
    }
}
This ESP-IDF code initializes the KY-053 ADC module (ADS1115) using the I2C interface on GPIO21 (SDA) and GPIO22 (SCL). It continuously reads all four analog channels and prints the values to the console every second.
ESPHome Example
sensor:
  - platform: ads1115
    multiplexer: 'A0_GND'
    gain: 6.144
    name: "KY-053 ADC Channel 0"
    update_interval: 1s
  - platform: ads1115
    multiplexer: 'A1_GND'
    gain: 6.144
    name: "KY-053 ADC Channel 1"
    update_interval: 1s
  - platform: ads1115
    multiplexer: 'A2_GND'
    gain: 6.144
    name: "KY-053 ADC Channel 2"
    update_interval: 1s
  - platform: ads1115
    multiplexer: 'A3_GND'
    gain: 6.144
    name: "KY-053 ADC Channel 3"
    update_interval: 1s
This ESPHome configuration sets up the KY-053 ADC module (ADS1115) to read all four analog channels. Each channel is configured with a gain of 6.144V, and the values are updated every second.
PlatformIO Example
platformio.ini
[env:esp32]
platform = espressif32
board = esp32dev
framework = arduino
lib_deps =
    adafruit/Adafruit ADS1X15
PlatformIO Example Code
#include <Arduino.h>
#include <Wire.h>
#include <Adafruit_ADS1X15.h>

Adafruit_ADS1115 ads;

void setup() {
    Serial.begin(115200);
    ads.setGain(GAIN_TWOTHIRDS);
    if (!ads.begin()) {
        Serial.println("Failed to initialize KY-053 ADS1115!");
        while (1);
    }
}

void loop() {
    int16_t values[4];
    for (int i = 0; i < 4; i++) {
        values[i] = ads.readADC_SingleEnded(i);
        Serial.printf("AIN%d: %d\n", i, values[i]);
    }
    delay(1000);
}
This PlatformIO code sets up the KY-053 ADC module (ADS1115) using the I2C interface. It continuously reads and prints the values from all four analog input channels every second.
MicroPython Example
import machine
import time
from ads1x15 import ADS1115

i2c = machine.I2C(0, scl=machine.Pin(22), sda=machine.Pin(21))
adc = ADS1115(i2c, address=0x48)

while True:
    for i in range(4):
        value = adc.read(i)
        print(f"AIN{i}: {value}")
    time.sleep(1)
This MicroPython script configures the KY-053 ADC module (ADS1115) using the I2C interface. It continuously reads all four analog channels and prints the values every second.
Conclusion
The ESP32 KY-053 Analog Digital Converter Module is a powerful KY-0xx module sensor that offers excellent performance and reliability. With support for multiple development platforms including Arduino, ESP-IDF, ESPHome, PlatformIO, and MicroPython, it's a versatile choice for your IoT projects.
For optimal performance, ensure proper wiring and follow the recommended configuration for your chosen development platform.
Always verify power supply requirements and pin connections before powering up your project to avoid potential damage.
