

Control a BenQ ScreenBar Halo from Home Assistant
Add a first-generation ScreenBar Halo to Home Assistant as two lights with brightness and colour temperature. Two cheap ESP32 boards, four wires, no changes to the lamp.
I've wanted my ScreenBar Halo in Home Assistant for a long time. It's a lovely lamp with one annoying gap: it only listens to its dial remote. No Wi-Fi, no app, nothing Home Assistant can talk to. So I kept an eye on the BenQ ScreenBar thread on the Home Assistant forum, where progress was slow for years.
When I opened it again recently, things had moved. Djoko-cli had decoded the first-gen Halo's radio protocol, and Junyi-99 had a bare ESP32-S3 talking to the lamp. But I still couldn't just add it to Home Assistant. Finding the lamp's address took a second radio, like a CC2500, the S3 took its commands from a script on a computer over USB, and the stand-alone bridges spoke Matter or Apple Home, not ESPHome.
So I rebuilt it as an ESPHome device. An ESP32-S3 plays the remote, an ESP32-C3 runs ESPHome, and the lamp shows up as two ordinary lights. The lamp stays closed and the real dial keeps working. Here is the whole build: about EUR 10 in parts, four wires and half an hour.
What's new here
The hard parts came from others (credits at the end). This build turns their work into something you add to Home Assistant and forget about:
1What you end up with
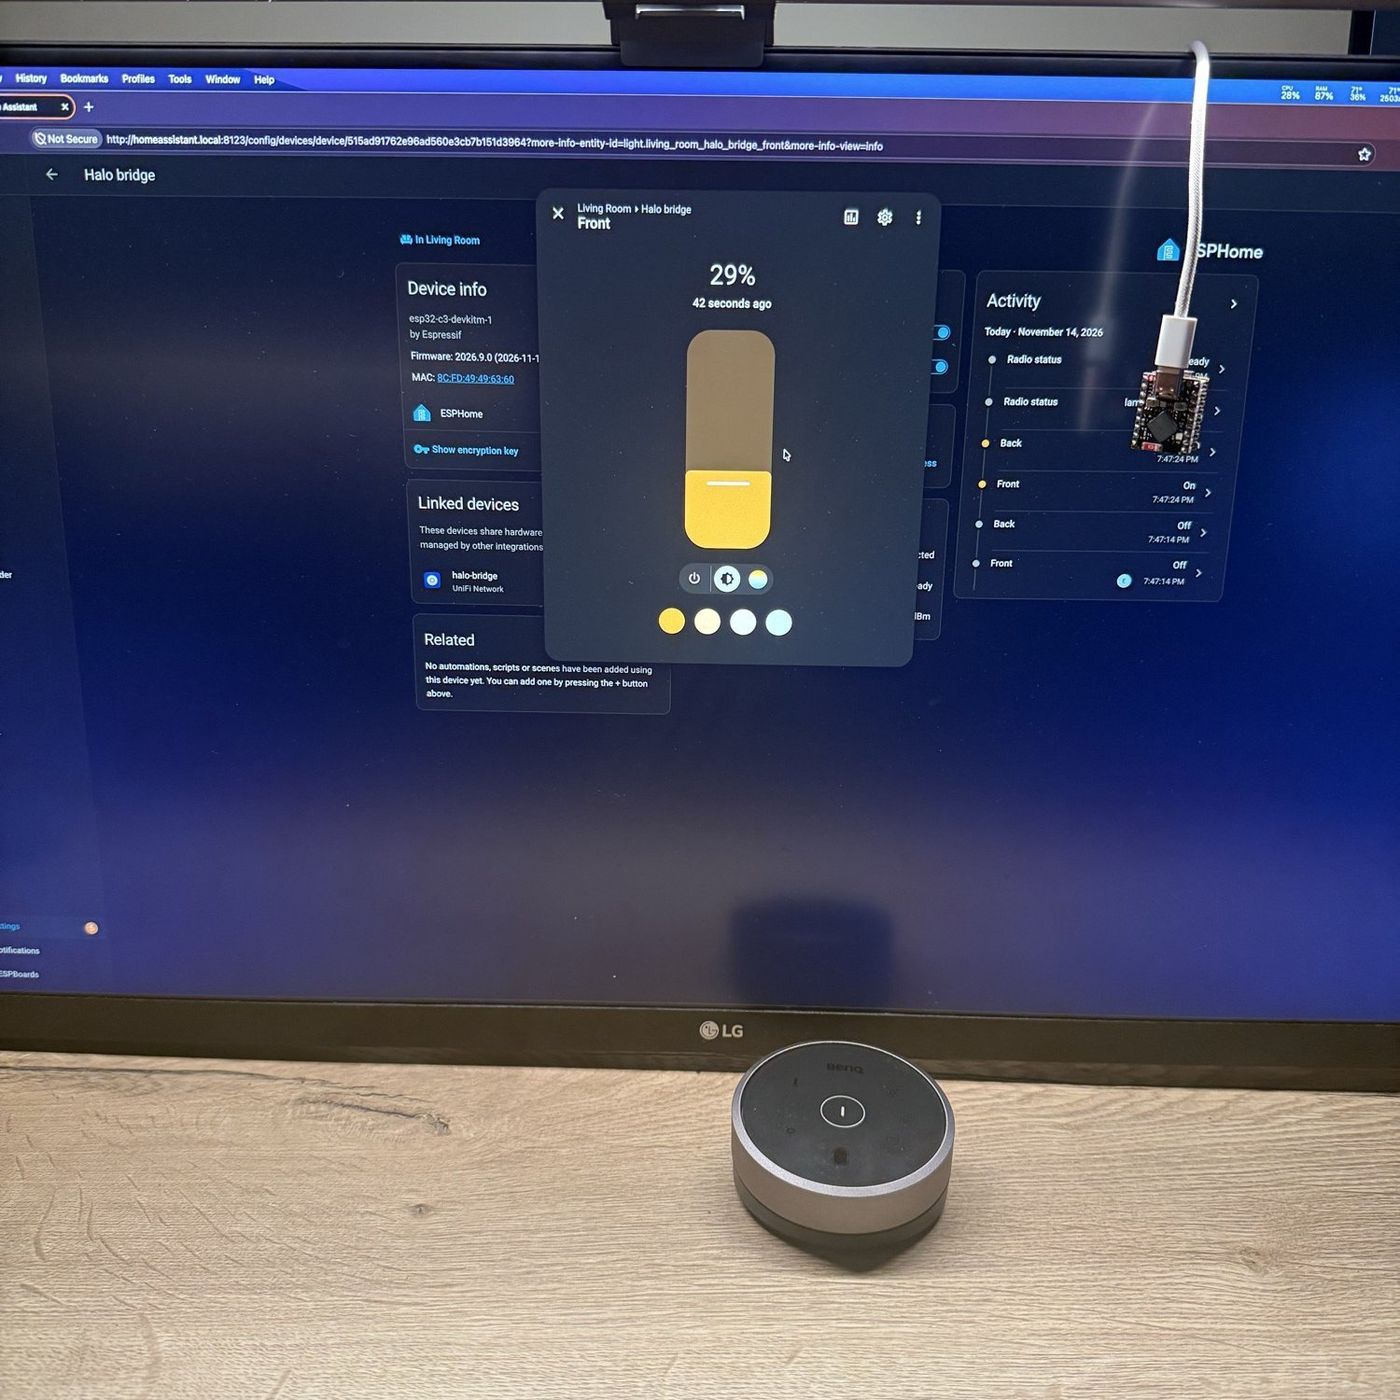
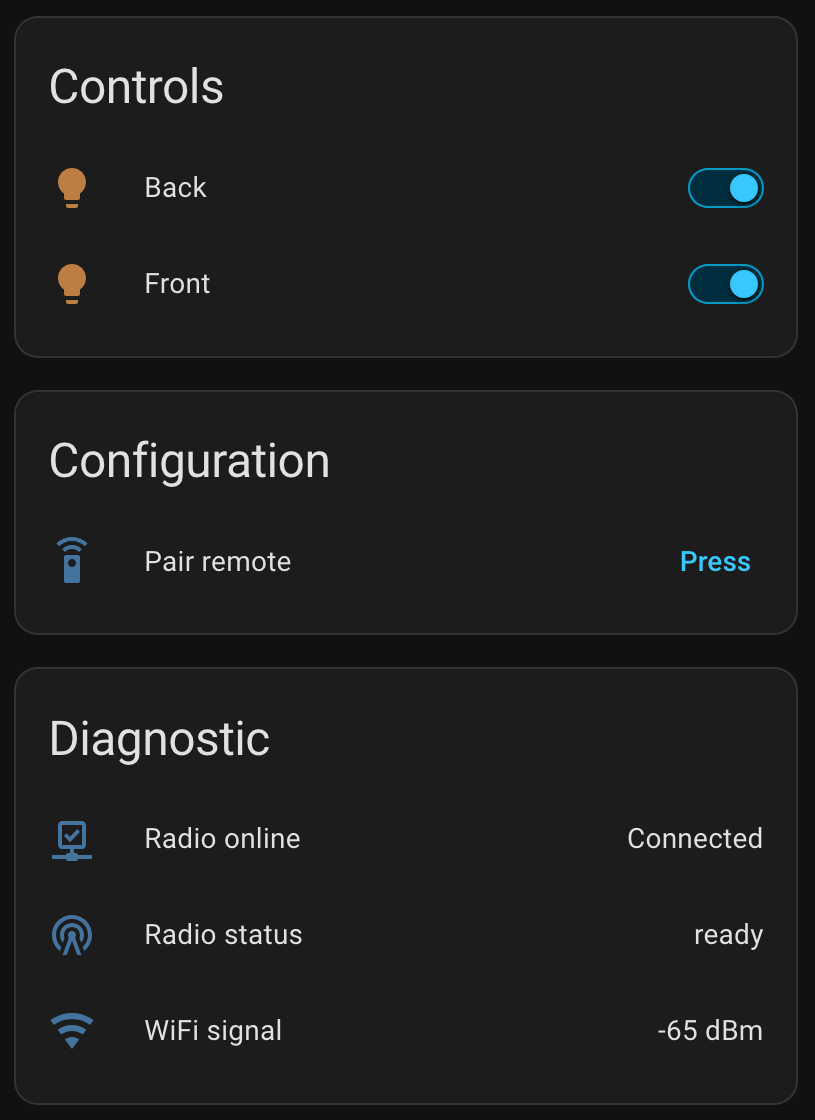
One new ESPHome device in Home Assistant, with everything the lamp can do. This is the real one on my desk:
Good to know
- Front and Back share one brightness and colour.The lamp stores a single value for both. Each one still switches on and off by itself.
- The dial lags behind Home Assistant.It catches up with Home Assistant's changes after it sleeps and wakes. The other way round is instant.
- Keep the bridge near the lamp.It was tested at desk distance; longer range is untested.
- No Auto mode or heart button.A scene replaces the heart; an automation with a light sensor can stand in for Auto.
- First-generation Halo only.The Halo 2 doesn't work with this bridge; it has its own integration.
2How the signal travels
- You switch Front onHome Assistant calls the C3 over Wi-Fi, like any ESPHome device.
- The C3 passes it onA short message to the S3 over two serial wires.
- The S3 plays the remoteIt sends the dial's tiny radio packet. The lamp switches and answers with an ACK.
- ConfirmedThe S3 reports back. No ACK? It retries a few times first.
- You turn the dialThe remote talks to the lamp directly, as it always has.
- The S3 overhears itBetween commands it listens and catches the same packet.
- New state to the C3The S3 works out what changed and reports it.
- Home Assistant followsThe light card updates within a second.
Why two boards? The C3's Wi-Fi and Bluetooth radio can't produce the Halo's signal. The S3 builds it in software and plays it through its own Wi-Fi transmitter, like a small software-defined radio, so it can't stay on your network at the same time. The C3 handles Wi-Fi and Home Assistant.
3Wiring

As an Amazon Associate, ESPboards earns from qualifying purchases.

As an Amazon Associate, ESPboards earns from qualifying purchases.
Plus 4 jumper wires (or header pins to solder a stack), and a USB-C cable and power supply.
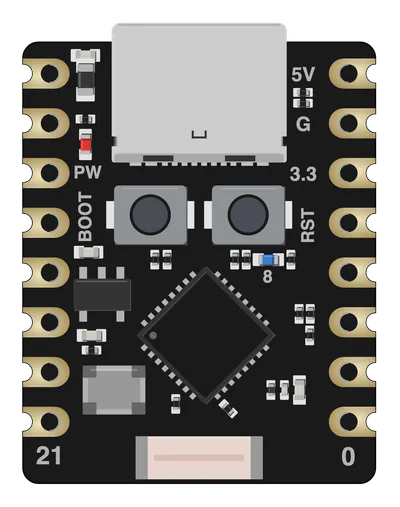
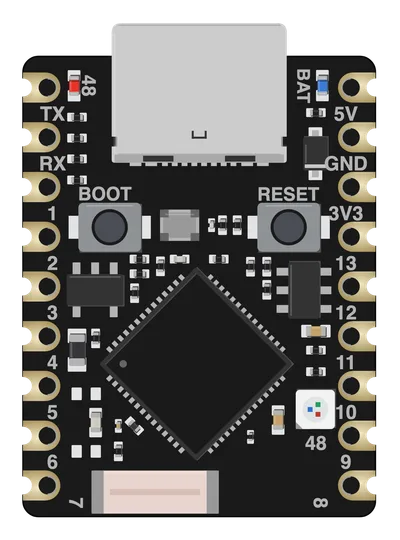
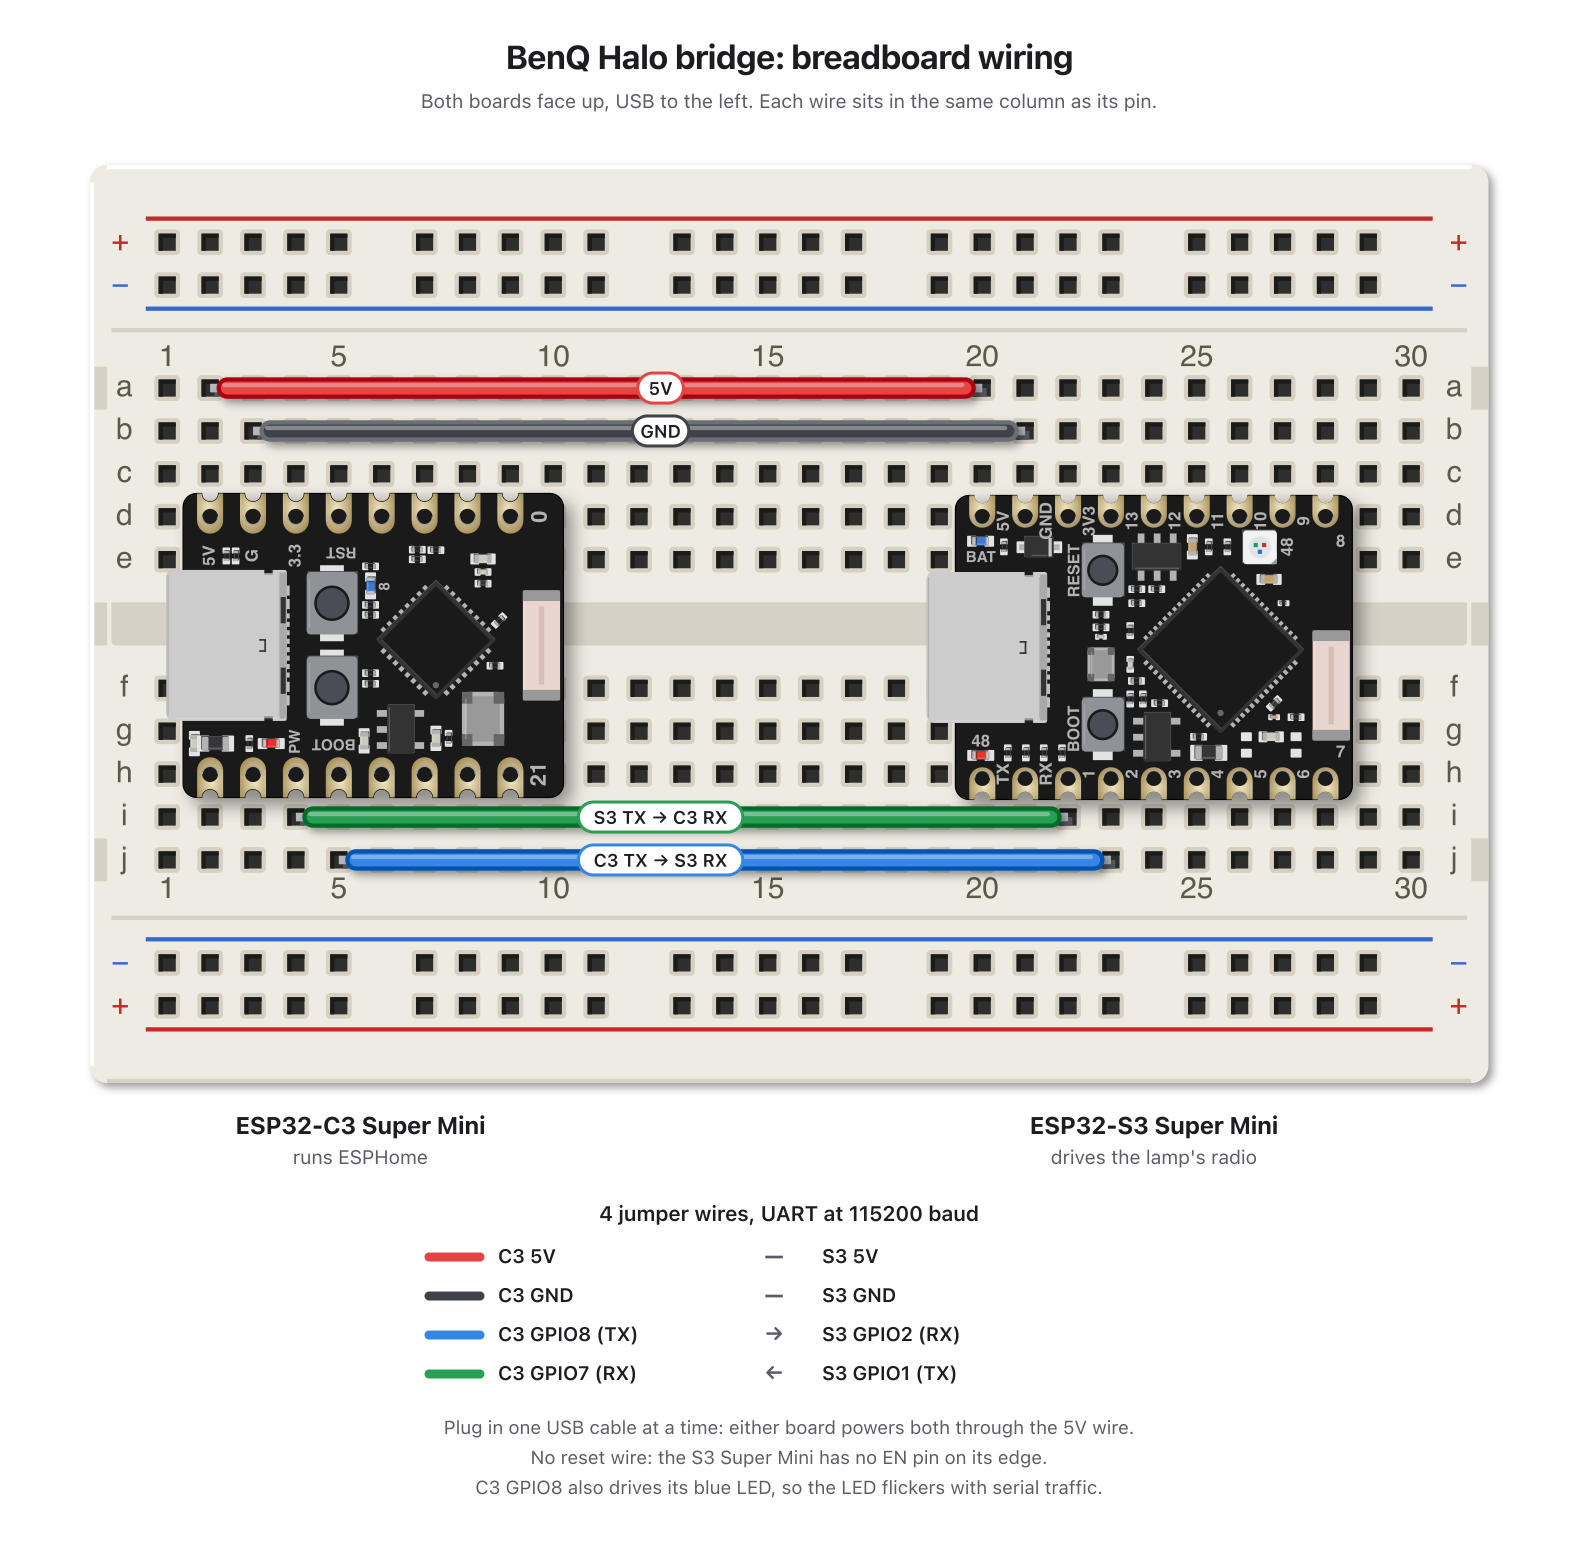
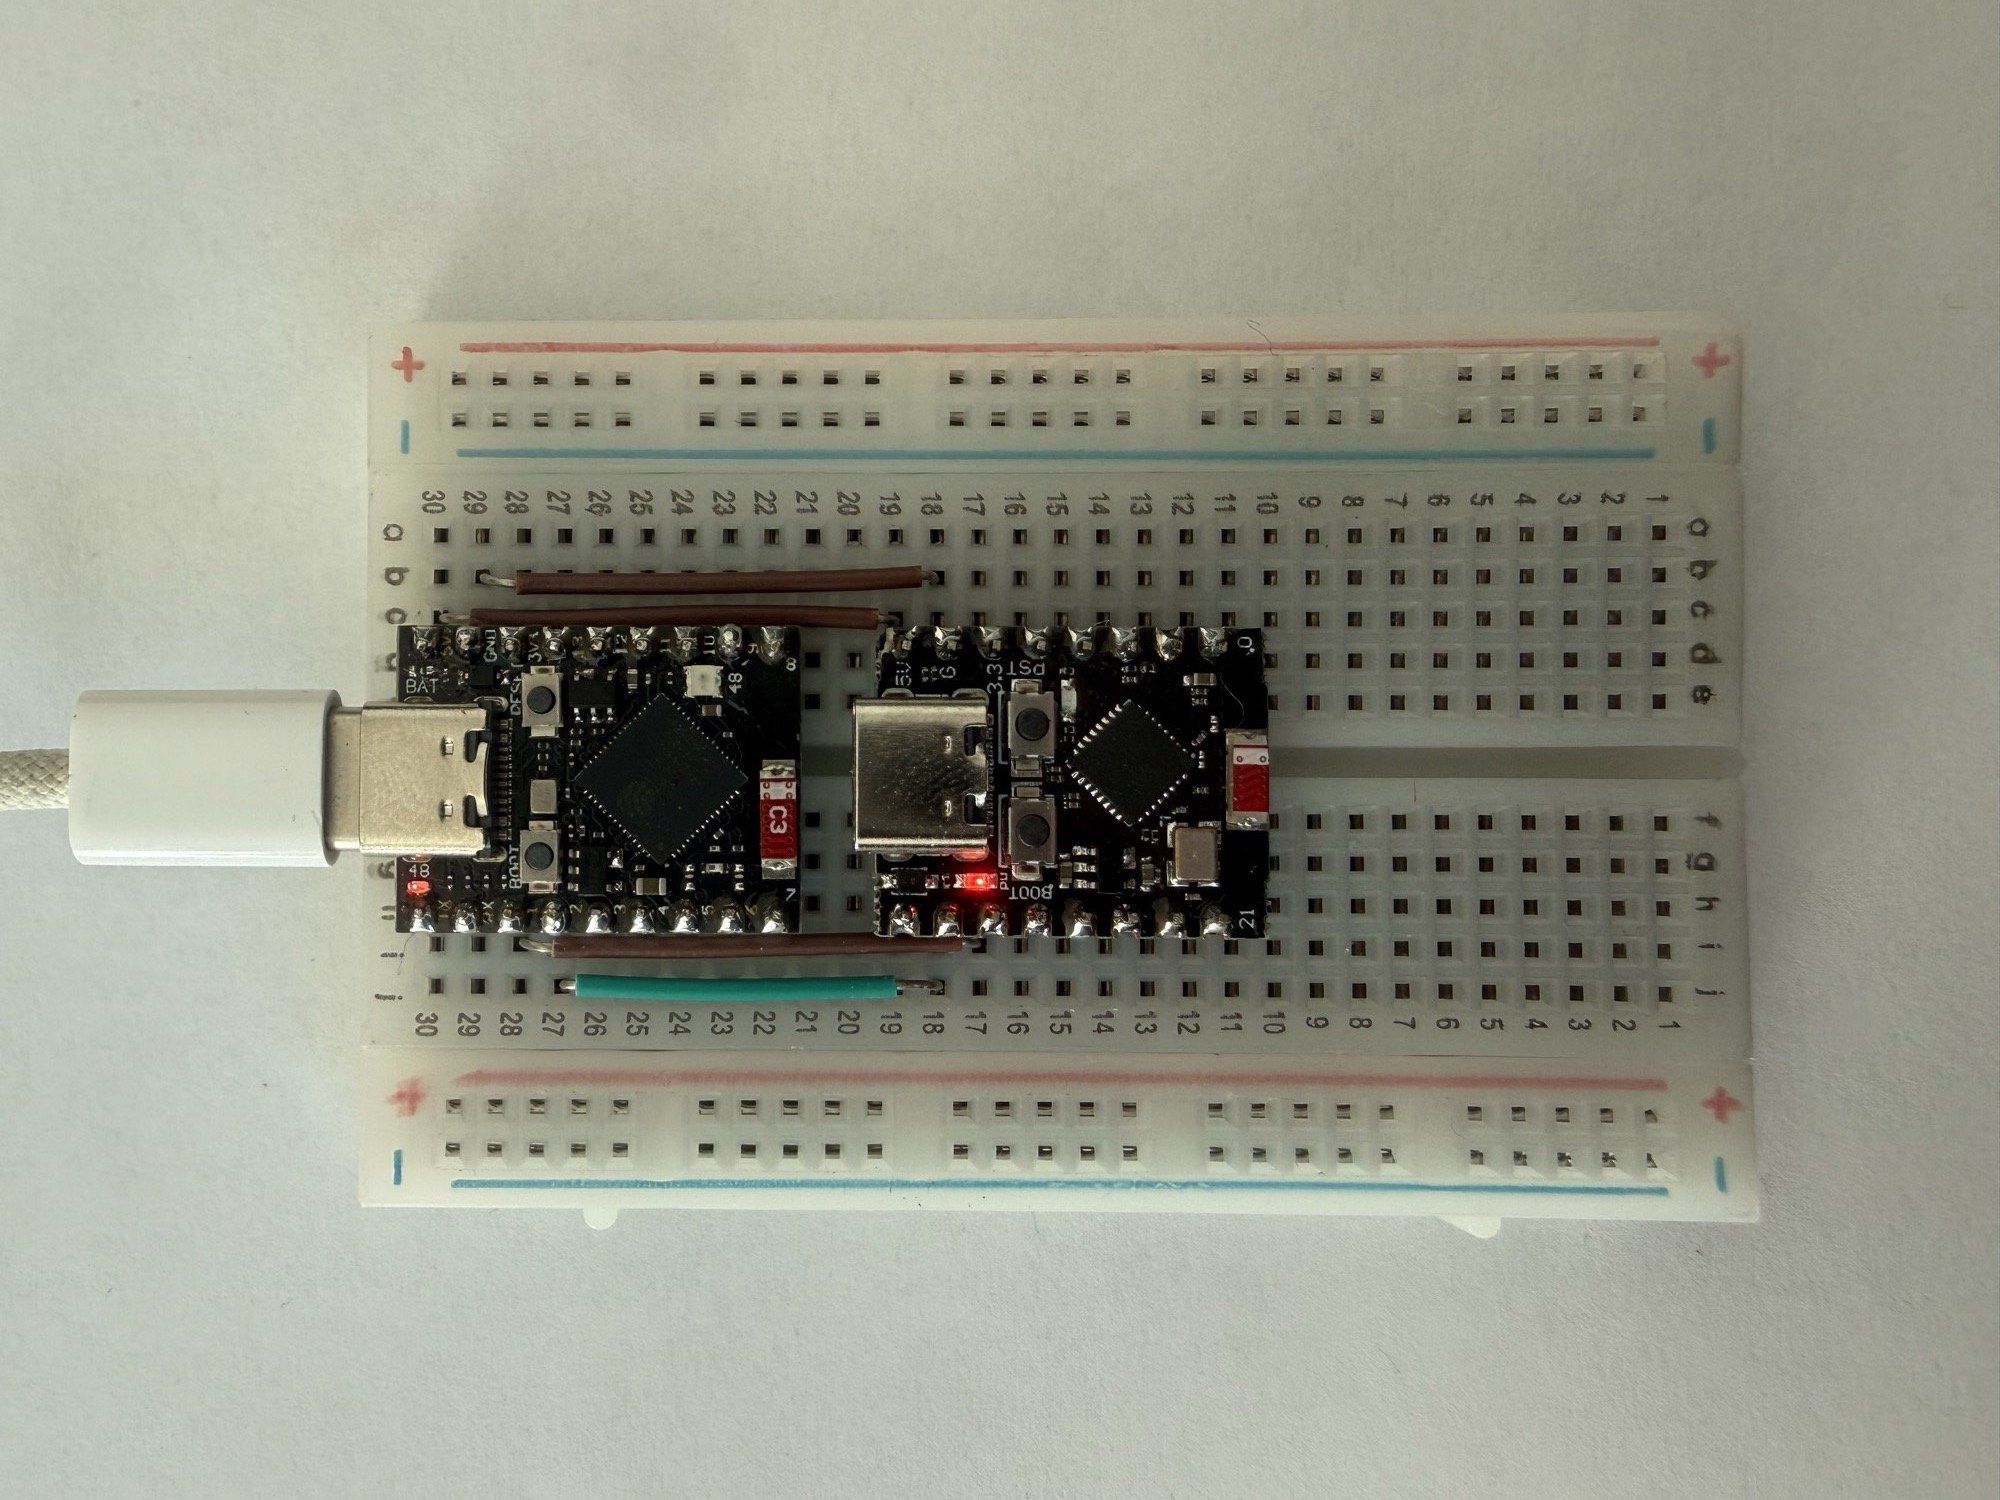
Four wires. TX goes to RX, RX goes to TX.
Easiest to start with: both boards straddle the breadboard, four jumper wires between them.
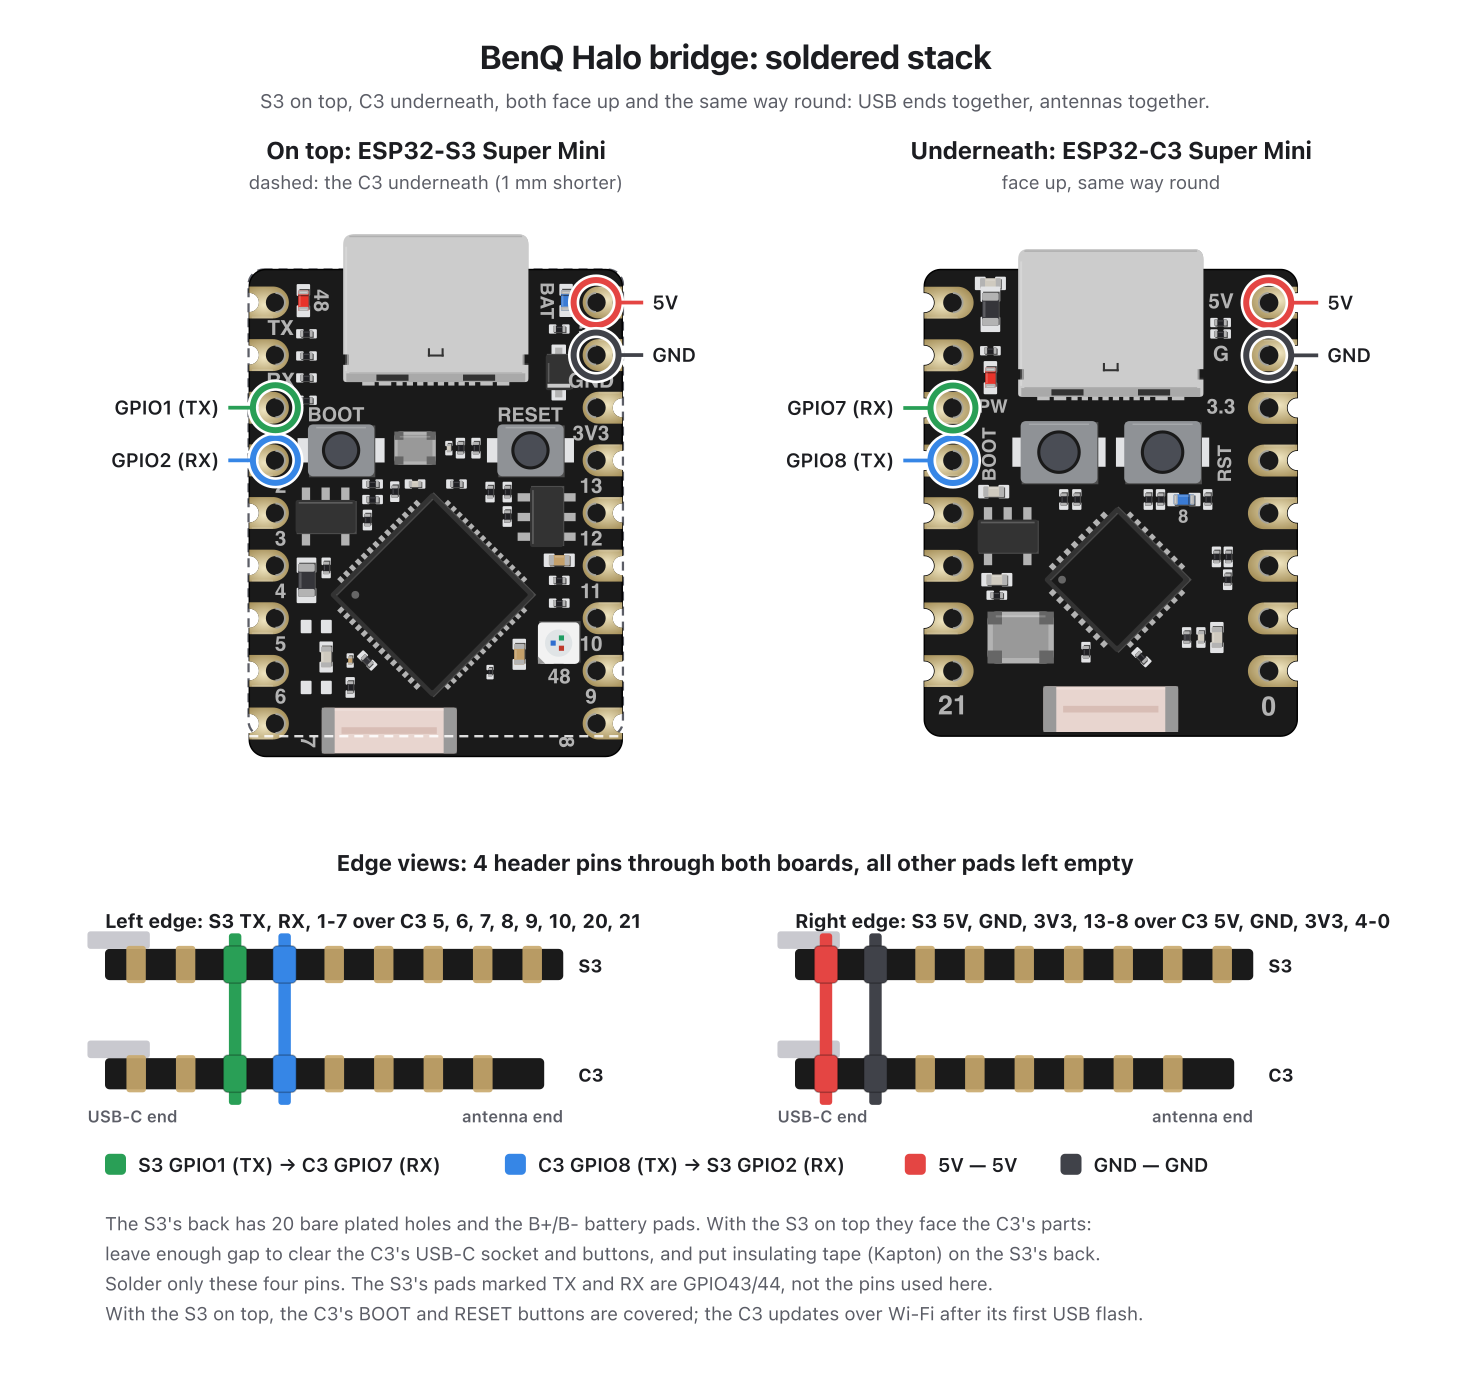
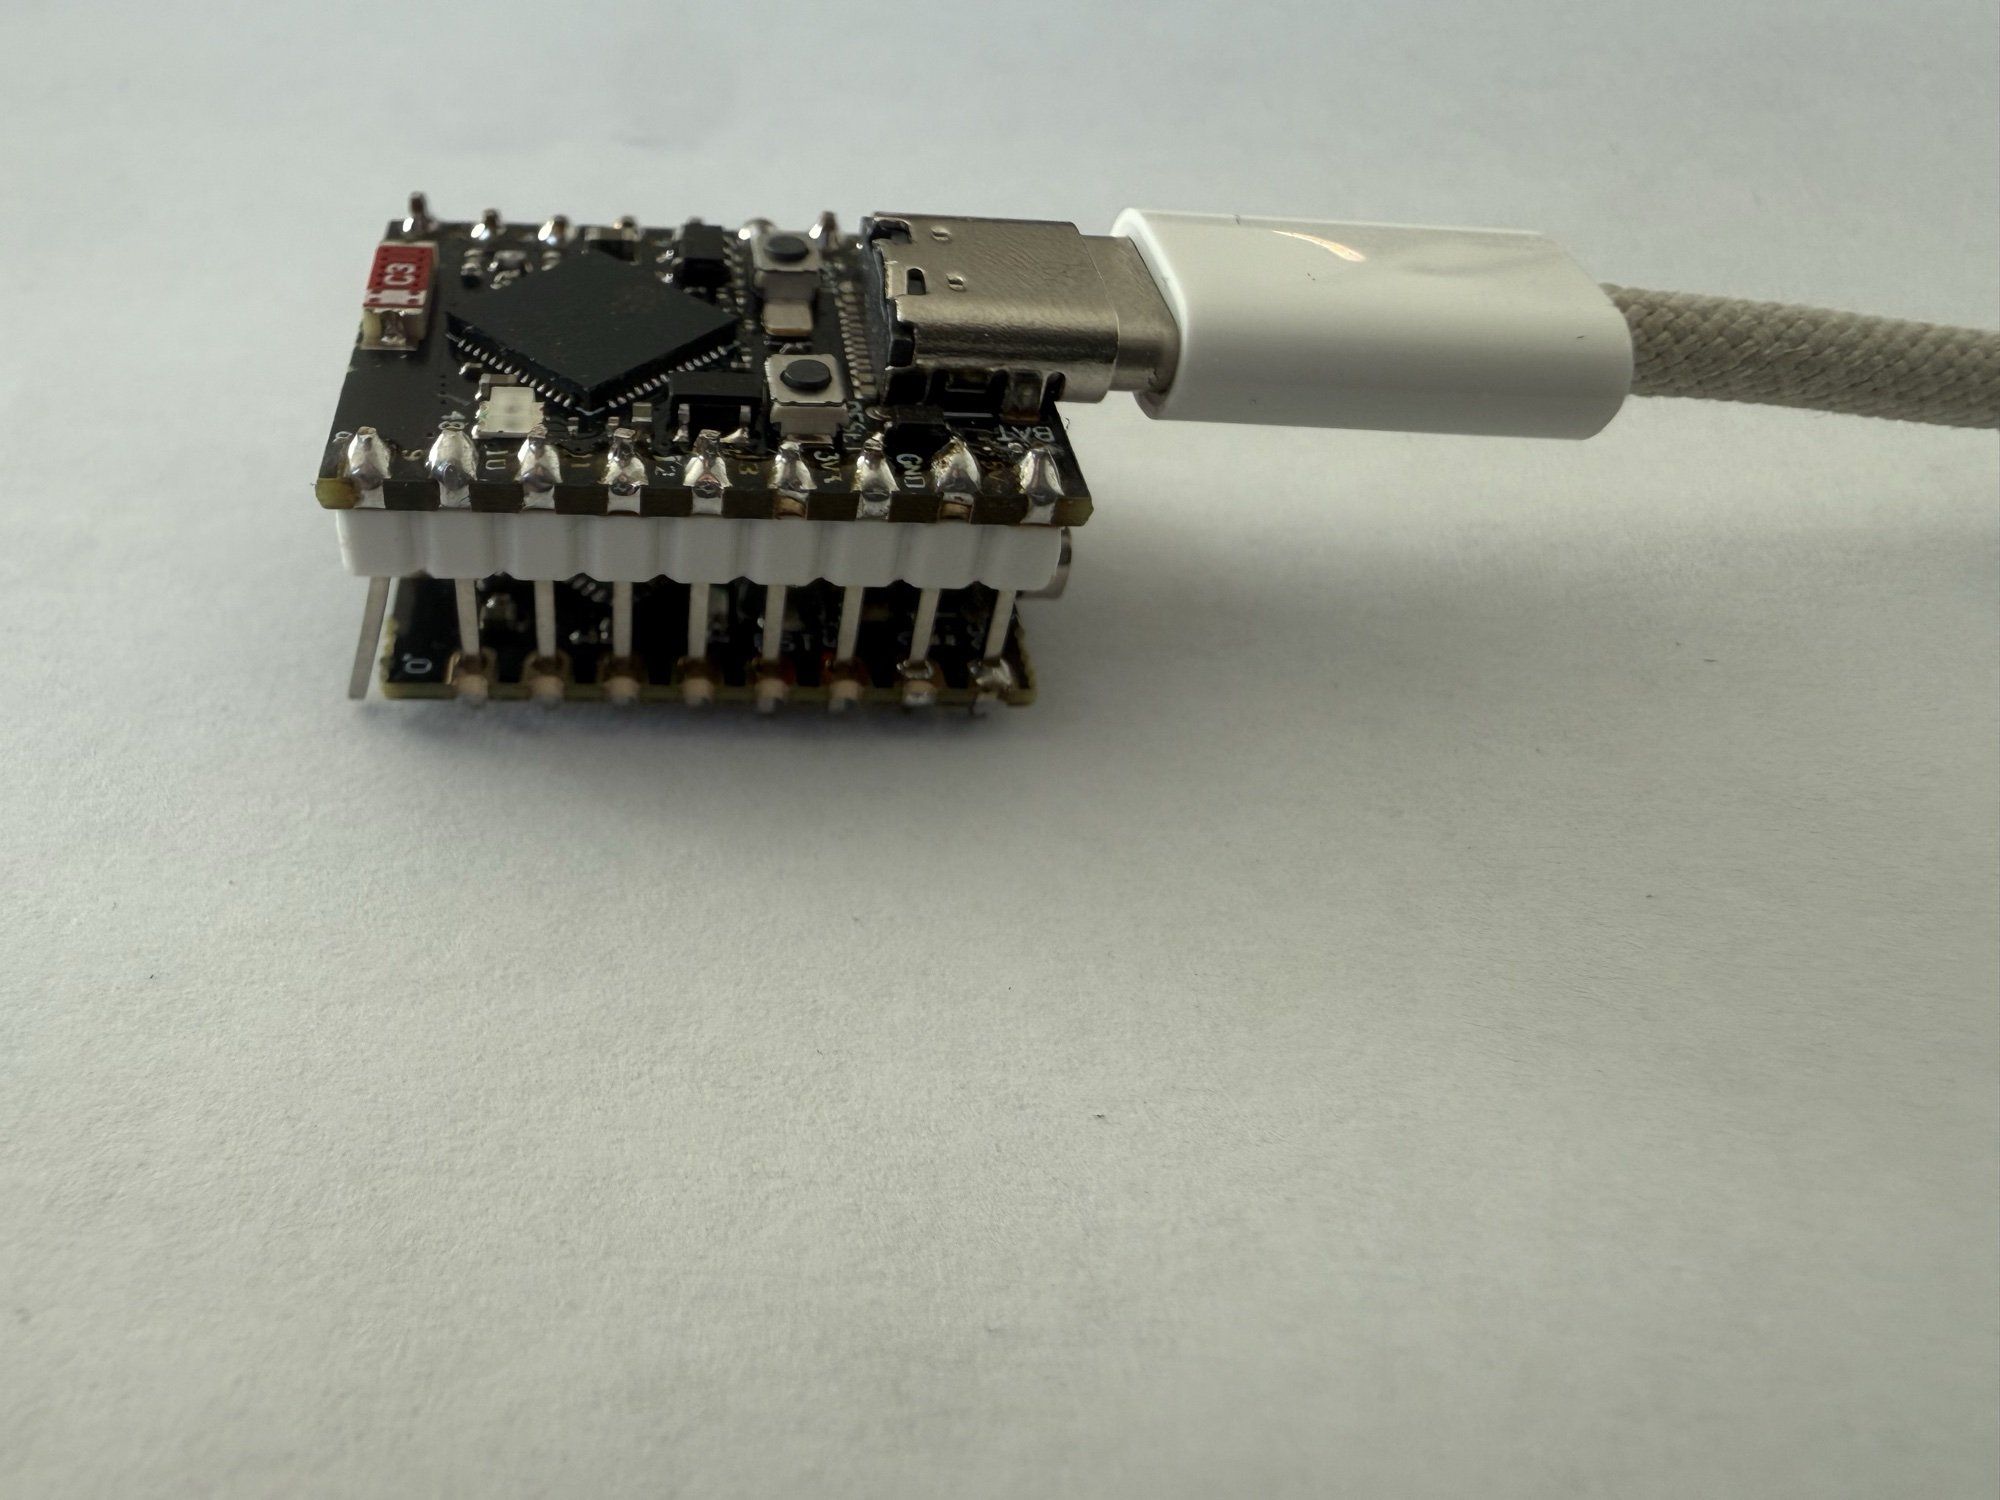
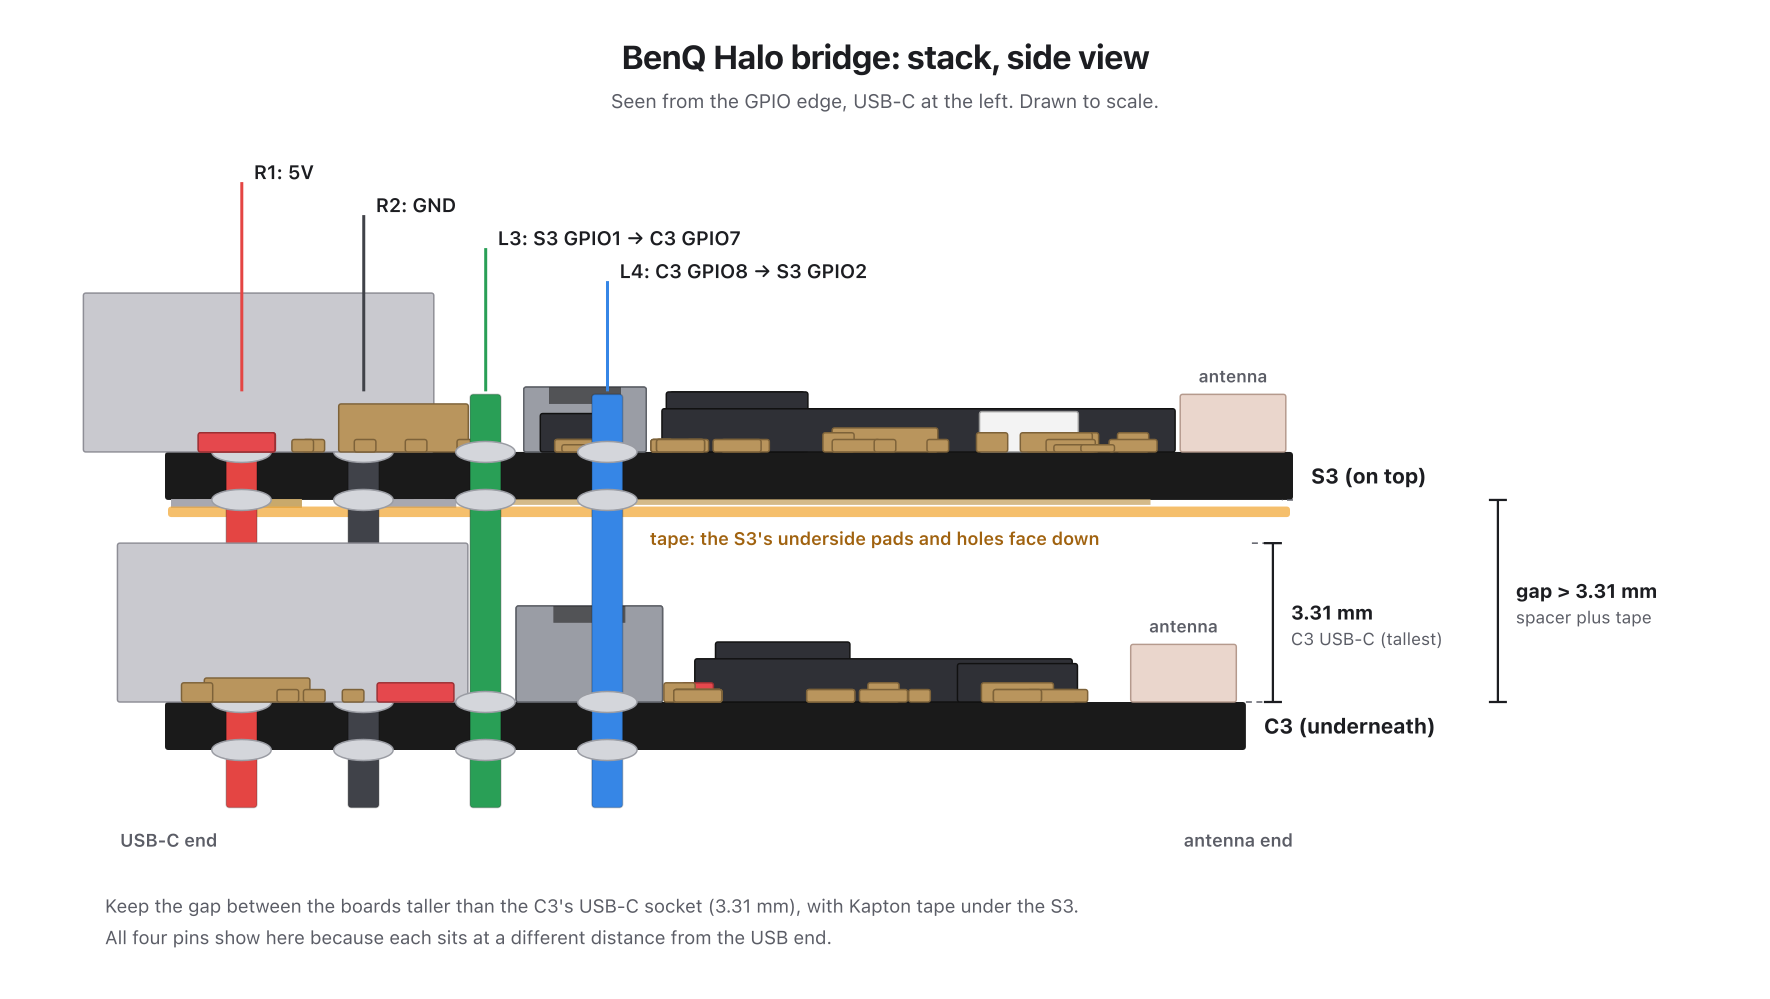
Smaller and nothing to come loose. Both boards face up, USB ends together. The four pins sit in the same edge slots on both boards, so they line up whichever board is on top. Solder only those four header pins and leave every other pad empty.
Put the S3 on top. It can only be reflashed over USB, so its port should stay easy to reach. Stacking didn't hurt the radio in testing. Flash the C3 (step 5) before you solder: after that it updates over Wi-Fi.
How much gap between the boards?
More than 3.3 mm: the C3's USB-C socket is its tallest part. Put Kapton tape on the S3's underside so its bare pads can't touch the C3.
4Flash the ESP32-S3
v1.0.0esptoolUSB-C cable- Download the firmwareGet
screenbar-halo-bridge-s3-v1.0.0.binfrom the v1.0.0 release. - Install esptoolEspressif's flashing tool. Version 5 or newer; older versions spell the command
write_flash.pip install esptool - Plug in the S3 and flashUse the S3's own USB-C port; the C3 can stay wired or soldered on. Replace
PORTwith the S3's serial port, for example/dev/cu.usbmodem101on a Mac,/dev/ttyACM0on Linux orCOM3on Windows.esptool --chip esp32s3 -p PORT --before usb-reset write-flash 0x0 screenbar-halo-bridge-s3-v1.0.0.bin
Build it from source insteadESP-IDF
The radio code uses undocumented chip internals that only exist in one exact ESP-IDF build, so install that version in its own folder first. It's a big download.
git clone https://github.com/espressif/esp-idf ~/esp/esp-idf-halo cd ~/esp/esp-idf-halo git checkout 25fe69f946311abdaf9ad56591f25fedbc20ac98 git submodule update --init --recursive ./install.sh esp32s3 . ./export.sh git clone --branch v1.0.0 https://github.com/ESPBoards/screenbar-halo-bridge ~/screenbar-halo-bridge cd ~/screenbar-halo-bridge/s3 idf.py build cd build esptool --chip esp32s3 -p PORT --before usb-reset write-flash @flash_args
5Flash the ESP32-C3 with ESPHome
- Create the deviceClick New device, name it
screenbarand pick ESP32-C3. ESPHome writes the Wi-Fi, API and OTA parts for you. Keepframework: type: esp-idfunderesp32:; that's what the bridge was tested with. - Add the bridgeClick Edit and paste this at the bottom. Keep
refon the same release as your S3 firmware.external_components: - source: type: git url: https://github.com/ESPBoards/screenbar-halo-bridge ref: v1.0.0 # same release as the S3 firmware path: esphome/components components: [halo_bridge] uart: id: radio_uart tx_pin: GPIO8 # to S3 GPIO2 rx_pin: GPIO7 # from S3 GPIO1 baud_rate: 115200 halo_bridge: uart_id: radio_uart status: name: Radio status online: name: Radio online pair: name: Pair remote light: - platform: halo_bridge name: Front zone: front - platform: halo_bridge name: Back zone: back sensor: - platform: wifi_signal name: WiFi signal update_interval: 60s entity_category: diagnostic - InstallPlug in the C3's USB-C port, click Install, then Plug into this computer. ESPHome may warn that GPIO8 is a strapping pin; it's fine as UART TX.
6Add it to Home Assistant and pair
Go to Settings > Devices & services. The screenbar device shows up as discovered: click Add. If it asks for an encryption key, copy it from the api: part of the YAML. Then open the device and pair it with your remote:
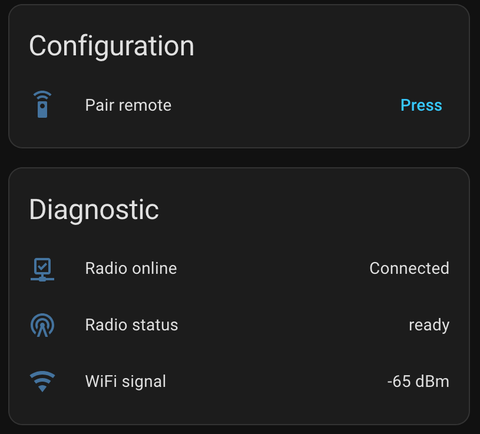
- Press Pair remoteRadio status changes to
pairing: turn the remote's dial now. - Turn the dial on the remoteA few clicks is enough; you have 30 seconds. Radio status shows
paired:and your lamp's address, thenready. - Done for goodThe C3 saves the address, so this survives restarts and updates.
7Preview
After pairing you have two lights. Here they are on the real lamp.
From here they work like any other light: put them on a dashboard, use them in scenes, or switch them with a presence sensor when you sit down.
If something's off, read Radio status
Everything the bridge knows ends up in Radio status on the device page. Find the message you see:
Normal
waiting for the radioThe C3 just started and is saying hello to the S3. Lasts a second or two.pairing: turn the remote's dial nowYou pressed Pair remote. It listens for 30 seconds.paired: 1A2B3C4DIt learned your lamp's address and saved it.readyAll good. Commands go straight to the lamp.Needs you
no lamp address: press PairNothing paired yet.Press Pair remote and turn the dial.pairing: no remote heardNothing from a remote in 30 seconds.Hold the remote closer and turn the dial, not the buttons. A weak remote battery does this too.pairing: heard a remote, but too few changesIt heard a remote but not enough separate dial clicks.Press Pair again and keep turning a few clicks.pairing needs the radio onlineThe S3 is not answering, so it cannot listen.See "radio offline" below.lamp didn't answerA command got no reply after all retries.Move the boards closer to the lamp. Still happening? Raise gain: (default 4, max 10) under halo_bridge:.radio offlineThe C3 cannot hear the S3.Check TX to RX both ways (GPIO8 to GPIO2, GPIO1 to GPIO7), GND, and that the S3 is flashed. A stuck S3 restarts itself within seconds.radio firmware mismatchThe S3 and C3 run different releases.Flash both from the same release.output_power: 8.5dB under wifi:.Credits
This builds on other people's work. Djoko-cli decoded the Halo's radio protocol. Junyi-99 built the ESP32-S3 radio that sends Halo packets, on top of esp-sdr and esp-sdr-zephyr, and halo-nrf52840 gave the colour temperature range. This build adds pairing from the remote with the S3 alone, listening to the remote so Home Assistant stays in sync, and the ESPHome bridge. Want the full story, from sniffing the remote's packets to decoding what its buttons send? Read the technical deep dive.
And thanks to everyone in the Home Assistant forum thread who kept poking at this lamp.
Not affiliated with or endorsed by BenQ. BenQ and ScreenBar are trademarks of BenQ Corporation, used here only to name the product.