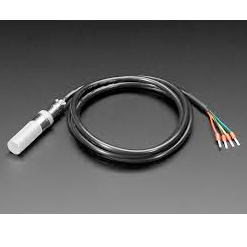
ESP32 AHT10 Temperature and Humidity Sensor
Overview
The AHT10 is an advanced, fully calibrated, and highly integrated temperature and humidity sensor that provides reliable, precise environmental measurements. Designed with cutting-edge CMOSens® technology, it offers high performance in a compact and energy-efficient package, making it ideal for various applications ranging from consumer electronics to industrial monitoring systems.


About AHT10 Temperature and Humidity Sensor
The AHT10 is the first sensor in the AHT series, developed by AOSONG (Aosong Electronics Co., Ltd.). It offers moderate accuracy in temperature and humidity measurements, making it a budget-friendly choice for various environmental monitoring applications.
⚡ Key Features
- Affordable & Reliable – A cost-effective option for basic climate sensing.
- Digital Output – Communicates via I²C interface for easy integration.
- Compact & Energy-Efficient – Suitable for IoT, smart home, and weather monitoring.
🔗 Learn more about the AHT10 sensor.
🔗 Check out the AHT20 sensor for an upgraded version with higher accuracy.
🔗 Explore a real-world project using the AHT10 in our IKEA Vindriktning Air Quality Sensor guide.
Where to Buy

Starting from
1$ per unit


Prices are subject to change. We earn from qualifying purchases as an Amazon Associate.
Technical Specifications
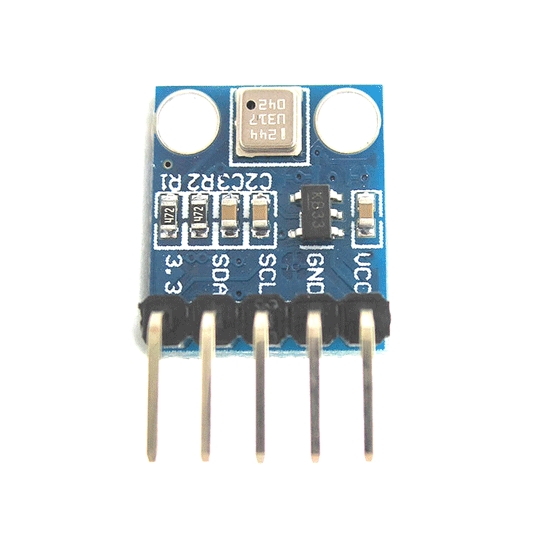
Pinout Configuration
The VCC pin is used to supply power to the sensor, and it typically requires 3.3V or 5V (refer to the datasheet for specific voltage requirements). The GND pin is the ground connection and must be connected to the ground of your ESP32.
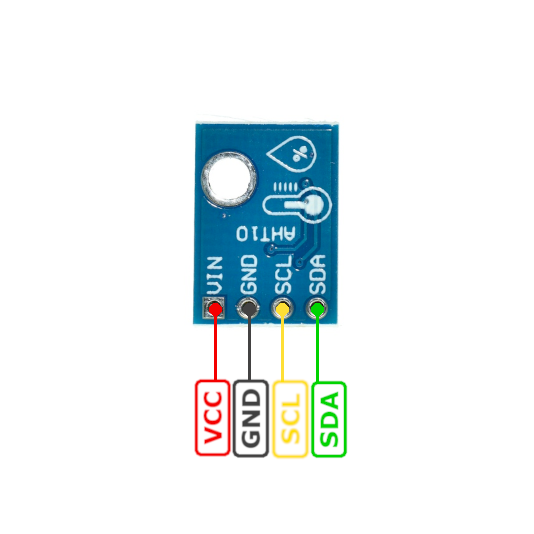
The AHT10 pinout is simple and follows the I2C communication protocol:
- SDA (Data Line): Used for transferring data between the sensor and the microcontroller (ESP32).
- SCL (Clock Line): Provides the clock signal for synchronizing data transfer.
- GND (Ground): Connect to the ground of the ESP32 to complete the circuit.
- VCC (Power): Connect to the 3.3V or 5V power supply on the ESP32 to power the sensor.
Wiring with ESP32
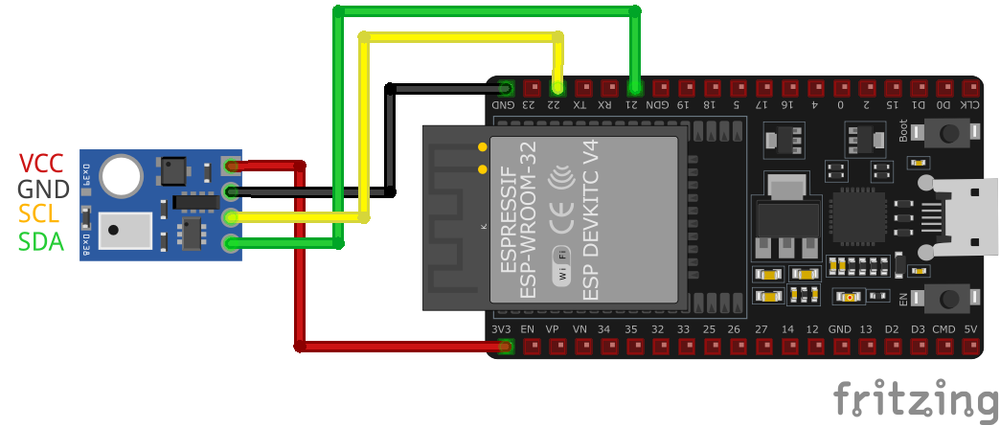
SDA, SCL, VCC and GND pins to the ESP32. Make sure to configure the I2C pins accordingly.Troubleshooting Guide
Common Issues
🔍 Sensor Not Detected on I2C Bus
Issue: The AHT10 sensor is not recognized on the I2C bus, resulting in communication failures.
Possible causes include incorrect wiring, insufficient power supply, or sensor malfunction.
Solution: Ensure proper wiring connections: connect VCC to 3.3V (as the AHT10 operates at 3.3V), GND to ground, SDA to the data line, and SCL to the clock line. Verify that the I2C address matches the sensor's default (0x38). Use an I2C scanner to detect the sensor's presence on the bus. If the sensor is still not detected, consider testing with a different microcontroller or replacing the sensor.
🛑 Compilation Errors When Using AHT10 Library
Issue: Compilation errors occur when attempting to use the AHT10 sensor with an Arduino board.
Errors such as 'stray '\342' in program' or 'TwoWire' does not name a type' may appear.
Solution: Ensure that the correct library for the AHT10 sensor is installed and properly included in the sketch. Verify that the code does not contain any unintended characters or formatting issues, especially if copied from external sources. If errors persist, consider using alternative libraries compatible with the AHT10 sensor.
🌡️ Inaccurate Temperature or Humidity Readings
Issue: The AHT10 sensor provides temperature or humidity readings that are inconsistent or incorrect.
Possible causes include sensor placement near heat sources, inadequate sensor initialization, or lack of calibration.
Solution: Position the sensor away from direct heat sources or sunlight to avoid skewed readings. Ensure that the sensor is properly initialized in the code before attempting to read data. While the AHT10 is factory-calibrated, if discrepancies persist, consider implementing software-based calibration adjustments based on known reference values.
🔄 Interference with Other I2C Devices
Issue: Connecting the AHT10 sensor alongside other I2C devices causes communication issues or device malfunctions.
Possible causes include the AHT10's fixed I2C address or improper bus management.
Solution: The AHT10 has a fixed I2C address (0x38), limiting the ability to use multiple AHT10 sensors on the same bus. To use multiple sensors, consider using an I2C multiplexer or selecting sensors with configurable addresses. Ensure that all devices on the I2C bus are functioning correctly and that there are no address conflicts.
Debugging Tips
🔍 Serial Monitor
Use the Serial Monitor to check for error messages and verify the sensor's output. Add debug prints in your code to track the sensor's state.
⚡ Voltage Checks
Use a multimeter to verify voltage levels and check for continuity in your connections. Ensure the power supply is stable and within the sensor's requirements.
Additional Resources
Code Examples
Arduino Example
#include <Wire.h>
#include <Adafruit_AHT10.h>

// Create an instance of the AHT10 sensor
Adafruit_AHT10 aht;

void setup() {
  // Initialize Serial Monitor
  Serial.begin(115200);
  Serial.println("AHT10 Sensor Example");

  // Initialize I2C communication
  if (!aht.begin()) {
    Serial.println("Failed to find AHT10 sensor! Check wiring.");
    while (1);
  }
  Serial.println("AHT10 sensor initialized.");
}

void loop() {
  // Read temperature and humidity from the sensor
  sensors_event_t humidity, temp;
  aht.getEvent(&humidity, &temp); // Populate the event objects

  // Print temperature and humidity to Serial Monitor
  Serial.print("Temperature: ");
  Serial.print(temp.temperature);
  Serial.println(" °C");

  Serial.print("Humidity: ");
  Serial.print(humidity.relative_humidity);
  Serial.println(" %");

  // Delay between readings
  delay(2000);
}
This code demonstrates how to use the AHT10 temperature and humidity sensor with an Arduino-compatible microcontroller. The sensor communicates over I2C and is initialized using the Adafruit AHT10 library.
Library Installation #
To use this code, you need to install the Adafruit AHT10 library. Follow these steps:
- Open Arduino IDE.
- Navigate to Sketch → Include Library → Manage Libraries.
- Search for "Adafruit AHT10" and install it.
Alternatively, you can download the library from the official Adafruit GitHub repository:
🔗 Adafruit AHT10 Library
ESP-IDF Example
#include <stdio.h>
#include "driver/i2c.h"
#include "esp_log.h"

#define I2C_MASTER_NUM I2C_NUM_0
#define I2C_MASTER_SDA_IO 21
#define I2C_MASTER_SCL_IO 22
#define I2C_MASTER_FREQ_HZ 100000

#define AHT10_I2C_ADDR 0x38
#define AHT10_CMD_INIT 0xE1
#define AHT10_CMD_MEASURE 0xAC

static const char TAG = "AHT10";

void aht10_init(i2c_port_t i2c_num) {
    uint8_t init_cmd[] = {AHT10_CMD_INIT, 0x08, 0x00};
    esp_err_t ret = i2c_master_write_to_device(i2c_num, AHT10_I2C_ADDR, init_cmd, sizeof(init_cmd), 1000 / portTICK_PERIOD_MS);
    if (ret == ESP_OK) {
        ESP_LOGI(TAG, "AHT10 initialized successfully");
    } else {
        ESP_LOGE(TAG, "Failed to initialize AHT10");
    }
}

void aht10_measure(i2c_port_t i2c_num, float temperature, float humidity) {
    uint8_t measure_cmd[] = {AHT10_CMD_MEASURE, 0x33, 0x00};
    uint8_t data[6];

    // Send measurement command
    esp_err_t ret = i2c_master_write_to_device(i2c_num, AHT10_I2C_ADDR, measure_cmd, sizeof(measure_cmd), 1000 / portTICK_PERIOD_MS);
    if (ret != ESP_OK) {
        ESP_LOGE(TAG, "Failed to send measurement command");
        return;
    }

    vTaskDelay(100 / portTICK_PERIOD_MS);

    // Read measurement data
    ret = i2c_master_read_from_device(i2c_num, AHT10_I2C_ADDR, data, sizeof(data), 1000 / portTICK_PERIOD_MS);
    if (ret != ESP_OK) {
        ESP_LOGE(TAG, "Failed to read data");
        return;
    }

    // Parse temperature and humidity
    uint32_t raw_humidity = (data[1] << 12) | (data[2] << 4) | (data[3] >> 4);
    uint32_t raw_temperature = ((data[3] & 0x0F) << 16) | (data[4] << 8) | data[5];

    humidity = ((float)raw_humidity / 1048576.0)  100.0;
    temperature = ((float)raw_temperature / 1048576.0)  200.0 - 50.0;

    ESP_LOGI(TAG, "Temperature: %.2f °C, Humidity: %.2f %%", temperature, *humidity);
}

void app_main() {
    // Configure I2C master
    i2c_config_t i2c_config = {
        .mode = I2C_MODE_MASTER,
        .sda_io_num = I2C_MASTER_SDA_IO,
        .scl_io_num = I2C_MASTER_SCL_IO,
        .sda_pullup_en = GPIO_PULLUP_ENABLE,
        .scl_pullup_en = GPIO_PULLUP_ENABLE,
        .master.clk_speed = I2C_MASTER_FREQ_HZ,
    };
    ESP_ERROR_CHECK(i2c_param_config(I2C_MASTER_NUM, &i2c_config));
    ESP_ERROR_CHECK(i2c_driver_install(I2C_MASTER_NUM, i2c_config.mode, 0, 0, 0));

    // Initialize AHT10
    aht10_init(I2C_MASTER_NUM);

    while (1) {
        float temperature = 0.0, humidity = 0.0;
        aht10_measure(I2C_MASTER_NUM, &temperature, &humidity);
        vTaskDelay(2000 / portTICK_PERIOD_MS);
    }
}0x38). The aht10_init() function sends an initialization command to the sensor over I2C and logs whether the initialization was successful. The aht10_measure() function sends a command to start a measurement, waits for the result, and reads six bytes of data from the sensor. It then parses the raw data into temperature (in Celsius) and relative humidity (percentage) values. In the app_main() function, the I2C master is configured and installed, and the AHT10 sensor is initialized. A continuous loop then calls aht10_measure() every 2 seconds to read and log the temperature and humidity values.ESPHome Example
sensor:
  - platform: aht10
    variant: AHT10
    temperature:
      name: "Living Room Temperature"
    humidity:
      name: "Living Room Humidity"
update_interval: 60saht10 platform and defining the variant as AHT10 to ensure the correct handling of the sensor. The temperature and humidity keys define the sensor outputs, assigning user-friendly names like 'Living Room Temperature' and 'Living Room Humidity.' These names make the sensor data easily identifiable in smart home platforms like Home Assistant. An update_interval of 60 seconds is specified, which determines how often the ESP32 reads and updates the temperature and humidity values.PlatformIO Example
platformio.ini
[env:esp32dev]
platform = espressif32
board = esp32dev
framework = arduino
lib_deps =
    adafruit/Adafruit AHT10 @ ^1.0.2
monitor_speed = 115200
PlatformIO Example Code
#include <Wire.h>
#include <Adafruit_AHT10.h>

Adafruit_AHT10 aht;

void setup() {
    Serial.begin(115200);
    Serial.println("AHT10 Sensor Example");

    // Initialize I2C and the sensor
    if (!aht.begin()) {
        Serial.println("Failed to initialize AHT10! Check connections.");
        while (1) delay(10); // Stay here if initialization fails
    }
    Serial.println("AHT10 Initialized.");
}

void loop() {
    // Read temperature and humidity
    float temperature = aht.getTemperature();
    float humidity = aht.getHumidity();

    // Print results to Serial Monitor
    Serial.print("Temperature: ");
    Serial.print(temperature);
    Serial.println(" °C");

    Serial.print("Humidity: ");
    Serial.print(humidity);
    Serial.println(" %");

    delay(2000); // Wait before next reading
}platform = espressif32 specifies that the project is for ESP32 boards, and board = esp32dev sets the specific development board being used. The lib_deps field includes the required library for the AHT10 sensor (Adafruit AHT10), ensuring that the correct library version (^1.0.2) is automatically downloaded and included in the build. The monitor_speed = 115200 sets the baud rate for the Serial Monitor, enabling consistent communication with the ESP32MicroPython Example
from machine import I2C, Pin
from time import sleep
import ahtx0

# Initialize I2C communication (SDA = GPIO21, SCL = GPIO22)
i2c = I2C(0, scl=Pin(22), sda=Pin(21))

# Initialize the AHT10 sensor
sensor = ahtx0.AHT10(i2c)

print("AHT10 Sensor Example")

while True:
    # Read temperature and humidity
    temperature = sensor.temperature  # Temperature in Celsius
    humidity = sensor.relative_humidity  # Relative Humidity in %

    # Print temperature and humidity to the console
    print("Temperature: {:.2f} °C".format(temperature))
    print("Humidity: {:.2f} %".format(humidity))

    # Delay between readings
sleep(2)ahtx0 library is used to simplify interactions with the AHT10 sensor, handling initialization and data retrieval. The sensor is initialized with the I2C instance, and a confirmation message is printed to indicate successful setup. Inside an infinite loop, the script continuously reads the temperature (in Celsius) and relative humidity (in percentage) using the sensor’s properties, sensor.temperature and sensor.relative_humidity. The readings are formatted and printed to the console for real-time monitoring. A 2-second delay between readings ensures that the data is updated at a manageable interval.Conclusion
The ESP32 AHT10 Temperature and Humidity Sensor is a powerful environment sensor that offers excellent performance and reliability. With support for multiple development platforms including Arduino, ESP-IDF, ESPHome, PlatformIO, and MicroPython, it's a versatile choice for your IoT projects.
For optimal performance, ensure proper wiring and follow the recommended configuration for your chosen development platform.
Always verify power supply requirements and pin connections before powering up your project to avoid potential damage.